How To Install Backer Board For a Tile Shower
Installing backer board is a crucial step in building a durable and water-resistant tile shower. Backer board, also known as shower board, is a non-combustible material that serves as a stable substrate for tile installation. It provides a robust barrier against moisture, ensuring the longevity of your shower and preventing costly water damage. This article will guide you through the steps of installing backer board for a tile shower, providing essential information to ensure a successful project.
1. Preparing the Shower Area
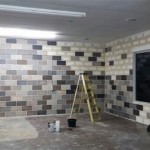
Before installing the backer board, it's imperative to prepare the shower area thoroughly. This involves removing any existing wall coverings, such as drywall or paint. Ensure the existing framing is sound and structurally stable. Use a level to check for any inconsistencies in the walls, and address them by shimming or adding additional framing as needed. Once the framing is prepared, clean the area to remove debris and dust, creating a clean surface for the backer board installation.
2. Installing the Backer Board
The installation process involves securing the backer board to the framing using screws or nails. It's essential to use the appropriate fasteners for the specific backer board material. For instance, cement board often requires specialized screws designed for its material. Here's a step-by-step guide to installing backer board:
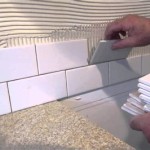
- Measure and Cut Backer Board: Measure the shower walls and cut the backer board panels to size using a utility knife or a circular saw with a carbide-tipped blade. Make sure the cuts are precise to ensure a smooth and even finish.
- Secure the Bottom Row: Begin by attaching the bottom row of backer board to the framing. Start at the bottom and work your way up. Use screws or nails, depending on the type of board, and space them evenly along the edges and center of the panel. Ensure the screws or nails are countersunk to provide a flush surface for the tile installation.
- Install Subsequent Rows: Proceed with the installation of the remaining rows of backer board, ensuring that each panel is flush with the previous one. Use a level to maintain consistency and avoid any noticeable inconsistencies in the walls. Leave a small gap between the panels for expansion and contraction.
- Secure Corners and Joints: At corners and joints, use special corner pieces or joint tape to ensure watertightness and prevent water from seeping into the shower wall. Apply a thin layer of thin-set mortar or waterproof membrane to the corners and joints before attaching the special pieces.
- Seal and Finish: After installing the backer board, apply a sealant around the edges and corners to further enhance water resistance. This will prevent moisture from penetrating the board and potentially damaging the shower walls. This step is particularly crucial in areas with high humidity.
3. Considerations for Backer Board Installation
When selecting and installing backer board, consider the following factors:
- Material Type: The market offers various types of backer board, including cement board, fiberglass-reinforced cement board, and waterproof membrane boards. Choose the type that best suits your project needs and budget. Cement board is a durable and highly water-resistant option, while fiberglass-reinforced cement board offers greater flexibility and ease of installation. Waterproof membrane boards are specifically designed for moisture-sensitive areas, providing an extra layer of protection.
- Thickness: The thickness of the backer board is essential to consider, especially when working with thin walls. Thicker boards offer greater stability and support for tile installation. Consult local building codes for the recommended thickness for your shower project.
- Installation Technique: Proper installation techniques are crucial for ensuring a successful backer board installation. Consult the manufacturer's instructions and follow the recommended steps to avoid mistakes that could compromise the integrity of the shower.
- Safety Precautions: Backer board installation involves using power tools and sharp objects. Always prioritize safety by wearing appropriate protective gear, such as safety glasses, gloves, and dust masks. Be mindful of your surroundings and avoid working in unstable areas.
Installing backer board for a tile shower is an important step in creating a durable and water-resistant shower space. By following these steps, you can ensure a successful installation that will contribute to the longevity and functionality of your shower. Remember to prioritize safety and follow the manufacturer's recommendations for optimal results.

Tile Backer Board Installation Key Steps For A Quality Armchair Builder Blog Build Renovate Repair Your Own Home Save Money As An Owner

Tile Installation Backer Board Around A Bathtub Family Handyman

How To Install Shower Backerboard Hardieboard Cement Proper Installation Diy

Tile Backerboard Material Options Fine Homebuilding

How To Install Goboard Tile Backer Board Diytileguy

The Best Way To Waterproof Your Shower Before Tiling Inspired Hive

How To Install And Waterproof Shower Tile Backer Board Diy

Diy Guide To Choosing And Installing Shower Tile Backer Board

How To Install Cement Board For Tile Projects Diy Family Handyman

Installing Cement Board In The Bathroom Angie S Roost
Related Posts