How to Install Backer Board for Tile in Shower
Installing tile in a shower requires a sturdy and waterproof substrate. Backer board, specifically designed for wet areas, provides the ideal foundation for tile. This durable material, typically made of cement board or a similar composite, prevents moisture damage and ensures the longevity of your shower. Installing backer board might seem daunting, but with proper preparation and careful execution, it's a manageable DIY project.
1. Preparing the Shower Area
Before installing backer board, it's crucial to prepare the shower area thoroughly. Begin by removing any existing fixtures, including the showerhead, faucet, and drain. Next, strip the shower walls of any existing tile, mortar, or other materials, exposing the underlying studs or framing.
Ensure all framing members are sound and adequately supported. If any wood is rotten or damaged, replace it with new lumber. Use a level to check the walls for plumbness and use shims to adjust any uneven areas. These steps create a solid foundation for your backer board installation.
2. Cutting and Installing Backer Board
Once the shower area is prepped, it's time to install the backer board. Backer board comes in standard 32" x 48" sheets, offering a generous coverage area. Depending on your shower's dimensions, you may need to cut the board to size.
Use a utility knife or a circular saw equipped with a carbide blade to cut the backer board. Measure carefully and mark the cut lines with a pencil or a ruler. Make sure the cut lines are straight and smooth to ensure a strong and flush installation.
Start by installing the bottom row of backer board, making sure it's level and centered. Use construction adhesive to secure the board to the studs or framing. Apply the adhesive in a thick bead along the edges of the board, then press it firmly against the wall.
Attach the backer board to the studs using galvanized screws or nails designed specifically for cement board. Space the fasteners evenly, about 8 inches apart. Drive the fasteners in until their heads are flush with the surface.
Continue installing the backer board in rows, working from the bottom to the top. Ensure each row is level and butts tightly against the previous row. Make sure the seams are staggered for added strength and to prevent potential water leakage.
3. Sealing and Finishing
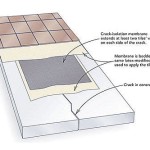
After installing the backer board, it's essential to seal the seams and any cut edges to prevent water from seeping through. Use a specialized backer board "thinset" mortar or a waterproof sealant designed for this purpose.
Apply a thin layer of sealant along the seams and cut edges of the backer board. Make sure to fill any gaps or voids completely. Use a trowel to spread the sealant evenly and ensure a smooth finish.
Once the sealant is dry, you can start applying the final layer of waterproofing. This could involve using a waterproof membrane, a sealant that's applied to the backer board with a brush or roller, or even a combination of both.
The final finishing touch is applying a layer of thinset mortar over the backer board before installing your tiles. This layer bonds the tiles to the backer board and creates a smooth surface for the grout.
Remember to allow the thinset mortar to cure properly before proceeding with tile installation. Installing backer board correctly provides a strong and waterproof foundation for your shower tiles.

Tile Backer Board Installation Key Steps For A Quality Armchair Builder Blog Build Renovate Repair Your Own Home Save Money As An Owner

Tile Installation Backer Board Around A Bathtub Family Handyman

Tile Backerboard Material Options Fine Homebuilding

How To Install Goboard Tile Backer Board Diytileguy

The Best Way To Waterproof Your Shower Before Tiling Inspired Hive
How To Install Shower Backerboard Hardieboard Cement Proper Installation Diy

How To Install And Waterproof Shower Tile Backer Board Diy

How To Install Cement Board For Tile Projects Diy Family Handyman

Installing Cement Board In The Bathroom Angie S Roost

Here S How Install A New Shower Stall With Tile Floor
Related Posts

