How to Install Backer Board for Wall Tile
Installing tile directly onto drywall can lead to cracks and other issues. Backer board provides a robust, moisture-resistant surface that ensures a long-lasting and aesthetically pleasing tile installation. The process of installing backer board before tiling is relatively straightforward and can be accomplished by most DIYers. This article offers a comprehensive guide to installing backer board for wall tile, detailing the necessary materials, tools, and steps for a successful installation.
Choosing the Right Backer Board
The first step is to select the appropriate backer board for your project. There are two primary types commonly used: cement board and fiberglass-reinforced polymer (FRP) board.
Cement board is a durable, moisture-resistant option known for its strength and resistance to impact. It is ideal for applications requiring heavy-duty support, such as large-format tiles or installations in areas with high moisture levels, like shower stalls. However, it can be heavier and more difficult to cut than FRP board.
FRP board, often branded as "Wedi" or "Kerdi," is a lightweight and versatile alternative. Its smooth, waterproof surface makes it easier to install and significantly reduces the risk of leaks. It is particularly well-suited for smaller projects and areas with limited support.
Consider the following factors when making your selection:
- Type of tile: Larger tiles and heavier materials require a stronger backer board.
- Location: High-moisture areas benefit from a more waterproof option like cement board or FRP board.
- Budget: FRP board is generally more expensive than cement board.
- Ease of installation: FRP board is typically easier to cut and install.
Preparing the Wall
Before installing the backer board, prepare the wall surface to ensure a secure and level installation. This involves the following steps:
- Remove existing finishes: Remove any existing tile, wallpaper, or other coverings from the wall.
- Clean the wall: Thoroughly clean the wall using a damp cloth to remove dust, debris, and any loose paint.
- Check for studs: Locate the wall studs using a stud finder. Mark their positions with a pencil.
- Patch and repair: Fill any gaps or cracks in the drywall using drywall compound. Allow the compound to dry completely before proceeding.
- Level the wall: Use a level to check for any unevenness in the wall. If necessary, apply shims to level the surface.
Installing the Backer Board
Once the wall is prepared, you can begin installing the backer board. Follow these steps:
- Cut the backer board: Measure the wall area and cut the backer board to size using a utility knife or a circular saw.
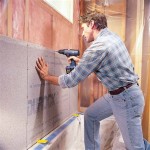
- Attach the backer board: Use screws or construction adhesive to secure the backer board to the wall. If using screws, pre-drill pilot holes to prevent splitting.
- Apply mortar to joints: Apply thin-set mortar to the joints between the backer board panels.
- Apply backer board tape: Apply backer board tape over the joints to create a waterproof seal.
- Apply thin-set mortar over the tape: Apply a thin layer of thin-set mortar over the tape to ensure a smooth surface.
Additional Tips
Here are some additional tips for a successful backer board installation:
- Wear safety gear: Protect yourself with safety glasses, gloves, and a dust mask when working with cutting tools.
- Use a level: Ensure that the backer board is installed level and plumb for a smooth and professional finish.
- Allow adequate drying time: Allow the thin-set mortar and backer board tape to dry completely before proceeding with tiling.
- Consult a professional: If you are unsure about any aspect of the installation, consult a professional tile installer for guidance.

How To Install Cement Board For Tile Projects Diy Family Handyman

How To Install Cement Board For Tile Projects Diy Family Handyman

How To Install Cement Backer Board For Floor Tile Installation The Home Depot

How To Install Hardiebacker Cement Board On Walls James Hardie Pros

Tile Backer Board Installation Key Steps For A Quality Armchair Builder Blog Build Renovate Repair Your Own Home Save Money As An Owner

Installing Cement Board In The Bathroom Angie S Roost

Drywall To Backerboard Transition In Tiled Showers The Floor Elf

Tile Installation Backer Board Around A Bathtub Family Handyman

How To Install Cement Board For Tile Bower Power

How To Install Cement Board The Home Depot
Related Posts