How To Tile A Bathroom Floor On Concrete
Tiling a bathroom floor over a concrete subfloor is a common and effective way to create a durable and aesthetically pleasing surface. A properly tiled floor will resist moisture, withstand daily wear and tear, and contribute significantly to the overall design of the bathroom. This article outlines the steps involved in successfully tiling a bathroom floor on concrete, providing a comprehensive guide for achieving professional-quality results.
Preparing the Concrete Subfloor
The first and arguably most crucial step in tiling a bathroom floor is preparing the concrete subfloor. The concrete must be clean, level, and structurally sound to ensure proper adhesion of the tile and to prevent future issues like cracking or unevenness. Thorough preparation will minimize the risk of tile failure and extend the lifespan of the tiled floor.
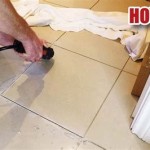
Begin by thoroughly cleaning the concrete surface. Remove any existing flooring materials, such as old tile, linoleum, or carpet. Use a scraper, putty knife, or specialized flooring removal tool to dislodge these materials. Following the removal of large debris, vacuum the entire area to eliminate loose particles and dust.
Next, inspect the concrete for cracks, holes, or unevenness. Small cracks (hairline cracks) may not require immediate attention, but larger cracks (wider than 1/8 inch) should be addressed. Use a concrete crack filler or patching compound to repair these imperfections, following the manufacturer's instructions for application and curing time. For larger holes or significant damage, consider using a self-leveling concrete compound to create a truly even surface.
Leveling the concrete floor is a critical step. Even slight variations in level can cause tiles to sit unevenly, creating an unsightly and potentially hazardous surface. Use a long spirit level (at least 6 feet long) to identify any high or low spots. Mark these areas clearly. For high spots, use a concrete grinder or scarifier to carefully remove material until the surface is level. For low spots, apply a self-leveling concrete compound, ensuring proper mixing and application according to the product's instructions. Allow the self-leveling compound to fully cure before proceeding.
Once the repairs and leveling are complete, thoroughly clean the concrete surface again. Vacuum the area to remove any dust or debris created during the repair process. Finally, apply a concrete primer specifically designed for tile installation. The primer will improve the adhesion of the thin-set mortar to the concrete, creating a stronger bond and reducing the risk of tile failure. Follow the manufacturer's instructions for primer application and drying time.
Allow the primer to dry completely before starting the tiling process. This preparation phase is vital, as a poorly prepared subfloor will compromise the entire tiling project, regardless of the quality of the tile or the skill of the installer.
Laying Out the Tile
Proper layout is critical to achieving a professional-looking tiled floor. Careful planning and measurement will ensure that the tiles are evenly spaced, that cuts are minimized, and that the overall design is visually appealing. A well-planned layout will also help prevent awkward cuts in prominent areas of the bathroom.
Begin by determining the center point of the bathroom. Measure the length and width of the room and divide each measurement by two. Mark the center point on the floor. Use a chalk line to create two perpendicular lines that intersect at the center point. These lines will serve as the primary guidelines for laying out the tiles.
Dry-lay the tiles along the chalk lines to visualize the tile pattern and assess any potential issues. Place full tiles along the lines, leaving the recommended grout spacing (typically 1/8 inch to 3/16 inch) between each tile. Use tile spacers to maintain consistent grout lines. This dry-laying process will reveal how the tiles will align with the walls and fixtures.
Pay particular attention to the edges where the tiles meet the walls. Ideally, the border tiles should be as large as possible, minimizing the need for small, awkward cuts. If the border tiles are less than half a tile in width, consider adjusting the center point slightly to achieve larger border tiles. This adjustment will require recalculating the layout, but it will result in a more visually appealing and professional finished product.
Consider any obstructions in the bathroom, such as toilets, sinks, or pipes. Plan the tile layout to accommodate these obstructions, ensuring that tiles are cut neatly around them. Use a profile gauge to accurately trace the shape of the obstruction onto the tile before cutting. Precise cuts around these obstacles are essential for a clean and professional appearance.
Once satisfied with the layout, mark the tile positions along the chalk lines. This will serve as a guide during the actual tile installation process. Take photographs of the dry-laid layout as a reference. This visual aid can be helpful when installing the tiles, especially in complex areas or around obstructions.
Remember to account for grout lines when calculating the tile placement. Grout lines contribute to the overall appearance of the floor and provide a space for expansion and contraction, preventing tiles from cracking. Consistent grout lines are essential for a professional-looking installation. Proper layout is the foundation of a successful tiling project, ensuring a visually appealing and durable bathroom floor.
Applying Thin-Set Mortar and Setting the Tile
The application of thin-set mortar and setting the tile are the core steps in the tiling process. Using the correct type of mortar, applying it properly, and setting the tiles accurately are all crucial for ensuring a strong bond and a level surface. This section details the process of applying thin-set mortar and setting the tile effectively.
Choose the correct type of thin-set mortar for the specific tile and subfloor. Modified thin-set mortar is generally recommended for bathroom floors, as it offers improved adhesion and flexibility, reducing the risk of cracking. Refer to the tile manufacturer's recommendations for the appropriate type of mortar.
Mix the thin-set mortar according to the manufacturer's instructions. Use a clean bucket and a mixing drill with a mixing paddle. Add water gradually while mixing, until the mortar reaches a smooth, creamy consistency. Let the mortar slake (rest) for the recommended time, typically 5-10 minutes, and then remix briefly before use. This slaking process allows the polymers in the mortar to fully hydrate, enhancing its bonding properties.
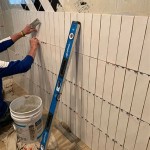
Using a notched trowel of the correct size for the tile being installed, apply a layer of thin-set mortar to a small section of the floor (approximately 2-3 square feet). The size of the notch on the trowel will determine the thickness of the mortar bed. Hold the trowel at a 45-degree angle and create ridges in the mortar by dragging the trowel across the surface. These ridges will help to create a stronger bond between the tile and the mortar.
Carefully place the tiles onto the mortar bed, aligning them with the layout lines. Press each tile firmly into the mortar, using a slight twisting motion to ensure good contact. Use tile spacers to maintain consistent grout lines between the tiles. Check the level of each tile with a spirit level and adjust as needed by gently tapping the tile with a rubber mallet.
Continue applying mortar and setting tiles in small sections, working your way across the floor. Periodically check the levelness of the entire surface to ensure that the tiles are consistently level. Remove any excess mortar from the tile surfaces with a damp sponge. Do not allow the mortar to dry on the tile surfaces, as it will be difficult to remove later.
For tiles that need to be cut to fit around walls or obstructions, use a tile saw or a tile cutter. Measure and mark the tile accurately before cutting. Always wear safety glasses when cutting tiles. Apply mortar to the back of the cut tiles and set them in place, ensuring that they align properly with the adjacent tiles.
Allow the thin-set mortar to cure completely before grouting the tiles. The curing time will vary depending on the type of mortar and the ambient temperature and humidity. Refer to the manufacturer's instructions for the recommended curing time. Generally, it is best to wait at least 24-48 hours before grouting.
Following these steps carefully will ensure a strong, level, and durable tiled floor, enhancing the beauty and functionality of the bathroom.

How To Use Concrete For Designing A Bathroom Shower Exchange

10 Photos That Will Convince You To Get A Concrete Bathroom Floor Hunker Top Design

How Tiles Can Mimic Concrete Flooring Tile Wizards

30 Concrete Bathroom Designs Polished Floors And Tile Ideas

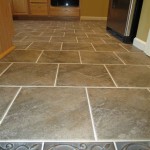
Bringing Concrete Look Floor Tile To A Master Bath Remodel

Bathroom Open Showers Concrete Floors Stone Tile Walls Design Photos And Ideas Dwell

Bringing Concrete Look Floor Tile To A Master Bath Remodel

Featured Install Bathroom Monrovia Ca Tiledaily

Concrete Look Tiles The Perfect Blend Of Durability And Aesthetic

Concrete Flooring For Bathrooms What Are The Benefits
Related Posts