Install Tile On Concrete Floor
Installing tile on a concrete floor is a rewarding home improvement project that can significantly enhance the aesthetics and value of a space. While it requires careful planning and execution, a DIY approach can save significant costs. This article provides a comprehensive guide to installing tile on a concrete floor, covering essential preparations, materials, and installation steps.
Assessing the Concrete Substrate
Before initiating the tile installation, thorough assessment of the concrete substrate is crucial. The concrete must be clean, dry, level, and structurally sound. Any existing cracks, uneven areas, or moisture issues must be addressed before proceeding. Efflorescence, a white powdery substance sometimes found on concrete surfaces, indicates moisture problems and should be treated with an appropriate cleaner.
Necessary Materials and Tools
Gathering the necessary materials and tools beforehand streamlines the installation process. This includes the chosen tiles, thin-set mortar, grout, spacers, a notched trowel, a grout float, a tile cutter or wet saw, a rubber mallet, a level, a tape measure, buckets, sponges, and safety glasses.
Preparing the Concrete Surface
Proper surface preparation is paramount for successful tile adhesion. Begin by thoroughly cleaning the concrete surface to remove dust, debris, grease, and any existing sealant. A degreaser can be used for stubborn grease stains. Any cracks or holes should be patched with a concrete patching compound. Ensure the patching compound is completely dry before proceeding. For uneven surfaces, a self-leveling underlayment might be necessary to create a smooth and level substrate.
Planning the Tile Layout
A well-planned layout ensures a professional-looking finished product. Dry-laying the tiles before applying any adhesive allows for visualizing the final look and making necessary adjustments. This helps determine the best starting point and minimizes tile cutting. Consider the desired pattern and the placement of cut tiles, ideally keeping them in less conspicuous areas. Mark reference lines on the floor to guide the tile placement during the installation.
Mixing and Applying Thin-Set Mortar
Following the manufacturer's instructions, mix the thin-set mortar to the correct consistency. Apply the mortar to the concrete surface using a notched trowel, covering an area slightly larger than the size of a single tile. The size of the notches on the trowel depends on the size and type of tile being installed. Consult the tile manufacturer's recommendations for the appropriate trowel size.
Setting the Tiles
Place the first tile firmly onto the mortar bed, ensuring full contact. Use a twisting motion to ensure proper adhesion and remove any air pockets. Insert tile spacers between adjacent tiles to maintain consistent grout lines. Continue setting the tiles, working in small sections, and regularly checking for levelness using a level. Remove any excess mortar from the tile surface and grout lines immediately using a damp sponge.
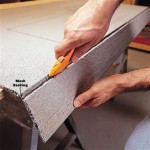
Cutting Tiles
Inevitably, some tiles will require cutting to fit around corners, edges, and obstacles. A tile cutter or wet saw can be used for making straight cuts, while a tile nipper can be used for smaller, intricate cuts. When cutting tiles, always wear safety glasses to protect your eyes from flying debris.
Grouting
After the thin-set mortar has cured for at least 24 hours, the grout can be applied. Mix the grout according to the manufacturer’s instructions. Apply the grout using a grout float, pressing it diagonally into the grout lines to ensure complete filling. Remove excess grout from the tile surface with a damp sponge, being careful not to remove grout from the joints.
Cleaning and Sealing
Once the grout has dried, thoroughly clean the tile surface using a damp sponge and clean water. Allow the grout to cure completely according to the manufacturer's instructions. A grout sealer can be applied to protect the grout from staining and moisture penetration. This is particularly important in areas exposed to moisture, such as bathrooms and kitchens.
Curing
Allow the newly installed tile floor to cure completely before subjecting it to heavy traffic or placing furniture on it. The curing time varies depending on the type of thin-set and grout used. Refer to the manufacturer's instructions for specific curing times.
Maintenance
Regular cleaning and maintenance will prolong the life and beauty of the tile floor. Sweep or vacuum regularly to remove loose dirt and debris. Clean the floor periodically with a suitable tile cleaner, avoiding harsh chemicals that can damage the tile or grout.

How To Lay A Tile Floor On Concrete Diy Homeimprovement
:max_bytes(150000):strip_icc()/can-you-install-tile-directly-on-concrete-1822600-04-458f7bb6c78348c1835cf8054ef36553.jpg?strip=all "How To Install Tile Over Concrete")
How To Install Tile Over Concrete

Tiling Over A Ed Concrete Slab Fine Homebuilding

How To Tile Onto Concrete Floors Porcelain Super

How To Install Ceramic Tiles On Concrete Floor Tile Installation

How To Lay Tile On Concrete With Pictures Wikihow

How To Lay Floor Tiles On Concrete Stonesuper

How To Install Ceramic Tiles On Concrete Floor Tile Installation

How To Install Ceramic Tile Over A Concrete Slab Home Love Construction Diy

Sound Dampening Ceramic Tile Over A Concrete Floor Fine Homebuilding
Related Posts