How to Take Up Floor Tiles in a Bathroom: A Comprehensive Guide
Removing existing floor tiles in a bathroom is a common task undertaken during renovations. While it can be labor-intensive, understanding the correct procedures and employing the appropriate tools can simplify the process and minimize damage to the subfloor. This article provides a detailed guide on how to safely and effectively remove bathroom floor tiles.
Prior to commencing any demolition work, safety precautions are paramount. The removal of tiles generates dust and debris that can be harmful to respiratory systems. Sharp tile fragments pose a laceration hazard, and the forceful action of tile removal can lead to musculoskeletal strain. Therefore, the following safety measures must be implemented:
- Personal Protective Equipment (PPE): Safety glasses are essential to protect eyes from flying debris. A dust mask or respirator is necessary to prevent the inhalation of dust particles, especially if the tiles contain asbestos (more on this later). Work gloves will protect hands from cuts and abrasions. Knee pads are highly recommended for comfort and to protect knees during prolonged work at ground level.
- Ventilation: Ensure adequate ventilation in the bathroom. Open windows and doors, and consider using a fan to circulate air and remove dust.
- Containment: Cover nearby fixtures, such as the toilet, sink, and bathtub, with plastic sheeting to protect them from dust and debris. Seal off the bathroom doorway with plastic sheeting to prevent dust from spreading to other areas of the house.
- Electrical Safety: Turn off the electricity to the bathroom at the circuit breaker to avoid any electrical hazards while working near plumbing or moisture.
Furthermore, it is imperative to identify the type of tile being removed. Older homes may contain asbestos-containing tiles. Asbestos is a known carcinogen, and disturbing it can release harmful fibers into the air. If there is any suspicion that the tiles contain asbestos, it is critical to have them professionally tested. If asbestos is confirmed, a qualified asbestos abatement contractor must be hired to remove the tiles safely and legally. Attempting to remove asbestos-containing materials without proper training and equipment is extremely dangerous and illegal in many jurisdictions.
Key Point 1: Preparation and Tool Acquisition
Proper preparation is crucial for a successful tile removal project. This involves gathering the necessary tools and preparing the work area. The specific tools required will depend on the type of tile, the adhesive used, and the condition of the subfloor.
Essential Tools:
- Hammer: A standard claw hammer will be used to dislodge stubborn tiles.
- Chisel: A cold chisel or a specialized tile chisel is essential for breaking up and lifting tiles. Different sizes and shapes of chisels may be needed depending on the tile and grout.
- Scraper: A floor scraper with a rigid blade is necessary for removing adhesive residue from the subfloor.
- Grout Removal Tool: To prevent tile damage, it is necessary to remove the grout. Choose a grout saw, power grout remover, or a utility knife with a grout removal attachment.
- Pry Bar: A small pry bar can be helpful for lifting larger or particularly stubborn tiles.
- Shop Vacuum: A shop vacuum is necessary for cleaning up dust and debris. A vacuum with a HEPA filter is recommended, especially if there is a concern about asbestos.
- Putty Knife: A putty knife will aid in scraping off the remaining thin set mortar.
- Gloves, Safety Glasses, Dust Mask/Respirator: Reinforcing the critical need for PPE.
- Buckets or Trash Bags: Providing adequate containers for disposing of broken tiles and debris.
Preparing the Work Area:
Once tools are acquired, the next stage involves clearing the bathroom of any removable objects. This includes rugs, toiletries, and any other items that might obstruct the work area or be damaged by dust and debris. Protect any remaining fixtures, especially mirrors, with a sturdy covering.
Carefully remove all trim pieces, such as baseboards, quarter round, and shoe molding, using a pry bar and hammer. This will prevent damage to the trim during the tile removal process.
Thoroughly vacuum the bathroom floor to remove any loose dirt or debris. This will help to prevent the dust from becoming airborne during the tile removal process.
Key Point 2: Grout Removal and Tile Lifting Techniques
The actual tile removal process involves carefully removing the grout surrounding the tiles and then lifting the tiles from the subfloor. This requires patience and attention to detail to minimize damage to the subfloor.
Grout Removal:
The initial step is to remove the grout surrounding each tile. This can be accomplished using a variety of tools, including a grout saw, a power grout remover, or a utility knife with a grout removal attachment. Using the selected tool, carefully remove the grout along all the grout lines surrounding each tile. Apply steady pressure and avoid damaging the adjacent tiles. For a manual grout saw, use a sawing motion to cut through the grout. Ensure the blade is sharp and replace it if necessary. For a power grout remover, follow the manufacturer's instructions carefully. Avoid applying too much pressure, which can damage the tiles.
If using a utility knife with a grout removal attachment, carefully score the grout lines multiple times until the grout is sufficiently weakened. Vacuum away the loosened grout dust to improve visibility and prevent the dust from becoming airborne.
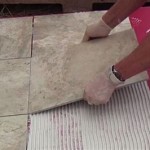
Tile Lifting:
Once the grout has been removed, the tiles can be lifted from the subfloor. Begin by selecting a tile that appears to be loose or damaged. This will serve as a starting point.
Position a chisel at the edge of the selected tile, angled slightly downwards. Using a hammer, gently tap the chisel to break the bond between the tile and the subfloor. Work around the edges of the tile, gradually loosening it. Use a pry bar to help lift the tile if necessary. Apply steady pressure and avoid using excessive force, which can damage the subfloor.
If a tile is particularly stubborn, try heating it with a heat gun for a few minutes. This can soften the adhesive and make it easier to remove. Be careful not to overheat the tile or the surrounding area. Continue working around the edges of the tile, gradually loosening it until it can be lifted completely.
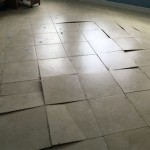
Once the first tile has been removed, repeat the process for the remaining tiles. Work systematically, removing one tile at a time. Be patient and avoid rushing the process. If a tile is particularly difficult to remove, try using a different approach. You may want to try a different chisel or a different angle of attack.
As tiles are removed, immediately place them in a bucket or trash bag to prevent them from becoming a tripping hazard. Clean up any debris or dust using the shop vacuum. As tiles are removed, inspect the subfloor for any damage. Repair any cracks or holes before proceeding.
Key Point 3: Subfloor Preparation and Post-Removal Tasks
After all the tiles have been removed, the subfloor will likely have adhesive residue remaining. This residue must be removed to create a smooth, clean surface for the new flooring.
Adhesive Removal:
Use a floor scraper to remove the adhesive residue from the subfloor. Apply firm, even pressure and work in a consistent direction. Different types of adhesive may require different techniques. Some adhesives may soften with heat, while others may require the use of a chemical adhesive remover.
If using a chemical adhesive remover, follow the manufacturer's instructions carefully. Ensure adequate ventilation and wear appropriate PPE. Allow the adhesive remover to soak for the recommended time before scraping. Scrape away the softened adhesive using the floor scraper.
For stubborn adhesive residue, you may need to use a grinder with a diamond grinding wheel. Use the grinder carefully and avoid damaging the subfloor. Wear appropriate eye and respiratory protection.
Subfloor Repair:
Once the adhesive residue has been removed, inspect the subfloor for any damage. Repair any cracks, holes, or unevenness. Small cracks can be filled with patching compound. Larger holes may require the use of a concrete repair mix. Apply the patching compound or concrete repair mix according to the manufacturer's instructions. Allow the repair material to dry completely before proceeding.
If the subfloor is severely damaged, it may need to be replaced. Subfloor replacement is a more involved process that requires specialized tools and knowledge. If you are not comfortable replacing the subfloor yourself, it is best to hire a professional.
Final Cleanup:
After the subfloor has been prepared, thoroughly vacuum the entire area to remove any remaining dust and debris. A clean subfloor is essential for proper adhesion of the new flooring.
Proper disposal of the removed tiles is also important. Check local regulations for guidelines on disposing of construction debris. Some municipalities may require that tiles be disposed of at a designated waste facility. If the tiles contain asbestos, they must be disposed of according to strict regulations. Contact a qualified asbestos abatement contractor for guidance on proper disposal procedures.
By following these detailed steps, individuals can successfully remove bathroom floor tiles while minimizing the risk of injury and damage. Careful preparation, proper tool selection, and attention to detail are essential for a successful outcome. If uncertain about any aspect of the process, consulting a professional is always a prudent decision.

How To Remove A Tile Floor

How To Remove A Tile Floor

How To Remove Old Tiles A Step By Guide Walls And Floors

How To Remove Tile Diy Easy Ceramic Removal

How To Remove Bathroom Tile Steps Prep Considerations

How To Remove A Tile Floor Homeserve Usa

How To Remove Tile Ugh The Honeycomb Home

How To Remove Tile An Easy Diy Guide Dumpsters Com

How To Remove Floor And Wall Tiles Without Breaking Them

How To Remove Tile Floor A Diy Guide
Related Posts