How To Take Off Bathroom Floor Tiles
Removing bathroom floor tiles is a common home renovation task often undertaken to update the aesthetic of a bathroom, repair damage, or prepare for a new flooring installation. This process, while seemingly straightforward, requires careful planning, the right tools, and a systematic approach to minimize damage to the subfloor and ensure personal safety. Successful tile removal results in a clean, even surface ready for the next phase of the renovation.
The difficulty of removing bathroom floor tiles can vary significantly based on several factors. These factors include the type of tile, the adhesive used to install the tile, the condition of the subfloor underneath, and the experience of the individual performing the work. Older installations, often utilizing more robust adhesives and cement-based mortars, can prove more challenging than newer installations employing thinner, more flexible adhesives. Furthermore, the type of subfloor (concrete versus wood) influences the methods and tools required for effective tile removal. Understanding these variable factors is crucial for selecting the appropriate strategy and mitigating potential complications.
Before initiating any tile removal project, it is essential to prioritize safety. Adequate personal protective equipment (PPE) significantly reduces the risk of injury from flying debris, sharp edges, and dust inhalation. This includes wearing safety glasses to protect the eyes from tile fragments and dust, heavy-duty work gloves to safeguard hands from cuts and abrasions, and a dust mask or respirator to prevent the inhalation of harmful particles, especially when dealing with potentially asbestos-containing materials in older homes. Additionally, hearing protection is advisable when using power tools such as demolition hammers or chisels.
Preparation and Safety Measures
Prior to commencing the tile removal process, several preparatory steps are necessary to ensure a smooth and efficient operation. First, carefully inspect the bathroom to identify any potential hazards, such as exposed plumbing or electrical wiring. Turn off the water supply to the toilet and sink to prevent accidental flooding. Remove any loose items from the bathroom, including rugs, toiletries, and wastebaskets. Cover any fixtures that are not being removed, such as the bathtub or toilet, with plastic sheeting to protect them from dust and debris. This protective measure minimizes cleaning efforts post-tile removal.
The proper selection of tools is also crucial for successful tile removal. The specific tools required will depend on the type of tile, the adhesive used, and the condition of the subfloor. Essential tools typically include a hammer, a chisel (both a cold chisel and a narrow chisel are often useful), a putty knife or scraper, a pry bar, a utility knife, and a shop vacuum. For more stubborn tiles or larger areas, a demolition hammer or a floor scraper may be necessary. A paint scraper and mineral spirits can be invaluable in removing adhesive residue from the subfloor. Invest in quality tools to improve efficiency and reduce the risk of tools breaking or causing injury.
A thorough assessment of the tile installation is paramount. Before forcefully removing tiles, attempt to identify a weak point or an area where the adhesive has already begun to fail. This can often be determined by tapping on the tiles and listening for hollow sounds, which indicate that the tile is not fully bonded to the subfloor. Start the removal process in these areas, as they will offer less resistance and minimize the risk of damage to the subfloor. If no weak points are readily apparent, consider using a grout saw to remove the grout around a few tiles. This creates space for the chisel and provides a better starting point for the removal process. The grout saw should be used carefully to avoid damaging adjacent tiles that are to remain in place, if applicable.
The Tile Removal Process
The primary method for removing bathroom floor tiles involves using a hammer and chisel. Position the chisel at the edge of the tile, ideally at an angle, and strike it firmly with the hammer. The goal is to break the bond between the tile and the subfloor without cracking the tile into numerous small pieces. Work systematically, moving the chisel around the perimeter of the tile to gradually loosen it. If the tile is particularly stubborn, increase the force of the hammer blows, but exercise caution to avoid damaging the subfloor. The use of a narrow chisel is often helpful for getting under the edges of the tile where space is limited.
Once a portion of the tile has been lifted, use the pry bar to gently lever the tile away from the subfloor. Insert the pry bar under the lifted edge of the tile and apply steady pressure to separate the remaining adhesive bond. Avoid using excessive force, as this can easily damage the subfloor. If the tile remains firmly attached, reposition the chisel and hammer to further weaken the bond. The key is to apply controlled force and work gradually to minimize the risk of damage. If the tile breaks into multiple pieces, carefully remove each piece separately, taking care to avoid creating sharp edges or further damaging the subfloor.
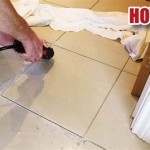
For larger areas or particularly stubborn tile installations, a demolition hammer can significantly expedite the removal process. A demolition hammer is a power tool designed for breaking materials and is equipped with a chisel bit. When using a demolition hammer, it is crucial to wear appropriate PPE, including safety glasses, ear protection, and a dust mask or respirator. Position the chisel bit of the demolition hammer at the edge of the tile and apply gentle pressure. The hammer will vibrate and break the bond between the tile and the subfloor. Work systematically, moving the hammer across the surface of the tile to gradually loosen it. Exercise caution to avoid applying excessive force, which can damage the subfloor. Due to the power of the demolition hammer, it is especially important to maintain control of the tool and to be aware of surrounding structures.
In some cases, a floor scraper can be used to remove tiles, especially if the adhesive is relatively weak or has already begun to deteriorate. A floor scraper is a long-handled tool with a wide blade designed for scraping materials from floors. Position the blade of the floor scraper under the edge of the tile and apply steady pressure to separate the tile from the subfloor. Work systematically, moving the scraper across the surface of the tile to gradually loosen it. A floor scraper is particularly useful for removing large, flat tiles, where it can provide more leverage and control than a chisel and hammer. However, it may not be effective for removing tiles that are tightly bonded to the subfloor.
Subfloor Preparation and Clean Up
After the tiles have been removed, the subfloor will likely be covered with adhesive residue. Removing this residue is essential for creating a smooth, even surface for the new flooring installation. The method for removing adhesive residue will depend on the type of adhesive used. For some adhesives, a putty knife or scraper may be sufficient to remove the residue. In other cases, a chemical adhesive remover may be necessary. Always follow the manufacturer's instructions when using chemical adhesive removers, and ensure adequate ventilation to avoid inhaling harmful fumes.
For stubborn adhesive residue, consider using a paint scraper and mineral spirits. Apply a small amount of mineral spirits to the adhesive residue and allow it to sit for a few minutes to soften the adhesive. Then, use the paint scraper to remove the softened residue. Repeat this process as necessary until the subfloor is clean. Be sure to wear gloves and eye protection when working with mineral spirits. After using mineral spirits, clean the subfloor with a damp cloth to remove any remaining residue.
Once the adhesive residue has been removed, inspect the subfloor for any damage, such as cracks, holes, or unevenness. Repair any damage before proceeding with the new flooring installation. Fill any cracks or holes with a concrete patching compound or wood filler, depending on the type of subfloor. Allow the patching compound or wood filler to dry completely before sanding it smooth. If the subfloor is uneven, consider using a self-leveling compound to create a smooth, even surface. Follow the manufacturer's instructions when using a self-leveling compound.
Finally, thoroughly clean the subfloor to remove any dust, debris, or loose particles. Use a shop vacuum to remove any loose material and then wipe the subfloor with a damp cloth. Allow the subfloor to dry completely before proceeding with the new flooring installation. A clean, smooth, and even subfloor is essential for ensuring a successful and long-lasting flooring installation. Proper subfloor preparation is just as important as the tile removal process itself and should not be overlooked.

How To Remove A Tile Floor

How To Remove A Tile Floor

How To Remove Bathroom Tile Steps Prep Considerations

Removing Ceramic Tile How To Remove Floor

A Diy Guide To Removing Old Tile Flooring

How To Remove Old Tiles A Step By Guide Walls And Floors

How To Remove A Tile Floor Homeserve Usa

How To Remove Ceramic Tile And Thinset The Nifty Nester

How To Remove Replace One Bathroom Tile Ceramic Repair

How To Remove Vinyl Floor With Iron Tile Bathroom
Related Posts