How To Take Down Bathroom Wall Tile
Removing bathroom wall tile can be a necessary step in a larger renovation project, addressing water damage, or simply updating the aesthetic of a space. It is a task that requires careful planning, the right tools, and a methodical approach to minimize damage to the surrounding surfaces and ensure a safe working environment. While it can be a physically demanding process, careful execution can save significantly on labor costs compared to hiring a professional.
Prior to commencing the removal process, it’s crucial to assess the existing tile installation. Factors such as the type of tile, the adhesive used, and the condition of the underlying wall are all important considerations. Understanding these factors will influence the choice of tools and the overall strategy employed. Different types of tile, such as ceramic, porcelain, or glass, may require different approaches. Similarly, the type of adhesive, whether it's thin-set mortar or mastic, can affect the ease of removal.
Safety should be the primary concern throughout the entire process. Protective eyewear, gloves, and a dust mask or respirator are essential to prevent injury from flying debris and exposure to potentially harmful dust. Creating a clean and contained work area will further contribute to a safe and efficient removal process. This may involve covering surrounding surfaces with drop cloths and sealing off the bathroom from other areas of the house to prevent the spread of dust.
The following detailed instructions provide a comprehensive guide for successfully removing bathroom wall tile, outlining the necessary tools, preparation steps, and removal techniques to achieve optimal results.
Preparing for Tile Removal
Before initiating the tile removal process, several key steps must be taken to ensure a safe, efficient, and controlled environment. These steps involve gathering the necessary tools and materials, preparing the bathroom to minimize damage and dust spread, and understanding the potential challenges associated with tile removal.
Gathering Essential Tools and Materials: A comprehensive toolkit is vital for a successful tile removal project. Essential tools include a hammer, chisel (preferably a cold chisel or a smaller tile chisel), a putty knife or scraper, a utility knife, and safety glasses. A dust mask or respirator is crucial for protecting against airborne particles. Gloves are necessary to protect hands from injury. Depending on the scale of the project and the difficulty encountered, a larger demolition hammer or oscillating multi-tool might be beneficial. For clean-up, a shop vacuum and drop cloths are indispensable. A pry bar can be helpful for removing stubborn tiles or larger sections of tile. Finally, containers for debris disposal are crucial for maintaining a clean work area.
Protecting the Work Area: Preparing the bathroom is essential for minimizing damage and containing dust. Drop cloths should be used to cover the floor, bathtub, toilet, and any other fixtures that are not being removed. Painter's tape can be used to secure the drop cloths and protect trim or adjacent surfaces. Sealing off the bathroom doorway with plastic sheeting will help contain the dust and prevent it from spreading to other areas of the house. Be aware that removing tiles can be a messy process; proper preparation greatly reduces the cleanup effort.
Identifying Potential Hazards and Challenges: Before starting, inspect the tile and grout for any signs of asbestos. If there is any suspicion of asbestos, it is crucial to have the materials tested by a qualified professional before proceeding. Water damage behind the tile is another potential hazard. If water damage is present, address the underlying issue before replacing the tile. Also, note that removing tile can potentially damage the drywall or plaster underneath. Be prepared to repair any damage to the wall after the tile is removed. In some cases, removing the drywall along with the tile may be the most practical approach.
The Tile Removal Process: Step-by-Step Instructions
Following a methodical approach during tile removal is crucial for minimizing damage and ensuring a clean and efficient process. This involves carefully breaking the grout lines, strategically prying off the tiles, and addressing any remaining adhesive residue.
Softening Grout Lines: The first step in removing bathroom wall tile is to weaken or remove the grout surrounding the tiles. This can be achieved using a grout saw, a utility knife with a grout removal blade, or an oscillating multi-tool with a grout removal attachment. Carefully run the tool along the grout lines, applying consistent pressure to break down the grout. Avoid applying excessive force, as this can damage the surrounding tiles. Removing as much grout as possible will significantly ease the tile removal process. For stubborn grout, a grout removal solvent may be used to soften it further, but ensure adequate ventilation and follow the manufacturer's instructions carefully. A wet sponge can be used to wipe away grout dust, improving visibility.
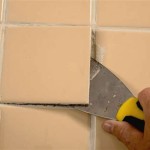
Prying Off the Tiles: Once the grout has been weakened, the next step is to pry off the tiles. Start by selecting a tile that appears to be loose or damaged. Position the chisel at a slight angle against the edge of the tile, and gently tap the end of the chisel with a hammer. The goal is to separate the tile from the wall without breaking it into multiple pieces. If the tile is firmly attached, try working around the edges of the tile, gradually applying pressure until it begins to loosen. A putty knife or scraper can also be used to assist in prying off the tiles. For larger tiles, it may be necessary to use a pry bar. Be cautious when using a pry bar, as it can easily damage the wall behind the tile. Work slowly and methodically, taking breaks as needed. If a tile breaks, carefully remove the remaining pieces, ensuring to avoid sharp edges.
Removing Adhesive Residue: After the tiles have been removed, adhesive residue will likely remain on the wall. The type of adhesive used will determine the best method for removing it. For thin-set mortar, a scraper or chisel can be used to chip away the residue. A heat gun can be used to soften stubborn adhesive, making it easier to scrape off. For mastic adhesives, a solvent-based adhesive remover may be necessary. Always follow the manufacturer's instructions when using chemical adhesive removers, and ensure adequate ventilation. Apply the remover to the adhesive residue, allow it to sit for the recommended time, and then scrape off the softened adhesive. Repeat as necessary. A wire brush can be used to remove any remaining residue after scraping.
Post-Removal Tasks: Clean-Up and Wall Preparation
After the tile has been successfully removed, the focus shifts to cleaning the work area and preparing the wall for the next phase of the renovation project. This includes removing debris, repairing any damage to the wall, and ensuring a smooth and level surface for new tile or other finishes.
Debris Clean-Up: Once all tiles have been removed, the next step is to thoroughly clean the work area. Use a shop vacuum to remove all debris, including broken tile pieces, grout dust, and adhesive residue. Pay close attention to corners and crevices where debris may accumulate. Dispose of the debris properly, following local regulations for construction waste disposal. Sweep the floor and wipe down any remaining surfaces with a damp cloth. It is crucial to remove all dust and debris to ensure proper adhesion of new materials.
Repairing Wall Damage: Removing tile often results in damage to the underlying wall surface. Small holes and imperfections can be repaired with drywall compound or spackle. Apply the compound to the damaged areas using a putty knife, spreading it evenly and feathering the edges. Allow the compound to dry completely, then sand it smooth with sandpaper. For larger areas of damage, it may be necessary to replace sections of drywall. Cut out the damaged section of drywall and replace it with a new piece of the same thickness. Secure the new drywall to the studs with screws, and then apply drywall tape and compound to the seams. Sand the compound smooth after it dries. For plaster walls, use plaster patching compound to repair any damage.
Preparing the Wall Surface: Before installing new tile or applying other finishes, the wall surface must be properly prepared. Ensure that the wall is clean, dry, and free of any loose debris. Apply a primer to the wall surface to improve adhesion of new materials. For tile installations, a moisture-resistant primer is recommended. If the wall surface is uneven, apply a skim coat of drywall compound to create a smooth and level surface. Sand the compound smooth after it dries. Check the wall for plumb and level, making any necessary adjustments before proceeding with the next phase of the project. A properly prepared wall surface is essential for a successful and long-lasting installation.

Easy Diy Guide On Removing Tiles From Walls Fantastic Handyman Au

The Best Way To Remove Old Shower Tile

How Do I Remove The Adhesive From 1950 S Pink Wall Tiles Removing Bathroom Tile

How To Remove Wall Tiles

Edited Removing Tile From Bathroom Walls Hometalk

Preparing Walls For Tiling Removing Old Tiles Bathroom Guru

How To Remove A Tile Backsplash Homeserve Usa

Demoing Tile Mortar Metal Mesh In The Bathroom Walls Young House Love

How To Remove Bathroom Wall Tile Barana Tiles

Diy Half Bathroom Demolition The Handyman S Daughter
Related Posts