How to Put Down Concrete Board for Tile
Installing tile is a popular home improvement project that can add beauty and value to your home. One of the most important steps in tiling is properly installing concrete board. Concrete board is a cement-based backer board that provides a stable and moisture-resistant surface for tile installation. In this article, we'll guide you through the essential aspects of putting down concrete board for tile.
Materials You'll Need:
- Concrete board
- Thin-set mortar
- Notched trowel
- Screws or nails
- Drill or nail gun
- Level
- Tape measure
- Safety glasses and gloves
Step 1: Prepare the Subfloor
Before installing concrete board, make sure the subfloor is flat, level, and free of debris. Level the subfloor using self-leveling compound if necessary.
Step 2: Measure and Cut the Concrete Board
Measure the area where you'll be installing the concrete board. Cut the concrete board to size using a circular saw or tile saw. Ensure each piece of concrete board is cut cleanly and straight.
Step 3: Apply Thin-Set Mortar
Spread a thin layer of thin-set mortar onto the subfloor using a notched trowel. The notch size should be appropriate for the size and type of tile you're installing.
Step 4: Install the Concrete Board
Carefully place the first piece of concrete board onto the thin-set mortar. Use a level to ensure it's level. Screw or nail the concrete board into the subfloor using a drill or nail gun. Keep the screws or nails spaced evenly apart.
Step 5: Continue Installing the Concrete Board
Continue installing the remaining pieces of concrete board by repeating steps 3 and 4. Stagger the joints between the pieces to improve strength. Leave a small gap (approximately 1/8 inch) between each piece for expansion.
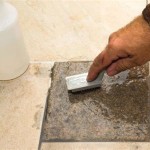
Step 6: Fill Gaps and Joints
Once all the concrete board is installed, fill any gaps or joints with thin-set mortar and use a putty knife to smooth it out. Allow the thin-set mortar to cure for 24 hours.
Step 7: Let the Concrete Board Cure
Let the concrete board cure for at least 72 hours before installing the tile. This will give the thin-set mortar enough time to fully harden and the concrete board to acclimate to the environment.
Tips:
- Wear safety glasses and gloves when handling concrete board.
- Use a chalk line to ensure straight cuts when cutting the concrete board.
- Don't overload the notched trowel with thin-set mortar.
- Check the manufacturer's instructions for the specific type of concrete board and thin-set mortar you're using.
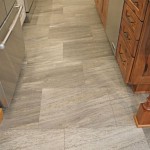
By following these steps and tips, you can successfully install concrete board for tile. This will provide a stable and moisture-resistant surface for your tile installation, ensuring a beautiful and durable finish.

How To Install Cement Board The Home Depot

How To Install Cement Board On A Floor Diy Family Handyman

How To Install Cement Board The Home Depot

How To Install Hardiebacker Cement Board On Floors James Hardie Pros

How To Install Cement Backer Board For Floor Tile Installation The Home Depot

How To Install Cement Board For Tile Projects Diy Family Handyman

How To Install Cement Board The Home Depot

How To Install Cement Board For Tile Bower Power

How To Install Cement Board The Home Depot

How To Install Cement Board For Tile Bower Power
Related Posts