How to Put Down Backer Board for Tile Floor
Backer board is a crucial component in tile floor installation, providing a stable and moisture-resistant base that ensures tile longevity. It's a sheet material, typically made of cement or fiber-reinforced polymer, and serves as a protective barrier between the subfloor and the tile. Installing backer board correctly is essential for a successful tile project, avoiding potential problems like cracking, warping, and moisture damage. This article will guide you through the steps of laying down backer board for a tile floor, ensuring a durable and aesthetically pleasing finish.
Preparing the Subfloor
Before starting the backer board installation, it is vital to ensure a solid and level subfloor. This will prevent issues with uneven tile installation and potential cracking. The subfloor should be inspected for any imperfections such as dips, bumps, or rot. Repair any damaged or uneven areas using concrete patching compound or plywood shims. Ensure the subfloor is clean and free of debris before proceeding.
Measuring and Cutting Backer Board
Once the subfloor is prepared, the next step is to measure the area where the backer board will be installed. It's essential to measure the area accurately and allow for any necessary cuts to fit the space. Mark the backer board sheets using a pencil and a ruler. Ensure all cuts are straight and accurate for a seamless installation. Use a utility knife or a circular saw with a fine-tooth blade to cut the backer board. Apply a firm pressure to the blade and ensure a smooth, clean cut. If using a circular saw, wear safety glasses to protect your eyes from dust.
Attaching the Backer Board
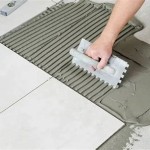
The backer board is typically attached to the subfloor using screws or construction adhesive. When using screws, ensure they are driven straight and deep into the subfloor, without penetrating the backer board. The screw heads should be slightly below the surface of the backer board to avoid interfering with the tile installation. If using construction adhesive, apply a generous layer of adhesive to the backer board and press it firmly against the subfloor. Allow the adhesive to cure according to the manufacturer's instructions before proceeding.
Installing the Backer Board
Start by laying down the first sheet of backer board, ensuring it is flush with the walls or other existing flooring. Use a level to check for any unevenness and adjust accordingly. Use shims to achieve a level installation. Secure the backer board with screws or adhesive, ensuring it is attached securely to the subfloor. Continue laying down the backer board sheets, ensuring the joints between them are staggered like bricks. This will help prevent cracking and enhance the stability of the entire installation.
Additional Considerations
- Moisture Barrier: For areas susceptible to moisture, such as bathrooms or kitchens, consider using a moisture barrier under the backer board. This will further protect the subfloor and prevent water damage.
- Expansion Joints: Expansion joints are essential for preventing cracking due to expansion and contraction of the backer board. Install expansion joints along walls, corners, and in large areas using a sealant tape or a flexible grout.
- Backer Board Thickness: The thickness of the backer board is crucial for the strength and stability of the tile floor. Choose a thickness that's appropriate for the subfloor and the tile type being used.
- Safety Precautions: Always wear safety glasses, gloves, and a dust mask when handling backer board. Use proper ventilation during the installation process to avoid exposure to dust.
Installing backer board is a critical step in creating a durable and long-lasting tile floor. By carefully following the steps outlined above, you can ensure a successful installation. Remember to take appropriate safety precautions and choose the correct backer board material and thickness for your specific project.

How To Install Cement Board The Home Depot

How To Install Hardiebacker Cement Board On Floors James Hardie Pros

How To Install Cement Board On A Floor Diy Family Handyman

How To Install Cement Board The Home Depot

How To Install Cement Backer Board For Floor Tile Installation The Home Depot

Cement Backerboard Floor Tile Installation Uncookie Cutter

Installing Cement Backerboard For Tile Flooring Hometips

How To Install Backer Board Durock For Floor Tile

Tiling On Wooden Floors Part 4 Overboarding Bathroom Guru

How To Install Cement Board The Home Depot
Related Posts