How to Prep Cement Board for Tile in Shower
Cement board, also known as backer board, is a crucial component in shower construction. It provides a robust and water-resistant base for tile installation. The proper preparation of cement board is essential for a long-lasting and leak-proof shower. This article will guide you through the essential steps to prepare cement board for tile in a shower.
1. Prepare the Subfloor
Before installing the cement board, ensure the subfloor is level and structurally sound. Uneven subfloors can lead to tile cracking or grout lines that are not flush. Use a level to check for any variations in the subfloor. If necessary, use shims or concrete patching compound to level the subfloor before proceeding with the installation.
The subfloor should be made of a material that can adequately support the weight of the shower and its components. Common subfloor materials include plywood, OSB (oriented strand board), or concrete. It is important to check local building codes for specific requirements for subfloor thickness and material.
2. Install Cement Board
Cement board comes in various sizes and thicknesses, and the selection will depend on the specific shower design and local building codes. Before installing the cement board, ensure the shower area is clean and free of debris. Also, confirm the cement board is properly cut to fit the shower area. To ensure a secure bond, apply thinset mortar to the subfloor in accordance with the manufacturer's instructions.
Use screws or nails specifically designed for cement board. The screws or nails should be long enough to penetrate the subfloor by at least 1 inch. The screws or nails should be spaced approximately 8 inches apart, and they should be driven flush with the surface of the cement board. Use a moisture-resistant drywall tape to seal the joints between the cement board panels, and then apply thinset mortar over the tape to create a smooth, watertight surface.
3. Apply Waterproof Membrane
Once the cement board is installed and the joints are sealed, apply a waterproof membrane. This membrane acts as a barrier to prevent water from seeping behind the tiles and into the subfloor. There are various types of waterproof membranes available, including liquid-applied membranes, sheet membranes, and tile backer board with integrated membranes. The choice of membrane will depend on the specific shower design, the size of the shower, and the budget.
Follow the manufacturer's instructions for applying the membrane. Ensure that the membrane is applied evenly and is completely sealed around all edges of the cement board, including the corners and where the cement board meets the walls. For liquid-applied membranes, allow the membrane to dry completely before proceeding to the next step. For sheet membranes, ensure the membrane is properly overlapped and secured with the appropriate adhesive.
4. Install Shower Pan
A shower pan is a critical component of a shower that collects water and directs it to the drain. Ensure the shower pan is properly installed and is level before proceeding with the next step. The shower pan should be installed on a layer of thinset mortar over the waterproof membrane. Once the thinset mortar is dry, carefully level the shower pan using a level and shims.
5. Install Tile
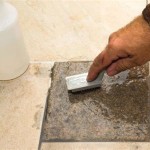
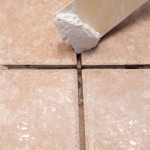
After the cement board is prepped with the waterproof membrane and the shower pan is installed, the final step is to install the tile. Applying thinset mortar to the back of each tile is crucial, ensuring a secure bond. Install the tile according to the pre-designed layout, ensuring the tiles are level and flush with each other. Use spacers to maintain consistent grout lines. After the thinset mortar dries, apply grout to fill the spaces between the tiles, creating a watertight seal.
Properly preparing cement board for tile in a shower is a vital step in constructing a durable and long-lasting shower. By following these steps, you can ensure your shower is watertight and ready for use. Always follow manufacturer instructions and local building codes for best results.

How To Install Cement Board For Tile Projects Diy Family Handyman

Installing Cement Board In The Bathroom Angie S Roost

Easily Install Cement Board To Prep For Tile Installation

How To Install Cement Board For Tile Bower Power

Tile Backerboard Material Options Fine Homebuilding

The Best Way To Waterproof Your Shower Before Tiling Inspired Hive

Installing Cement Board In The Bathroom Angie S Roost

Tile Tub Or Shower Surround Wall Preparation Today S Homeowner

How To Install Goboard Tile Backer Board Diytileguy

How To Install Cement Board On A Floor Diy Family Handyman
Related Posts