How To Lay Tile in a Bathroom Shower Floor: A Comprehensive Guide
Laying tile in a bathroom shower floor is a challenging but rewarding home improvement project. A properly tiled shower floor provides a waterproof and aesthetically pleasing surface, while a poorly executed job can lead to leaks, mold growth, and costly repairs. This article provides a detailed guide on how to lay tile in a bathroom shower floor, covering preparation, installation, and sealing.
1. Planning and Preparation: The Foundation for Success
Proper planning and preparation are paramount to a successful tile installation. This phase ensures the project proceeds smoothly and reduces the likelihood of errors.
Demolition and Removal: Begin by removing the existing shower floor. This process typically involves breaking up the old tile and mortar bed. Exercise caution when using tools like hammers and chisels to avoid damaging the shower walls or plumbing. Wear safety glasses and gloves to protect against debris.
Subfloor Inspection and Repair: Once the old flooring is removed, carefully inspect the subfloor. It must be structurally sound and free of any rot, mold, or water damage. Plywood or concrete are common subfloor materials. If any damage is present, repair or replace the affected area before proceeding. A level and stable subfloor is crucial for a flat and even tile surface.
Creating Proper Slope: A shower floor requires a slope towards the drain to ensure proper water drainage. The recommended slope is ¼ inch per foot. This can be achieved by using a pre-sloped shower pan or by creating a mortar bed with the required slope. Pre-sloped shower pans are typically made of foam or concrete and offer a convenient and consistent solution for creating the necessary slope. If creating a mortar bed, use a level and a straight edge to ensure the slope is accurate.
Waterproofing: Waterproofing is essential to prevent water from seeping through the tile and causing damage to the underlying structure. Several waterproofing methods are available, including liquid membranes, sheet membranes, and hot mopping. Liquid membranes are applied like paint and create a seamless, waterproof barrier. Sheet membranes are adhered to the subfloor and provide a durable, waterproof layer. Hot mopping involves applying layers of hot asphalt to create a waterproof barrier. Select the waterproofing method that best suits the specific needs and skills.
Drain Installation: Install the shower drain according to the manufacturer's instructions. Ensure the drain is properly sealed to prevent leaks. Consider using a drain flange that is compatible with the chosen waterproofing method. Proper drain installation is critical for preventing water damage and ensuring efficient drainage.
Gathering Materials and Tools: Assemble all necessary materials and tools before starting the tile installation. This will streamline the process and prevent unnecessary interruptions. The following materials and tools are typically required:
- Tiles (shower-rated)
- Thin-set mortar
- Grout
- Grout sealer
- Tile spacers
- Notched trowel (appropriate size for the chosen tile)
- Rubber grout float
- Grout sponge
- Bucket
- Mixing paddle
- Level
- Measuring tape
- Tile cutter or wet saw
- Safety glasses
- Gloves
- Caulk
2. Tile Installation: Achieving a Durable and Aesthetically Pleasing Surface
Once the planning and preparation phase is complete, the tile installation can begin. This phase requires precision and attention to detail to ensure a professional-looking and long-lasting result.
Dry Layout: Before applying mortar, perform a dry layout of the tiles. This involves arranging the tiles on the shower floor without mortar to determine the best layout and identify any necessary cuts. This step allows adjustments to be made before committing to the final arrangement. Pay attention to the drain location and ensure tiles are evenly spaced around it. Adjust the layout as needed to minimize small or awkward cuts.
Mixing Mortar: Mix the thin-set mortar according to the manufacturer's instructions. Add water gradually while mixing with a mixing paddle until a smooth, consistent consistency is achieved. Avoid adding too much water, as this can weaken the mortar. Allow the mortar to slake (rest) for the recommended time before using it.
Applying Mortar: Use the notched trowel to apply a thin, even layer of mortar to a small section of the shower floor. The size of the notched trowel should be appropriate for the size of the tiles being used. Hold the trowel at a 45-degree angle to create ridges in the mortar. These ridges help the tiles adhere properly to the subfloor.
Setting Tiles: Carefully place the tiles onto the mortar, pressing firmly to ensure good contact. Use tile spacers to maintain consistent spacing between the tiles. Periodically check the level of the tiles and adjust as needed. Remove any excess mortar that squeezes up between the tiles. Work in small sections to prevent the mortar from drying out before the tiles are set.
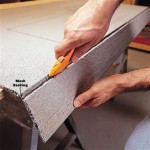
Cutting Tiles: Use a tile cutter or wet saw to cut tiles to fit around the edges and the drain. Measure accurately and make clean, precise cuts. Wear safety glasses when using a tile cutter or wet saw. Smooth any sharp edges with a tile file or sandpaper.
Allowing Mortar to Cure: Allow the mortar to cure for the recommended time, typically 24-48 hours, before proceeding to the next step. This allows the mortar to fully harden and provides a stable base for the grout.
3. Grouting and Sealing: Protecting and Enhancing the Tile Surface
Grouting and sealing are the final steps in the tile installation process. These steps protect the tile and grout from water damage and enhance the overall appearance of the shower floor.
Mixing Grout: Mix the grout according to the manufacturer's instructions. Add water gradually while mixing until a smooth, consistent consistency is achieved. Avoid adding too much water, as this can weaken the grout. Allow the grout to slake (rest) for the recommended time before using it.
Applying Grout: Use a rubber grout float to apply grout to the tile joints. Work the grout diagonally across the joints to ensure they are completely filled. Remove any excess grout from the tile surface with the grout float.
Cleaning Grout Haze: After the grout has partially set, use a damp grout sponge to clean the grout haze from the tile surface. Rinse the sponge frequently in clean water. Be careful not to remove too much grout from the joints. Multiple passes with the sponge may be necessary to remove all the grout haze.
Allowing Grout to Cure: Allow the grout to cure for the recommended time, typically 24-72 hours, before applying sealant. This allows the grout to fully harden and become resistant to water damage.
Sealing Grout: Apply a grout sealer to the grout joints to protect them from water damage and staining. Follow the manufacturer's instructions for application. Apply multiple coats of sealant for added protection. Allow the sealant to dry completely before using the shower.
Caulking: Apply caulk to the perimeter of the shower floor where it meets the walls and the drain. Use a high-quality, mildew-resistant caulk. Smooth the caulk with a caulk smoothing tool or a wet finger for a clean, professional finish. Caulk protects the joints from water intrusion and prevents mold growth.
By following these steps carefully, one can successfully lay tile in a bathroom shower floor, creating a waterproof, durable, and aesthetically pleasing surface. Careful planning, meticulous installation, and thorough sealing are crucial for achieving a long-lasting and problem-free result.

3 Shower Pan Choices For A Solid Tile Floor Installation Fine Homebuilding

How To Build A Shower Pan Install Tile Floor Homeadvisor

3 Shower Pan Choices For A Solid Tile Floor Installation Fine Homebuilding

8 Shower Floor Tile Ideas For The Modern Kiwi Home Space

How To Build A Shower Pan Install Tile Floor Homeadvisor

Laying Floor Tiles In A Small Bathroom Houseful Of Handmade

Bathroom Renovation Tiling The Shower From Bathtub To Walk In Remodelando La Casa

How To Build A Shower Pan Install Tile Floor Homeadvisor

Shower Pans Tile Vs Solid Surface Select Kitchen And Bath

How To Make A Tiled Shower Floor Less Slippery
Related Posts