How to Lay Porcelain Tile on a Concrete Floor Outside
Laying porcelain tile on a concrete floor outdoors can significantly enhance the aesthetic appeal and functionality of patios, walkways, and other exterior surfaces. Porcelain tile is a durable, weather-resistant material suitable for exterior applications, offering a wide range of design possibilities. A successful installation relies on meticulous preparation, the right materials, and adherence to established tiling techniques. This article provides a comprehensive guide to the process, outlining the steps necessary to achieve a professional-looking and long-lasting result.
Key Point 1: Concrete Surface Preparation
Proper concrete surface preparation is paramount to achieving a strong and lasting bond between the concrete substrate and the porcelain tile. Neglecting this step can lead to tile cracking, loosening, and ultimately, failure of the installation. The preparatory process involves cleaning, leveling, and addressing any existing damage to the concrete.
Cleaning the Concrete: The first step involves thoroughly cleaning the concrete surface. This begins with removing any loose debris, dirt, leaves, and other surface contaminants using a broom or leaf blower. Afterward, a pressure washer should be used to remove ingrained dirt, mildew, and algae. For stubborn stains, a concrete cleaner or degreaser may be necessary. Always follow the manufacturer's instructions for any cleaning products used. Allow the concrete surface to dry completely before proceeding.
Leveling the Concrete: Uneven concrete surfaces can create significant challenges when laying tile. High spots and dips can result in uneven tile surfaces and potential cracking. Using a long level or straight edge, assess the flatness of the concrete slab. Identify any areas that deviate significantly from level. For minor imperfections (less than ¼ inch), a self-leveling compound can be used. Follow the manufacturer’s recommendations for mixing and application. For larger discrepancies, consider using a concrete patching compound or, in extreme cases, a concrete grinding tool. Grinding should only be undertaken by experienced individuals or professionals.
Addressing Cracks and Damage: All cracks and damaged areas in the concrete must be addressed before tiling. Small hairline cracks can be filled with a concrete crack filler. Larger cracks (greater than ⅛ inch) often require more extensive repair. These cracks should be widened slightly using a chisel or grinder to create a V-shaped groove. The groove should then be cleaned and filled with a concrete patching compound or epoxy crack filler. Allow the patching compound to cure completely according to the manufacturer's instructions before proceeding. Areas with significant concrete spalling or deterioration may require more extensive repairs, potentially involving the removal and replacement of the damaged concrete section.
Applying a Primer: After cleaning, leveling, and repairing the concrete, applying a concrete primer is often recommended. The primer enhances the adhesion between the concrete and the thin-set mortar. Choose a primer specifically designed for outdoor use and compatible with the type of thin-set mortar being used. Apply the primer evenly using a paint roller or brush, following the manufacturer’s instructions regarding coverage and drying time.
Key Point 2: Selecting the Right Materials
Choosing appropriate materials is crucial for a successful outdoor tile installation. The specific type of porcelain tile, thin-set mortar, grout, and sealant must be selected with the outdoor environment in mind. These materials must be able to withstand temperature fluctuations, moisture exposure, and freeze-thaw cycles.
Porcelain Tile Selection: Not all porcelain tile is suitable for outdoor use. Look for porcelain tile specifically rated for exterior applications. These tiles will have a high breaking strength and low water absorption rate (ideally less than 0.5%). The tile's PEI (Porcelain Enamel Institute) rating should also be considered. A PEI rating of 3 or higher is generally recommended for outdoor use, indicating the tile's resistance to abrasion and wear. Consider the texture of the tile as well. Textured tiles provide better slip resistance, which is particularly important in wet or icy conditions. The size of the tile is also a factor. Larger tiles can create a more contemporary look, but they may be more prone to cracking if the concrete subfloor is not perfectly level.
Thin-Set Mortar Selection: The thin-set mortar must be specifically formulated for outdoor use and porcelain tile. Look for a modified thin-set mortar that is designed to withstand temperature fluctuations and moisture exposure. These mortars often contain polymers that enhance their flexibility and bond strength. Consider using a rapid-setting mortar if you need to minimize downtime or if the weather conditions are unpredictable. Read the manufacturer's instructions carefully regarding mixing ratios, setting time, and curing time. Using the wrong type of mortar or improperly mixing it can lead to tile adhesion problems.
Grout Selection: The grout used to fill the spaces between the tiles must also be weather-resistant and durable. Epoxy grout is an excellent choice for outdoor applications due to its waterproof and stain-resistant properties. Cement-based grout can also be used, but it must be sealed properly to protect it from moisture and staining. Consider using a sanded grout for wider grout lines (greater than ⅛ inch) and an unsanded grout for narrower grout lines. Choose a grout color that complements the tile and the surrounding environment. Darker grout colors tend to be more resistant to staining.
Sealant Selection: Applying a sealant to the grout lines is essential to protect them from moisture penetration and staining. Choose a high-quality penetrating sealant specifically designed for grout. Apply the sealant evenly using a brush or applicator, following the manufacturer's instructions. Allow the sealant to cure completely before exposing the tiled surface to water or heavy traffic. Reapply the sealant periodically (typically every 1-2 years) to maintain its effectiveness. A sealant may also be used on certain types of porcelain tiles to enhance their water resistance and protect them from staining.
Key Point 3: Tile Installation Techniques
Implementing proper tile installation techniques is critical to achieving a professional and durable result. Accurate layout, precise cutting, and proper mortar application are essential for a successful project.
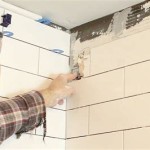
Layout Planning: Before applying any mortar, carefully plan the tile layout. Start by finding the center of the concrete surface and marking it. Then, dry-lay the tiles to determine the best layout and minimize the number of tile cuts required. Consider the aesthetic impact of grout lines and tile patterns. Ensure that the layout is symmetrical and visually appealing. Use tile spacers to maintain consistent grout lines. Adjust the layout as needed to avoid small slivers of tile along the edges of the surface. If necessary, shift the layout slightly to ensure that the edge tiles are at least half the size of a full tile.
Cutting Tiles: Cutting tiles accurately is essential for a professional-looking installation. Use a wet saw to make clean, precise cuts. A wet saw uses a diamond blade and water to cool the blade and minimize dust. When cutting tiles, always wear safety glasses and hearing protection. For intricate cuts, such as those around pipes or corners, use a tile nipper or a angle grinder with a diamond blade. Practice cutting a few scrap pieces of tile to get a feel for the saw and the tile’s cutting characteristics.
Mortar Application: Apply the thin-set mortar evenly to the concrete surface using a notched trowel. Choose a trowel size that is appropriate for the size of the tile being used. The notches in the trowel create ridges of mortar that help to ensure proper tile adhesion. Apply the mortar in small sections, working one area at a time. Avoid applying too much mortar at once, as it can dry out before the tiles are set. Press the tiles firmly into the mortar, using a slight twisting motion to ensure good contact. Use tile spacers to maintain consistent grout lines. Periodically check the level of the tiles using a level or straight edge. Adjust the tiles as needed to ensure a perfectly level surface. Remove any excess mortar from the grout lines with a damp sponge.
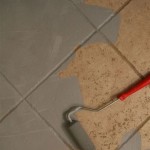
Grouting and Sealing: After the mortar has cured completely (typically 24-48 hours), it is time to grout the tile. Remove the tile spacers and clean the grout lines thoroughly. Mix the grout according to the manufacturer's instructions. Apply the grout to the tile surface using a grout float, working it into the grout lines. Remove the excess grout from the tile surface with a damp sponge. Rinse the sponge frequently to avoid smearing the grout. Allow the grout to cure for the recommended time (typically 24-72 hours). Once the grout has cured, apply a grout sealant to protect it from moisture and staining. Follow the manufacturer's instructions for applying the sealant. Allow the sealant to dry completely before exposing the tiled surface to water or heavy traffic.
By following these steps and paying careful attention to detail, one can successfully lay porcelain tile on a concrete floor outside, creating a beautiful and durable outdoor surface.

Can You Lay Outdoor Tiles Over Concrete Premier Porcelain

How To Lay Porcelain Tiles Onto A Concrete Patio
%202022-1.jpg?strip=all "How To Lay Porcelain Patio Paving Pavestone Natural Stone For Gardens And Driveways")
How To Lay Porcelain Patio Paving Pavestone Natural Stone For Gardens And Driveways

How To Lay Porcelain Slabs Bal Adhesives

Laying Porcelain Tiles Outside Tools And Best Practices

How To Install Porcelain Outdoor Floor Tiles In Your Garden Royale Stones Blog

Concrete Patio Transformation 7 Steps To Diy A New Outdoor Oasis

Laying Porcelain On A Concrete Bed Guide

Porcelain Ceramic And Vitrified Paving Pavingexpert

Concrete Patio Transformation 7 Steps To Diy A New Outdoor Oasis
Related Posts