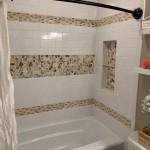
How To Lay Floor Tiles On Concrete Slab
Laying tile on a concrete slab can seem daunting, but with proper preparation and execution, it can be a manageable DIY project. This guide provides a step-by-step process for achieving a professional-looking tiled floor.
1. Assess and Prepare the Concrete Slab
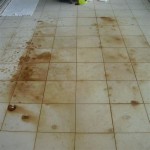
Before beginning, the concrete slab must be thoroughly assessed. Check for cracks, unevenness, and moisture. Cracks should be repaired using a concrete patching compound. Significant unevenness may require self-leveling underlayment. Moisture is a critical factor; excessive moisture can compromise the tile adhesive and lead to future problems. A moisture test should be conducted to ensure the slab is sufficiently dry. Different adhesives have varying moisture tolerances, so consult the manufacturer's instructions.
2. Gather Necessary Tools and Materials
Having all necessary tools and materials on hand before starting ensures a smooth and efficient process. This includes tiles, tile adhesive (thin-set mortar), grout, spacers, a notched trowel, a rubber grout float, a tile cutter or wet saw, a bucket, a sponge, safety glasses, and knee pads.
3. Clean the Concrete Surface
The concrete surface must be completely clean and free of any dust, debris, or contaminants. Sweep and vacuum the area thoroughly. A degreaser may be necessary to remove any grease or oil stains. Allow the surface to dry completely before proceeding.
4. Plan the Tile Layout
Planning the tile layout is a crucial step for achieving a visually appealing result. Dry-lay a few rows of tiles to determine the best starting point and to minimize cuts. Consider the room's dimensions and the tile size to create a balanced and symmetrical layout. Account for the spacing between tiles, which is typically 1/8" to 1/4".
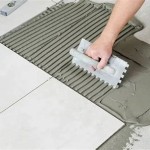
5. Apply the Tile Adhesive
Using the notched trowel, apply a thin layer of tile adhesive to a small section of the concrete slab, covering an area that can be tiled within the adhesive's working time (typically 20-30 minutes). Hold the trowel at a 45-degree angle to create ridges in the adhesive, which ensures proper coverage and bonding. Avoid applying too much adhesive, as this can make it difficult to level the tiles.
6. Lay the Tiles
Carefully place the first tile into the adhesive, pressing firmly and twisting slightly to ensure good contact. Insert tile spacers between each tile to maintain consistent spacing. Continue laying tiles in small sections, working outwards from the starting point. Periodically check the alignment and levelness of the tiles using a straight edge and a level. Clean any excess adhesive from the tile surfaces immediately using a damp sponge.
7. Cut Tiles as Needed
Tiles around the edges of the room and around obstacles will likely need to be cut. Use a tile cutter or wet saw for straight cuts. A tile nipper can be used for smaller, more intricate cuts. Measure carefully before cutting to ensure accurate sizing.
8. Apply Grout
After the adhesive has cured for the recommended time (typically 24-48 hours), apply the grout. Mix the grout according to the manufacturer's instructions. Using a rubber grout float, spread the grout over the tiled surface, working it into the spaces between the tiles at a 45-degree angle. Remove excess grout with the edge of the float.
9. Clean the Grout Haze
After the grout has begun to set (typically 15-30 minutes), clean the grout haze from the tile surface using a damp sponge. Rinse the sponge frequently and change the water often. Avoid using too much water, as this can wash out the grout. A final cleaning with a clean, damp sponge may be necessary after the grout has fully cured.
10. Seal the Grout (Optional)
Sealing the grout is optional but recommended, especially in areas prone to moisture or spills. Grout sealer helps prevent staining and makes cleaning easier. Apply the sealer according to the manufacturer's instructions.
11. Allow for Curing Time
Allow the newly tiled floor to cure completely before subjecting it to heavy traffic or furniture. The curing time for the adhesive and grout will vary depending on the specific products used, so consult the manufacturer's instructions for guidance. Proper curing ensures the longevity and durability of the tiled floor.

Tiling Over A Ed Concrete Slab Fine Homebuilding
:max_bytes(150000):strip_icc()/can-you-install-tile-directly-on-concrete-1822600-04-458f7bb6c78348c1835cf8054ef36553.jpg?strip=all "How To Install Tile Over Concrete")
How To Install Tile Over Concrete

How To Lay Floor Tiles On Concrete Stonesuper

How To Tile Onto Concrete Floors Porcelain Super

How To Lay Floor Tiles On Concrete Welcome The Rubi Tools Blog

How To Install Ceramic Tiles On Concrete Floor Tile Installation

How To Install Ceramic Tiles On Concrete Floor Tile Installation

Sound Dampening Ceramic Tile Over A Concrete Floor Fine Homebuilding
:max_bytes(150000):strip_icc()/can-you-install-tile-directly-on-concrete-1822600-01-8a89ceab1a274fb8ac81890ab7fc6b1b.jpg?strip=all "How To Install Tile Over Concrete")
How To Install Tile Over Concrete

How To Install Ceramic Tiles On Concrete Floor Tile Installation
Related Posts