How To Install Wall Tile In Shower
Installing wall tile in a shower is a challenging yet rewarding home improvement project. Proper execution leads to a durable, aesthetically pleasing, and water-resistant shower enclosure. This article will provide a detailed guide on the steps necessary to successfully install wall tile in a shower, covering preparation, installation, and finishing touches.
Preparation: Ensuring a Solid Foundation
The success of any tile installation hinges on meticulous preparation. This phase involves assessing the existing shower structure, addressing any damage, and ensuring a level, waterproof substrate for the tile.
Assessing the Existing Structure: The initial step is a thorough inspection of the shower walls. Look for signs of water damage, such as soft spots, discoloration, or mold. Any compromised areas must be addressed before proceeding. Pay particular attention to the condition of the existing backer board or drywall. If these materials are damaged, they must be removed and replaced.
Addressing Water Damage: Water damage, if left unattended, can lead to structural problems and mold growth. Damaged structures should be removed and replaced. If the problem is limited, the affected areas can be cut away using a utility knife or oscillating tool. Ensure the removal extends beyond the visibly damaged area to reach sound material.
Choosing the Right Backer Board: Backer board provides a stable and water-resistant surface for tile installation. Cement board and waterproof gypsum board are popular choices. Cement board offers excellent water resistance and durability but can be heavier and more difficult to cut. Waterproof gypsum board is lighter and easier to work with but may not be as durable in consistently wet environments. Select the material that best suits the specific requirements of the shower and the installer's skill level.
Installing Backer Board: Cut the backer board to fit the shower walls, using a utility knife and scoring tool for cement board or a drywall saw for gypsum board. Attach the backer board to the wall studs using corrosion-resistant screws designed for this purpose. Ensure that the screws are spaced according to the manufacturer's instructions, typically every 6-8 inches. Seal the seams between the backer board panels with mesh tape and thin-set mortar. This creates a continuous waterproof barrier.
Waterproofing: Despite the use of water-resistant backer board, additional waterproofing is crucial. This can be achieved using a liquid waterproofing membrane or a sheet membrane. Liquid waterproofing membranes are applied with a brush or roller, creating a seamless barrier. Sheet membranes are adhered to the backer board with thin-set mortar. Pay close attention to corners, seams, and protrusions like showerheads and faucets, as these are vulnerable areas for water penetration. Multiple coats may be necessary for liquid waterproofing membranes to achieve the desired thickness and protection.
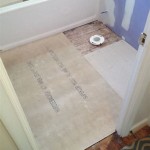
Ensuring a Level Surface: Uneven walls can create challenges during tile installation and result in an unprofessional-looking finish. Use a level and straight edge to identify any irregularities in the backer board surface. Minor imperfections can be corrected with thin-set mortar during the tile installation process. However, significant variations require more extensive leveling. This may involve shimming the backer board or applying a leveling compound to create a smooth and even surface.
Tile Installation: Laying the Foundation for a Beautiful Shower
With the preparation complete, the next phase is the tile installation itself. This involves selecting the appropriate thin-set mortar, applying it correctly, and carefully placing each tile to achieve a uniform and aesthetically pleasing result.
Selecting Thin-Set Mortar: Thin-set mortar is the adhesive used to bond the tile to the backer board. Choose a thin-set mortar specifically designed for shower applications, as these are typically modified with polymers to improve water resistance and adhesion. Different types of tile may require specific types of thin-set mortar, so consult the tile manufacturer's recommendations. Consider the open time of the thin-set mortar, which is the amount of time it remains workable after being mixed. Choose a thin-set mortar with an appropriate open time for the work pace.
Mixing Thin-Set Mortar: Mix the thin-set mortar according to the manufacturer's instructions, using a mixing drill and a mixing paddle. Add water gradually while mixing until the mortar reaches a smooth, peanut butter-like consistency. Avoid adding too much water, as this can weaken the mortar. Allow the mixed mortar to slake for the recommended time, typically 5-10 minutes, before remixing and applying.
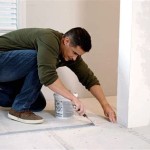
Applying Thin-Set Mortar: Use a notched trowel to apply the thin-set mortar to the backer board. The size of the notches on the trowel will depend on the size and type of tile. Apply the mortar in small sections, typically no more than a few square feet at a time, to prevent it from drying out before the tile is installed. Hold the trowel at a 45-degree angle and apply even pressure to create consistent ridges in the mortar. These ridges provide adequate surface area for the tile to bond to the mortar.
Setting the Tile: Press each tile firmly into the thin-set mortar with a slight twisting motion. This ensures good contact between the tile and the mortar. Use tile spacers to maintain consistent grout lines between the tiles. Check the alignment of the tiles frequently with a level and adjust as needed. Remove any excess thin-set mortar from the face of the tiles with a damp sponge. Regular cleaning prevents the mortar from hardening and becoming difficult to remove.
Cutting Tiles: Cutting tiles is often necessary to fit them around corners, pipes, and other obstructions. Use a wet saw for precise cuts, especially for porcelain or stone tiles. A tile cutter can be used for simpler cuts on ceramic tiles. Always wear safety glasses when cutting tiles to protect your eyes from flying debris.
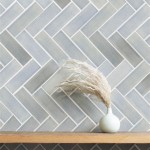
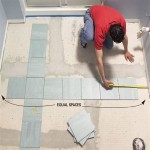
Layout Considerations: Before starting the tile installation, plan the layout carefully. Start with a full tile in a prominent area, such as the center of the wall. This ensures that the cut tiles are less noticeable. Avoid placing small slivers of tile in highly visible areas. Consider the placement of accent tiles or patterns to create visual interest. Use a chalk line to establish a straight and level starting point for the tile installation.
Allowing the Mortar to Cure: Once the tile is installed, allow the thin-set mortar to cure completely before proceeding to the next step. The curing time will vary depending on the type of mortar and the ambient temperature and humidity. Consult the manufacturer's instructions for the recommended curing time, typically 24-72 hours.
Grouting and Sealing: Protecting and Finishing the Tile Installation
After the thin-set mortar has cured, the final stages involve grouting the tile joints and sealing the grout to protect it from water damage and staining. Selecting the right grout and sealant is crucial for long-term performance.
Selecting Grout: Grout fills the spaces between the tiles, providing a watertight seal and enhancing the overall appearance of the installation. Choose a grout specifically designed for shower applications, as these are typically mold and mildew resistant. Consider the color of the grout in relation to the tile. A contrasting grout color can highlight the tile pattern, while a matching grout color can create a more seamless look. Epoxy grout is a more expensive option but offers superior water resistance and stain resistance compared to cement-based grout.
Applying Grout: Remove the tile spacers before applying the grout. Mix the grout according to the manufacturer's instructions, using a mixing drill and a mixing paddle. Apply the grout to the tile joints using a grout float, holding the float at a 45-degree angle and pressing firmly to fill the joints completely. Work in small sections and remove excess grout from the tile surface with the grout float. Wipe the tile surface with a damp sponge to remove any remaining grout residue. Rinse the sponge frequently in clean water. Allow the grout to haze over slightly before buffing the tile surface with a clean, dry cloth. Repeat this process until the tile surface is clean and free of grout residue.
Sealing Grout: Grout is porous and susceptible to water damage and staining. Sealing the grout helps to protect it and prolong its lifespan. Apply a grout sealer according to the manufacturer's instructions, using a brush or applicator. Allow the sealer to penetrate the grout for the recommended time before wiping off any excess. Reapply the sealer periodically, typically every 6-12 months, to maintain its protective properties.
Caulking: Apply caulk to all corners, seams, and areas where the tile meets non-tiled surfaces, such as the shower pan or tub. Use a mildew-resistant silicone caulk designed for wet environments. Apply the caulk in a smooth, even bead and smooth it with a caulk smoothing tool or a wet finger. Remove any excess caulk with a damp cloth. Caulking provides a flexible and watertight seal that prevents water from penetrating behind the tile. It also helps to prevent the growth of mold and mildew.
Final Inspection and Cleanup: Conduct a final inspection of the tile installation to ensure that all tiles are properly aligned, the grout is evenly applied, and the caulk is smooth and seamless. Clean any remaining grout haze or residue from the tile surface. Allow the grout and caulk to cure completely before using the shower, typically 24-72 hours. Proper ventilation during the curing process can help to speed up the drying time.
Installing wall tile in a shower is a labor-intensive project that requires patience, attention to detail, and proper execution. By following these guidelines carefully, it is possible to achieve a professional-looking and long-lasting shower enclosure.

Part 1 How To Install Tile On Shower Tub Wall Step By

How To Install A Shower Tile Wall Bathroom

The Complete Guide To Installing Tile On Shower Or Bathtub Walls

How To Install A Shower Tile Wall Bathroom

How To Tile A Bathroom Shower Walls Floor Materials 100 Pics Pro Tips

How To Tile A Shower At Home Diy Guide For Beginners

How To Install 12 X24 Shower Tile Ep 44 Off Grid Cottage Build

A Diy Shower Tile Step By

Tiling A Shower All By Yourself

A Diy Shower Tile Step By
Related Posts