How to Install Tile on a Concrete Floor
Installing tile on a concrete floor is a popular choice for homeowners seeking a durable, stylish, and easy-to-clean flooring option. Whether you're updating your kitchen, bathroom, or any other room with a concrete subfloor, the process involves several key steps, each requiring careful attention to ensure a successful and long-lasting installation. This guide provides a comprehensive breakdown of the process, outlining the essential tools and techniques for a professional-looking finish.
1. Prepare the Concrete Subfloor
A solid foundation is crucial for a successful tile installation. The concrete subfloor must be clean, level, and free of any imperfections that could compromise the tiles' adhesion and longevity.
Start by thoroughly cleaning the concrete surface with a broom and a wet mop to remove dirt, debris, and any existing coatings. For stubborn stains, a concrete cleaner can be used. Allow the floor to dry completely before proceeding to the next step.
Next, assess the levelness of the concrete floor. Uneven surfaces can lead to uneven tile installation and potential cracking. Use a level to check for any significant dips or bumps. Small imperfections can be addressed with thin-set mortar, while larger inconsistencies may require leveling compound or self-leveling concrete.
Once the floor is level, it's important to address any cracks or holes in the concrete. Fill these imperfections with a concrete patching compound, allowing it to dry completely before moving on.
2. Install a Waterproof Membrane
In areas prone to moisture, such as bathrooms and kitchens, installing a waterproof membrane is essential to prevent water damage and ensure the longevity of your tile installation. This membrane acts as a barrier, protecting the subfloor from water infiltration.
There are various types of waterproof membranes available, including polyethylene sheeting, PVC membranes, and liquid-applied membranes. The choice depends on the specific needs of the project.
Carefully follow the manufacturer's instructions for installation. Ensure that the membrane is properly overlapping and sealed at all seams, creating a watertight barrier.
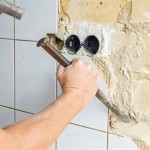
3. Install Backer Board
Backer board serves as a stable and moisture-resistant layer between the subfloor and the tile, providing a secure and durable foundation. It's especially crucial in areas with high moisture exposure, such as bathrooms and kitchens.
Common types of backer board include cement backer board and fiber cement board. Cement backer board tends to be more durable and moisture-resistant, while fiber cement board is lighter and easier to work with.
Install the backer board using thin-set mortar, ensuring that the pieces are tightly butted against each other. Leave a small expansion gap around the perimeter of the room, as well as between the backer board and walls, to accommodate any movement.
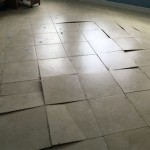
4. Lay Out and Mark the Tiles
Before applying thin-set mortar and installing the tiles, it's important to plan the layout and mark the tile placement. This ensures a visually appealing and symmetrical pattern.
Start by measuring the room and determining the size of the tile. Consider how the tiles will be laid out to minimize waste. It's often recommended to begin the tile installation in the center of the room, working outward.
Use a chalk line or pencil to mark the center point of the room, as well as the tile lines. This helps guide the installation and ensures an even distribution of tiles. If necessary, cut tiles to fit around fixtures and walls using a wet saw.
5. Apply Thin-Set Mortar and Install Tiles
Once the layout is determined and the tiles have been cut to size, you can begin applying the thin-set mortar and installing the tiles.
Use a notched trowel to spread the mortar evenly across the backer board or the subfloor, creating ridges to help secure the tiles in place. The size of the notches should be appropriate for the size and thickness of the tiles.
Place the tiles onto the mortar, gently pressing them into the thin-set. Use a level to ensure that the tiles are installed at the same height and that there are no gaps between them. Tap the tiles lightly with a rubber mallet to ensure they are properly seated in the mortar.
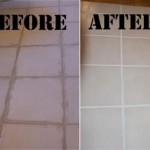
6. Grout the Tiles
Once the thin-set mortar has cured sufficiently, it's time to grout the tiles. Grout fills the gaps between the tiles, creating a smooth, watertight seal and enhancing the overall aesthetic of the installation.
Use a grout float to apply the grout to the joints between the tiles, ensuring that the gaps are completely filled. Work the grout into the joints, removing any excess with a damp sponge. Allow the grout to dry thoroughly before cleaning the tiles with a damp cloth.
7. Seal the Grout
For added protection and durability, seal the grout after it has dried. Grout sealer helps prevent staining and makes the grout easier to clean. Choose a sealant specifically designed for tile and grout, and follow the manufacturer's instructions for application.
Apply the sealer evenly to the grout using a brush or sponge. Allow the sealer to dry completely before walking on the newly installed tile floor.
:max_bytes(150000):strip_icc()/can-you-install-tile-directly-on-concrete-1822600-04-458f7bb6c78348c1835cf8054ef36553.jpg?strip=all "How To Install Tile Over Concrete")
How To Install Tile Over Concrete

Tiling Over A Ed Concrete Slab Fine Homebuilding

How To Tile Onto Concrete Floors Porcelain Super

How To Lay Floor Tiles On Concrete Stonesuper

How To Lay Tile On Concrete With Pictures Wikihow

How To Install Ceramic Tiles On Concrete Floor Tile Installation

How To Lay Floor Tiles On Concrete Welcome The Rubi Tools Blog

How To Install Ceramic Tiles On Concrete Floor Tile Installation
:max_bytes(150000):strip_icc()/can-you-install-tile-directly-on-concrete-1822600-01-8a89ceab1a274fb8ac81890ab7fc6b1b.jpg?strip=all "How To Install Tile Over Concrete")
How To Install Tile Over Concrete

How To Tile A Concrete Floor Howtospecialist Build Step By Diy Plans Floors Flooring
Related Posts