How To Install Shower Floor Tile: A Comprehensive Guide
Installing shower floor tile requires meticulous planning and execution. It is a project that demands attention to detail, proper preparation, and the use of appropriate materials. This article provides a comprehensive guide to installing shower floor tile, outlining the necessary steps from initial planning to final grouting.
Key Point 1: Preparation and Planning
Before commencing any physical work, a detailed plan is essential. This stage encompasses several critical aspects, including accurate measurement, material selection, and ensuring the subfloor is adequately prepared. Neglecting this stage can lead to significant complications later in the installation process.
Accurate Measurement: Begin by precisely measuring the shower floor area. This measurement will determine the quantity of tile needed. Account for waste by adding 10-15% extra material. Irregular shower shapes require more precise calculations. Consider using a digital measuring device for greater accuracy.
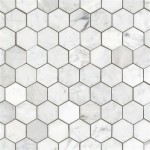
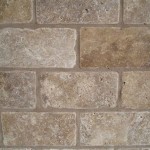
Material Selection: Shower floor tile must be durable, water-resistant, and slip-resistant. Popular choices include porcelain, mosaic tile, and natural stone (such as slate or granite, properly sealed). Porcelain is a particularly good option due to its low water absorption rate and durability. Mosaic tiles offer design flexibility and can conform to curved surfaces. Natural stone provides a luxurious aesthetic but requires periodic sealing.
Beyond tile, consider the following essential materials:
- Thin-set mortar: Choose a mortar specifically designed for wet environments and the type of tile being used.
- Grout: Select a grout suitable for shower floors, often epoxy-based for superior water resistance.
- Grout sealer: Apply a grout sealer to protect the grout from staining and water damage.
- Waterproofing membrane: A waterproof membrane is critical to prevent water from seeping through to the subfloor.
- Caulk: Use a high-quality, mildew-resistant caulk for sealing corners and edges.
Subfloor Preparation: The subfloor must be structurally sound, level, and clean. Imperfections in the subfloor will telegraph through the tile, resulting in an uneven and potentially unstable surface.
If the subfloor is concrete, inspect it for cracks and repair them with a concrete patching compound. Ensure the surface is free of debris, paint, and old adhesive. A self-leveling compound can be used to create a perfectly level surface if necessary. If the subfloor is wood, verify its integrity. Replace any rotted or damaged wood. Screw down any loose boards and reinforce any weak areas. Plywood or cement board (backer board) is typically used as a subfloor for tiling. Backer board is more resistant to moisture than plywood and provides a better surface for adhering tile.
Waterproofing: After the subfloor is prepared, apply a waterproofing membrane to the entire shower floor area. This membrane prevents water from penetrating the subfloor and causing damage. There are several types of waterproofing membranes available, including liquid membranes, sheet membranes, and prefabricated shower pans. Follow the manufacturer's instructions for application. Overlap seams properly to ensure a continuous waterproof barrier. Pay particular attention to corners and drains.
Key Point 2: Tile Installation
The process of setting the tile involves careful application of thin-set mortar, precise placement of the tiles, and consistent spacing to achieve a professional-looking and durable shower floor.
Mixing Thin-Set Mortar: Follow the manufacturer's instructions for mixing the thin-set mortar. Add water gradually while mixing with a drill and mixing paddle until the mortar reaches a smooth, peanut butter-like consistency. Allow the mortar to slake (sit) for the recommended time, and then remix briefly before use. Avoid adding too much water, as this will weaken the mortar.
Applying Thin-Set Mortar: Use a notched trowel to apply the thin-set mortar to the subfloor. The size of the notch will depend on the size of the tile. Apply the mortar in small sections, working from one corner of the shower floor outward. Hold the trowel at a 45-degree angle and create ridges in the mortar. These ridges will help the tile adhere properly.
Setting the Tiles: Press each tile firmly into the mortar, using a slight twisting motion to ensure good contact. Use tile spacers to maintain consistent grout lines. Align the tiles carefully, ensuring they are level and plumb. Periodically check the level of the tiles with a level. Tap any high spots with a rubber mallet to bring them down. Avoid walking on the newly laid tiles until the mortar has set.
Cutting Tiles: To fit tiles around drains, walls, and other obstructions, you will need to cut them. Use a wet saw for straight cuts and a tile nipper for curved cuts. Wear safety glasses when cutting tiles. Measure the area to be cut carefully and mark the tile with a pencil. Make the cut slowly and carefully, following the marked line. Smooth any rough edges with a rubbing stone.
Layout Considerations: Before applying any mortar, dry-lay the tiles to determine the best layout. This allows you to visualize the finished product and make any necessary adjustments. Consider the location of the drain and ensure the tiles slope towards it. Avoid small slivers of tile along the edges. If necessary, adjust the layout to create larger, more aesthetically pleasing cuts. Create a focal point or design element using different colored or patterned tiles.
Key Point 3: Grouting and Sealing
Grouting fills the spaces between the tiles, providing a water-resistant seal and enhancing the overall appearance of the shower floor. Sealing the grout adds an extra layer of protection against staining and water damage.
Mixing Grout: Mix the grout according to the manufacturer's instructions. As with thin-set mortar, add water gradually while mixing until the grout reaches a smooth, creamy consistency. Allow the grout to slake for the recommended time, and then remix briefly before use. Avoid adding too much water, as this will weaken the grout and cause it to crack.
Applying Grout: Use a grout float to apply the grout to the tile surface. Hold the float at a 45-degree angle and spread the grout diagonally across the grout lines, forcing it down into the spaces between the tiles. Remove any excess grout from the tile surface with the edge of the float. Work in small sections, allowing the grout to dry slightly before cleaning.
Cleaning the Grout: After the grout has dried slightly (typically 15-30 minutes), use a damp sponge to remove the excess grout from the tile surface. Rinse the sponge frequently in clean water. Be careful not to remove too much grout from the grout lines. Use a grout sponge or a microfiber cloth to remove any remaining haze from the tile surface. Repeat the cleaning process as necessary until the tile surface is clean.
Sealing the Grout: After the grout has cured completely (typically 24-72 hours), apply a grout sealer to protect it from staining and water damage. Follow the manufacturer's instructions for application. Apply the sealer with a brush or applicator pad, ensuring that all grout lines are thoroughly saturated. Allow the sealer to dry completely before using the shower.
Caulking: Apply a bead of mildew-resistant caulk along the perimeter of the shower floor, where the tile meets the walls. Also caulk any corners or edges where different materials meet. Smooth the caulk with a wet finger or a caulk smoothing tool. Remove any excess caulk with a damp cloth. Allow the caulk to dry completely before using the shower.
Final Inspection and Cleanup: After the grout and caulk have dried, inspect the shower floor for any imperfections. Touch up any areas that need attention. Clean up any tools and materials. Dispose of any waste properly. Allow the shower floor to dry completely before using it. Maintaining newly installed shower tile involves regular cleaning with non-abrasive cleaners and periodic resealing to prolong its lifespan and appearance.

3 Shower Pan Choices For A Solid Tile Floor Installation Fine Homebuilding

How To Build A Tile Shower Floor Pan Construction Diy

How To Build A Tile Shower Floor Pan Liner And Drain Diy

Here S How Install A New Shower Stall With Tile Floor

How To Tile A Basement Shower The Home Depot

How To Tile A Shower At Home Diy Guide For Beginners

3 Shower Pan Choices For A Solid Tile Floor Installation Fine Homebuilding

How To Retile A Shower Floor Art Tile Renovation

Installing A Shower Tray Tiles Madness Method

How To Build A Shower Pan Install Tile Floor Homeadvisor
Related Posts