How to Install Hardie Board for Tile
Hardie board, a type of cement board, is a popular choice for tile backer boards due to its durability, moisture resistance, and dimensional stability. It provides a strong and stable surface for tile installation, preventing cracking and movement over time. Installing Hardie board requires precision and proper preparation for a successful tile installation. This guide will provide a step-by-step approach to installing Hardie board for tile, ensuring a sturdy foundation for your project.
1. Prepare the Surface
Before installing Hardie board, it is crucial to prepare the substrate thoroughly. This involves removing any existing coverings, cleaning the surface, and ensuring it is level and smooth.
Start by removing any existing coverings, such as wallpaper, paint, or old tile. Then, clean the surface thoroughly with a damp cloth or sponge to remove dirt, dust, grease, or other contaminants. Use a scraper or putty knife to remove any loose or flaking material. Ensure the surface is dry before proceeding.
Next, check the level and smoothness of the surface. Use a level to identify any unevenness or bumps. If necessary, use a leveling compound or mortar to fill in any gaps or irregularities. Allow the leveling compound to dry completely before proceeding to the next step.
2. Cut and Install Hardie Board
Once the surface is prepared, you can begin cutting and installing the Hardie board.
Measure the area where you will be installing the Hardie board. Cut the board to the required size using a circular saw with a carbide-tipped blade. Make sure the cuts are straight and accurate. For intricate cuts or curves, you can use a jigsaw.
Apply a thin layer of thin-set mortar to the back of the Hardie board. Use a notched trowel to spread the mortar evenly. This will ensure proper adhesion to the substrate.
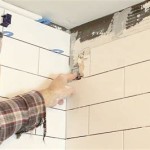
Position the first sheet of Hardie board on the prepared surface and press it firmly into the mortar. Align it with the wall or floor and ensure it is level. Use shims if necessary to achieve a level installation.
Repeat the process for the remaining sheets of Hardie board. Ensure each sheet is butted tightly against the previous sheet, leaving no gaps. Secure the Hardie board to the substrate using screws or nails specifically designed for cement board.
When installing the board, ensure that all the joints are staggered. This will provide greater stability and prevent cracking over time. For larger installations, consider using a Hardie board trim piece to cover the edges and provide a cleaner look.
3. Finish and Seal Hardie Board
After installing the Hardie board, it is crucial to properly finish and seal it before tiling. This step is essential to protect the board from moisture and create a smooth surface for tile adhesion.
Apply a thin layer of cement-based thin-set mortar over the entire surface of the Hardie board. Be sure to fill in any gaps or holes created during installation. Allow this layer to dry completely before proceeding.
Next, apply a waterproofing membrane over the Hardie board surface. This membrane will provide an extra layer of protection against moisture and prevent water damage. Apply the membrane according to the manufacturer's instructions.
Finally, apply a sealant over the Hardie board and waterproofing membrane. This seal will create a smooth and even surface for tile installation and also protect the board from water damage.
Once the sealant is dry, you can begin applying your chosen tile. The prepared Hardie board will offer a durable, stable surface that will support the weight of your tile for years to come. Remember to allow tile adhesive to fully dry before grouting to ensure a secure and long-lasting tile installation.

How To Install Hardiebacker Cement Board On Floors James Hardie Pros

How To Install Cement Board The Home Depot

How To Install Cement Board The Home Depot

How To Install Cement Backer Board For Floor Tile Installation The Home Depot

How To Install Cement Board For Tile Projects Diy Family Handyman

Tile Installation Backer Board Around A Bathtub Family Handyman

How To Install Hardiebacker Cement Board On Walls James Hardie Pros

How To Install Shower Backerboard Hardieboard Cement Proper Installation Diy

Easily Install Cement Board To Prep For Tile Installation

Tile Installers Select Hardiebacker Cement Board As Most Preferred Brand 2024 02 22 Stone World
Related Posts