How to Install Concrete Board for Shower Tile
Installing concrete board for shower tile is a critical step in creating a durable and waterproof shower system. Concrete board provides a stable and moisture-resistant base for tile to adhere to, preventing cracking and leaks. Follow these instructions to learn how to properly install concrete board for shower tile.
Step 1: Prepare the Shower Area
Clear the shower area of any fixtures, plumbing, or debris. Ensure the walls and floor are level and free of any imperfections that may affect the installation.
Step 2: Install a Moisture Barrier
Apply a moisture barrier, such as a plastic sheet or waterproof membrane, to the walls and floor. This will prevent moisture from penetrating the concrete board and damaging the underlying structure.
Step 3: Cut the Concrete Board
Measure and cut the concrete board to fit the walls and floor of the shower. Use a circular saw or utility knife to make clean, straight cuts. Ensure the edges of the concrete board are flush with each other.
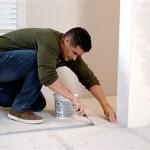
Step 4: Apply Thinset Mortar
Spread thinset mortar onto the back of the concrete board using a notched trowel. Hold the trowel at a 45-degree angle and create ridges in the mortar to provide a good bond between the concrete board and the wall or floor.
Step 5: Install the Concrete Board
Position the concrete board on the wall or floor and press it into the thinset mortar. Use a level to check for any unevenness and adjust the board accordingly. Tap the concrete board with a rubber mallet to secure it in place.
Step 6: Screw the Concrete Board
Drive screws through the concrete board and into the wall or floor studs. Use 1 1/4-inch screws spaced approximately 6 inches apart. Ensure the screws are flush with the surface of the concrete board.
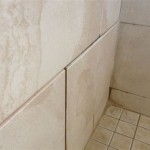
Step 7: Seal the Joints
Apply a waterproof sealant to the joints between the concrete board sheets. Use a caulk gun to apply the sealant and smooth it out with a wet finger or plastic tool. This will prevent water from penetrating the seams and damaging the installation.
Step 8: Let the Concrete Board Cure
Allow the thinset mortar and sealant to cure for 24-48 hours before tiling. This will ensure the concrete board is fully bonded and stable before adding any weight.
Tips:
- Use a cement backer board instead of concrete board if the shower area is exposed to moisture from outside sources, such as a leaking roof.
- Stagger the joints between the concrete board sheets to prevent weak points in the installation.
- Waterproof the edges of the concrete board with a waterproof paint or sealant before tiling.
Conclusion:
Installing concrete board for shower tile is a relatively straightforward process that can enhance the durability and longevity of your shower system. By following these instructions carefully, you can create a solid and waterproof base for your tile, ensuring a beautiful and functional shower for years to come.

How To Install Cement Board For Tile Projects Diy Family Handyman

How To Install Backer Board Around A Bathtub

How To Install Shower Surround Tile Backer Board Durock Or Cement Part 1

Installing Cement Board In The Bathroom

Tile Backer Board Installation Key Steps For A Quality Armchair Builder Blog Build Renovate Repair Your Own Home Save Money As An Owner

How To Install Cement Board For Tile Projects Diy Family Handyman

Tile Backer Board Breakdown Which One Is Best For Showers Diytileguy

How To Install Shower Backerboard Hardieboard Cement Proper Installation Diy

Easily Install Cement Board To Prep For Tile Installation

How To Install Cement Board For Tile Bower Power
Related Posts