How to Install Backer Board for a Tile Shower Floor
Installing tile in a shower is a popular choice for homeowners, offering both durability and aesthetic appeal. However, a strong and water-resistant foundation is crucial for a long-lasting and safe shower. Backer board, a specialized substrate designed for wet areas, provides this necessary foundation. This article will guide you through the process of installing backer board for a tile shower floor, ensuring a successful and robust installation.
1. Preparing the Subfloor
The success of any tile installation hinges on a well-prepared subfloor. In the case of a shower floor, the subfloor must be perfectly level and strong enough to support the weight of the tile and its associated mortar layers. Here's how to prepare the subfloor for backer board installation:
- Remove Existing Flooring: If there is existing flooring such as vinyl or wood, remove it completely. This ensures a clean and even surface for the backer board.
- Inspect and Repair: Thoroughly inspect the subfloor for any cracks, gaps, or unevenness. Use a wood filler or patching compound to repair any imperfections. Ensure the subfloor is level. A slight slope towards the drain is necessary to facilitate water runoff.
- Moisture Barrier: Apply a moisture barrier, such as a polyethylene sheet, to the subfloor. This protects the backer board and the underlying structure from moisture damage. Secure the moisture barrier with staples or tape.
- Leveling: If the subfloor is significantly uneven, consider using a leveling compound. This will create a perfectly flat surface for the backer board, making it easier to install the tile.
2. Installing the Backer Board
Once the subfloor is prepared, it's time to install the backer board. Backer board comes in various sizes and materials, but cement backer board is a common choice for shower floors due to its strength and water resistance. Here's a step-by-step guide to installing the backer board:
- Cut the Backer Board: Measure the shower floor area and carefully cut the backer board to size using a utility knife or circular saw with a diamond blade. Be sure to wear appropriate safety gear during cutting.
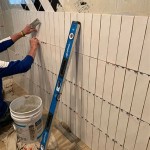
- Laying the First Row: Start at the shower drain and lay the first row of backer board. Ensure the edges are flush with the walls and that the boards are butted tightly together. Use thin-set mortar to adhere the backer board to the subfloor, spreading the mortar with a notched trowel.
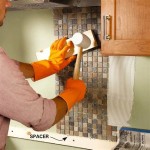
- Installing Subsequent Rows: Lay the remaining rows of backer board, ensuring that each row is butted tightly against the previous row. Use shims as needed to maintain a level surface.
- Securing the Backer Board: Use screws or nails designed for backer board to secure the boards to the subfloor. Drive the fasteners through the center of the board panels and into the subfloor, ensuring they are fully seated.
- Filling Gaps and Edges: Use a sealant to fill any gaps between the backer board and the shower walls. Apply a sealant along the edges of the backer board to protect against water infiltration.
3. Finishing Touches
Once the backer board is installed, there are a few finishing touches to ensure a smooth transition to the tile installation:
- Membrane Installation: In some cases, a waterproofing membrane is installed over the backer board. This provides an additional layer of protection against water damage, particularly in areas prone to leaks. Choose a membrane specifically designed for shower floors and follow the manufacturer's instructions for installation.
- Drainage: Ensure the shower drain is properly installed and functioning. This is crucial for preventing water from pooling on the shower floor. Check that the drain has a slight slope and that the drainpipe is secured to the plumbing system.
- Ready for Tile: Once the backer board is completely installed, it's ready to receive the tile. This includes the shower floor and any walls that are tiled.

How To Install Cement Backer Board For Floor Tile Installation The Home Depot

Here S How Install A New Shower Stall With Tile Floor

How To Install Cement Board The Home Depot

How To Install Shower Backerboard Hardieboard Cement Proper Installation Diy

How To Install Cement Board On A Floor Diy Family Handyman

Tile Installation Backer Board Around A Bathtub Family Handyman

Proper Way To Set Wallboard For Shower

How To Build A Tile Shower Pan Icreatables Com

How To Install Cement Board The Home Depot

How To Install Hardiebacker Cement Board On Floors James Hardie Pros
Related Posts