How To Install Backer Board For Tile In Shower Room
Installing backer board is a crucial step in preparing a shower room for tile. Backer board, also known as cement board, provides a stable and water-resistant substrate that is essential for the longevity and performance of tiled surfaces in wet environments. Proper installation of backer board helps to prevent water damage, mold growth, and tile failure. This article outlines the process of installing backer board for tile in a shower room, providing detailed instructions and essential considerations for a successful project.
Before commencing the installation process, it is imperative to gather the necessary tools and materials. These include backer board sheets (typically 3x5 feet or 4x8 feet), a utility knife or scoring tool, a circular saw or backer board saw, a drill with a screw gun attachment, backer board screws, measuring tape, a level, safety glasses, dust mask, thin-set mortar, seam tape (alkali-resistant mesh tape), and joint compound specifically formulated for cement board.
Thorough preparation of the shower area is paramount. This involves removing any existing wall coverings, such as drywall, plaster, or old tile. The studs should be exposed and inspected for any damage or rot. Any structural issues must be addressed before proceeding with the backer board installation. Ensure the studs are plumb and in the same plane. Adjustments can be made by shimming the studs as needed. The shower base or pan should be properly installed and level prior to installing the backer board on the walls.
Once the studs are prepared, measure the dimensions of the shower walls to determine the size and number of backer board sheets required. Plan the layout to minimize seams and optimize material usage. Cutting backer board can be messy, so it is best to work in a well-ventilated area and wear a dust mask and safety glasses to protect against dust and debris. Use a utility knife or scoring tool to score the backer board along the desired cut line. Then, snap the board along the score line. For more intricate cuts, a circular saw equipped with a blade specifically designed for cutting cement board can be used. Consider using a backer board saw which is specifically designed to create clean cuts with minimal dust. Always follow the manufacturer's instructions for operating power tools safely.
Preparing the Studs and Applying Thin-Set Mortar
The use of thin-set mortar is vital for creating a strong bond between the backer board and the studs. This helps to prevent movement and potential cracking of the tile. Apply a layer of thin-set mortar to the studs using a notched trowel. The specific size of the notch will depend on the manufacturer's recommendations for the type of backer board being used. The mortar should be applied evenly and consistently to all studs where the backer board will be installed. The purpose of the thin-set is not only adhesion but also to fill any minor gaps between the studs and the backer board, contributing to a flat and stable surface.
When applying the thin-set, work in manageable sections to prevent the mortar from drying out before the backer board can be installed. Pay particular attention to areas around the shower base or pan, ensuring a continuous bead of mortar to create a waterproof seal. Proper application of the thin-set is crucial for preventing water penetration and potential damage to the underlying structure.
Press the cut backer board sheets firmly against the mortar-covered studs. The board should be flush with the shower base or pan, leaving a small gap (approximately 1/8 inch) to allow for expansion and contraction. Use a level to ensure the backer board is plumb and properly aligned. If necessary, make adjustments before the mortar begins to set.
Fastening the Backer Board with Screws
Once the backer board is in place, it must be securely fastened to the studs using backer board screws. These screws are specifically designed for use with cement board and have a coating that resists corrosion in wet environments. Use a drill with a screw gun attachment to drive the screws through the backer board and into the studs. The screws should be spaced according to the manufacturer's recommendations, typically every 6 to 8 inches along the edges and every 8 to 12 inches in the field (center) of the board.
It is essential to drive the screws flush with the surface of the backer board, without over-tightening them. Over-tightening can damage the board and compromise its structural integrity. If a screw is stripped or driven in too deep, remove it and replace it with a new screw in a slightly different location. Ensure that all screws are properly embedded to provide a secure and lasting attachment.
When fastening the backer board around plumbing fixtures or shower controls, take extra care to avoid damaging the pipes or wiring. Pre-drill pilot holes if necessary to prevent the backer board from cracking. Use a hole saw to create precise openings for the fixtures. After installing the backer board, test the fit of the fixtures to ensure they align properly with the openings.
Taping and Mudding the Seams
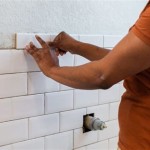
Once the backer board is securely fastened, the seams between the sheets must be taped and mudded to create a smooth and waterproof surface. Apply alkali-resistant mesh tape (seam tape) over all seams, corners, and screw heads. The tape should be centered over the seams and pressed firmly into place. This tape resists the alkalinity in the thin-set mortar and prevents it from deteriorating over time.
Using a joint compound knife, apply a thin layer of joint compound specifically formulated for cement board over the tape. The compound should be spread evenly and smoothly, feathering out the edges to blend seamlessly with the surrounding surface. Allow the first coat of compound to dry completely, according to the manufacturer's instructions. This may take several hours or overnight, depending on the humidity and temperature.
After the first coat of compound has dried, apply a second coat, again feathering out the edges. This coat should be slightly wider than the first coat, further smoothing the seams and creating a seamless surface. Again, allow the second coat to dry completely. If necessary, a third coat can be applied to achieve a perfectly smooth surface. Once the final coat is dry, lightly sand the seams with fine-grit sandpaper to remove any imperfections. Be careful not to sand too aggressively, as this can damage the tape or the backer board.
After sanding, remove any dust and debris with a damp cloth. The backer board is now ready for waterproofing and tiling. Before tiling, a waterproofing membrane should be applied over the entire surface of the backer board, especially in areas that will be exposed to direct water spray. This membrane will provide an additional layer of protection against water damage and help to ensure the longevity of the tiled surface. Follow the manufacturer's instructions for applying the waterproofing membrane, paying particular attention to the seams and corners.
Before tiling, it is recommended to prime the backer board with a primer specifically designed for use with cement board. This will improve the adhesion of the tile adhesive and help to prevent the tile from cracking or delaminating. Follow the manufacturer's instructions for applying the primer, allowing it to dry completely before tiling.
Following these steps will contribute to a properly installed backer board substrate, which is crucial for a successful and long-lasting tile shower installation. Consistent adherence to best practices will help to prevent water damage, mold growth, and costly repairs in the future. Always consult with a professional if you have any questions or concerns about the installation process.

The Best Way To Waterproof Your Shower Before Tiling Inspired Hive

Installing Cement Board In The Bathroom Angie S Roost

Tile Backerboard Material Options Fine Homebuilding

Tile Backer Board Installation Key Steps For A Quality Armchair Builder Blog Build Renovate Repair Your Own Home Save Money As An Owner

How To Install Shower Backerboard Hardieboard Cement Proper Installation Diy

How To Install Cement Board For Tile Projects Diy Family Handyman

Tile Installation Backer Board Around A Bathtub Family Handyman

Here S How Install A New Shower Stall With Tile Floor

Tile Backer Board Installation 60 Bathtub Surround Walls For Part 1

How To Install Goboard Tile Backer Board Diytileguy
Related Posts