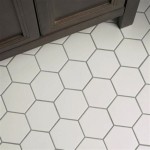
How to Fix Bathroom Floor Tile Grout
Bathroom floor tile grout, while seemingly a minor component, plays a critical role in the overall integrity and aesthetic appeal of a bathroom. It seals the gaps between tiles, preventing water from seeping beneath and causing structural damage. Additionally, grout contributes to the overall look and feel of the bathroom. Over time, grout can become stained, cracked, or even crumble, necessitating repair or replacement to maintain the functionality and appearance of the tiled surface. Addressing grout issues promptly prevents more significant and costly problems from developing. The following article will outline the common problems associated with bathroom floor tile grout and provide detailed instructions on how to effectively fix them.
Identifying Common Grout Problems
Before commencing any repair work, a thorough assessment of the grout is essential to identify the specific issues. This assessment will determine the appropriate repair methods and materials required. Common grout problems include:
Staining: Grout is porous and readily absorbs spills and dirt, leading to staining. This is particularly prevalent in high-traffic areas and around fixtures. Common culprits include soap scum, mildew, and hard water deposits. The color of the stains can vary depending on the source, ranging from light discoloration to dark, embedded marks.
Cracking: Cracks in grout are often caused by movement in the underlying subfloor or improper installation. Temperature and humidity fluctuations can also contribute to cracking. Small hairline cracks may seem insignificant, but they can allow water to penetrate, leading to more extensive damage. Large, visible cracks indicate a more serious underlying problem that needs to be addressed.
Crumbling: Crumbling grout, also known as grout deterioration, is typically a result of age, excessive moisture exposure, or the use of harsh cleaning chemicals. Over time, the grout loses its binding properties and begins to break down. This can lead to loose tiles and significant water damage. Regular exposure to standing water accelerates the crumbling process.
Missing Grout: In some cases, sections of grout may completely disappear, leaving gaps between the tiles. This is usually caused by wear and tear, aggressive cleaning practices, or impact damage. Missing grout significantly increases the risk of water damage and can create an environment conducive to mold and mildew growth. It also compromises the structural integrity of the tiled surface.
Mold and Mildew: The bathroom environment, with its high humidity and frequent moisture exposure, provides an ideal breeding ground for mold and mildew. These microorganisms thrive in porous grout, causing discoloration and potentially posing health risks. Mold and mildew are often black or green in color and have a distinctive musty odor.
Cleaning and Refreshing Grout
For minor staining and discoloration, cleaning and refreshing the grout may be sufficient. This approach is most effective when the grout is structurally sound and the staining is not deeply embedded. Several cleaning methods can be employed, ranging from simple household solutions to specialized grout cleaners.
Household Solutions: A mixture of baking soda and vinegar can be an effective cleaning agent for mild stains. Apply the paste to the grout lines, let it sit for 10-15 minutes, and then scrub with a stiff-bristled brush. Rinse thoroughly with clean water. Another option is a solution of warm water and dish soap. This is suitable for general cleaning and can help remove surface dirt and grime. For more stubborn stains, a solution of bleach and water (1 part bleach to 10 parts water) can be used, but it's crucial to wear gloves and eye protection, and ensure adequate ventilation. Always test any cleaning solution in an inconspicuous area first to ensure it does not damage the tile or grout.
Grout Cleaners: Numerous commercial grout cleaners are available, ranging from mild to heavy-duty formulations. Choose a cleaner specifically designed for the type of grout and tile you have. Follow the manufacturer's instructions carefully, paying attention to recommended application times and safety precautions. Some grout cleaners require pre-treatment of the grout with water, while others are designed to be applied directly to dry grout.
Steam Cleaning: Steam cleaners use high-pressure steam to dislodge dirt and grime from grout lines. They are an environmentally friendly option that does not require the use of harsh chemicals. Steam cleaning can be effective for removing surface stains and killing mold and mildew spores. However, it may not be sufficient for deeply embedded stains or significant grout discoloration. Ensure the steam cleaner is designed for use on tile and grout and follow the manufacturer's instructions.
Grout Pens: Grout pens are a convenient way to refresh the appearance of grout lines. They contain a pigmented sealant that covers stains and discoloration. These pens are available in a variety of colors to match existing grout. While grout pens can improve the aesthetic appearance of the grout, they do not address underlying structural issues. They are best suited for minor cosmetic improvements.
Repairing or Replacing Damaged Grout
When grout is cracked, crumbling, or missing, more extensive repairs are necessary. This involves removing the damaged grout and replacing it with new grout. This process requires patience and attention to detail to ensure a durable and aesthetically pleasing result.
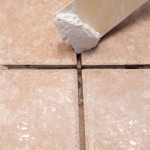
Removing Damaged Grout: The first step is to remove the existing damaged grout. Several tools can be used for this purpose, including a grout saw, a grout removal tool, or a rotary tool with a grout removal attachment. A grout saw is a manual tool that requires physical effort to scrape away the grout. A grout removal tool is a specialized hand tool designed for removing grout without damaging the tiles. A rotary tool with a grout removal attachment offers a faster and more efficient way to remove grout, but it requires careful handling to avoid scratching the tiles. Regardless of the tool used, exercise caution and work slowly to avoid damaging the surrounding tiles. Vacuum away any debris and dust after removing the grout.
Preparing the Area: Once the old grout has been removed, thoroughly clean the grout lines to remove any remaining debris or dust. A small brush and a vacuum cleaner can be used for this purpose. Ensure the area is completely dry before applying new grout. Dampness can prevent the grout from bonding properly and lead to premature failure. If necessary, use a hair dryer or a heat gun on a low setting to expedite the drying process.
Applying New Grout: Mix the new grout according to the manufacturer's instructions. The consistency should be similar to that of toothpaste. Use a rubber grout float to apply the grout to the grout lines, pressing it firmly into the gaps. Work in small sections and ensure that the grout fills the entire depth of the grout lines. Angle the grout float to remove excess grout from the tile surface. After applying the grout, allow it to set for the time recommended by the manufacturer, typically 15-30 minutes.
Cleaning the Tiles: Once the grout has partially set, use a damp sponge to wipe away any excess grout from the tile surface. Rinse the sponge frequently with clean water. Be careful not to remove too much grout from the grout lines. After the initial cleaning, allow the grout to cure completely according to the manufacturer's instructions, typically 24-72 hours. During the curing process, keep the area dry and avoid walking on the tiles.
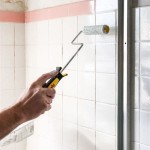
Sealing the Grout: After the grout has cured, apply a grout sealer to protect it from stains and water damage. Grout sealers are available in both penetrating and topical formulations. Penetrating sealers soak into the grout and create a barrier against moisture, while topical sealers form a protective coating on the surface of the grout. Apply the sealer according to the manufacturer's instructions, using a brush or applicator pad. Allow the sealer to dry completely before using the shower or exposing the floor to water. Reapply grout sealer periodically, typically every 6-12 months, to maintain its protective properties.
Preventive Measures to Maintain Grout
Preventing grout problems is often more effective and less costly than repairing them. Implementing a few simple preventive measures can significantly extend the lifespan of bathroom floor tile grout and maintain its appearance. These measures include:
Regular Cleaning: Clean the bathroom floor regularly with a mild detergent and water to remove dirt and grime before they can stain the grout. Avoid using harsh chemicals or abrasive cleaners, as these can damage the grout and accelerate its deterioration. A soft-bristled brush or sponge can be used to clean the grout lines. Regular cleaning helps prevent the buildup of soap scum, mildew, and hard water deposits.
Proper Ventilation: Ensure adequate ventilation in the bathroom to reduce humidity and prevent mold and mildew growth. Use the exhaust fan during and after showers and baths to remove excess moisture from the air. If the bathroom does not have an exhaust fan, consider installing one. Opening a window can also help improve ventilation.
Sealing Grout Regularly: As mentioned previously, grout sealer protects the grout from stains and water damage. Reapply grout sealer every 6-12 months, or as recommended by the manufacturer, to maintain its protective properties. Regularly inspect the grout for signs of wear and tear and reapply sealer as needed.
Prompt Spill Cleanup: Wipe up spills immediately to prevent them from staining the grout. Certain substances, such as coffee, tea, and red wine, can stain grout quickly if not cleaned up promptly. Use a clean cloth or sponge to absorb the spill and then clean the area with a mild detergent and water.
Use of Bath Mats and Shower Curtains: Place bath mats outside the shower or tub to absorb excess water and prevent it from soaking into the grout. Ensure shower curtains or doors are properly sealed to prevent water from splashing onto the floor. Regularly wash bath mats and shower curtains to prevent mold and mildew growth.
By following these preventive measures you can reduce the frequency of fixing bathroom floor tile grout and maintain its aesthetic and functional advantages for years to come.

How To Repair Ed Tile Grout An Easy Guide The Lived In Look

The Definitive Grout Repair Guide 5 Steps True Value

How To Prevent Expensive Bathroom Shower Tile And Grout Repair Promaster Home Handyman

How To Repair Ed Tile Grout An Easy Guide The Lived In Look

How To Repair Ed Tile Grout An Easy Guide The Lived In Look

Is Ed Grout A Problem Repair Easy The Medic

How To Fix Holes In Shower Grout The Experts

Ed Or Broken Grout Signals A Bigger Problem The Experts

How To Fix Ed Grout In Tile Floor Repair Tips

How To Regrout Bathroom Tile In 5 Easy Steps True Value
Related Posts