How Do You Install Wall Tile: A Comprehensive Guide
Installing wall tile can significantly enhance the aesthetic appeal and functionality of interior spaces like bathrooms, kitchens, and laundry rooms. While it might appear daunting, meticulous planning and a systematic approach can lead to a professional-looking result. This article provides a detailed guide to the process of wall tile installation, encompassing essential preparation, proper application techniques, and crucial finishing touches.
Preparing the Surface for Tile Installation
The longevity and success of any tile installation depend heavily on the preparation of the substrate. The substrate is the surface to which the tiles will be adhered. A stable, clean, and level surface is paramount. Inadequate preparation can lead to tile cracking, grout failure, and even tile detachment.
Firstly, the existing wall surface needs a thorough inspection. Identify any imperfections, such as cracks, holes, or loose paint. These blemishes must be addressed before proceeding. Use a patching compound to fill any holes or cracks, ensuring the compound dries completely and is sanded smooth to be flush with the surrounding surface. Remove any loose paint or wallpaper; these materials can interfere with the adhesion of the thin-set mortar.
Next, cleaning the surface is crucial for optimal bonding. Use a degreasing cleaner to remove any grease, oil, or dirt accumulation. Rinse thoroughly with clean water and allow the surface to dry completely. Even seemingly clean surfaces can harbor contaminants that impede proper adhesion.
Leveling the wall surface is another essential step. Examine the wall for any unevenness using a level. For minor imperfections, applying a self-leveling compound might suffice. However, for significant unevenness, consider installing cement backerboard. Cement backerboard provides a stable, waterproof, and impact-resistant surface that is ideal for tile installation, especially in wet environments like bathrooms and showers. Secure the backerboard to the wall studs using screws designed explicitly for this purpose, ensuring they are flush with the surface.
Once the wall is prepared and a backerboard is installed, if necessary, it's crucial to prime the surface. Priming enhances the bond between the thin-set mortar and the substrate. Choose a primer appropriate for the type of substrate and the tiling environment. Apply the primer evenly, following the manufacturer's instructions, and allow it to dry completely before proceeding.
Applying Thin-Set Mortar and Setting the Tiles
The application of thin-set mortar and the subsequent setting of the tiles are the core of the tile installation process. Precision and attention to detail are necessary to achieve a professional and aesthetically pleasing outcome.
Begin by selecting the appropriate thin-set mortar for the type of tile being used. Different types of tile, such as ceramic, porcelain, and natural stone, require specific types of thin-set mortar. Refer to the tile manufacturer's recommendations for the correct mortar type. Mix the thin-set mortar according to the manufacturer's instructions, paying close attention to the water-to-powder ratio. Achieving the correct consistency is crucial for adequate adhesion and workability. The mixture should be similar to peanut butter: pliable but not too runny. Let the mixture slake (sit undisturbed) for the recommended time before remixing briefly.
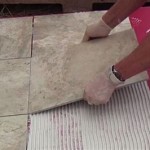
Using a notched trowel, apply the thin-set mortar to a small section of the wall. The size of the notched trowel depends on the size of the tiles. Consult the tile manufacturer's recommendations for the correct notch size. Hold the trowel at a 45-degree angle and apply even pressure to create consistent ridges in the mortar. Avoid applying too much mortar at once, as it can dry out before the tiles are set. Only apply mortar to an area that can be tiled within the open time of the mortar, typically 15-30 minutes. The open time refers to the period during which the mortar remains workable and capable of forming a strong bond.
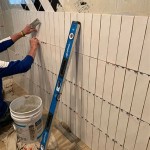
Immediately after applying the mortar, press the tiles firmly into place, using a slight twisting motion to ensure good contact. Use tile spacers to maintain consistent grout lines between the tiles. Proper spacing is essential for achieving a uniform appearance and allowing for grout to be applied evenly. Regularly check the alignment of the tiles using a level or a tile leveling system. Tile leveling systems can help to prevent lippage, which is when one tile sits higher than its neighbor, creating an uneven surface. These systems typically involve clips and wedges that are inserted between the tiles to keep them aligned during the mortar curing process.
As you progress, periodically wipe away any excess mortar from the tile surfaces with a damp sponge. Allow the thin-set mortar to cure completely according to the manufacturer's instructions. This curing process typically takes 24-72 hours. Do not disturb the tiles during this period to ensure a strong bond is formed.
Grouting and Sealing for a Finished Look
Grouting and sealing are the final steps in the tile installation process. These steps not only enhance the aesthetic appeal of the tile but also provide crucial protection against moisture and dirt.
Once the thin-set mortar has fully cured, remove the tile spacers. Clean the grout lines thoroughly, removing any debris or excess mortar. A grout saw or a utility knife can be helpful for removing stubborn mortar residues. Select a grout color that complements the tile. Mix the grout according to the manufacturer's instructions, paying close attention to the water-to-powder ratio. The consistency should be similar to that of the thin-set mortar. Let the mixture slake before mixing briefly, as you did with the thin-set mortar.
Using a grout float, apply the grout to the tile surface, working it into the grout lines at a 45-degree angle to ensure complete filling. Remove excess grout from the tile surface by holding the grout float at a near-vertical angle and scraping it across the tiles. After allowing the grout to set for the recommended time (typically 15-30 minutes), use a damp sponge to wipe away the remaining grout haze from the tile surface. Rinse the sponge frequently with clean water to avoid simply spreading the grout around. Several passes with the sponge may be needed to remove all the haze.
After the initial grout haze removal, allow the grout to cure completely according to the manufacturer's instructions. This curing process typically takes 24-72 hours. During this time, mist the grout with water periodically to help it cure properly and prevent cracking.
Once the grout has cured, apply a grout sealer to protect it from staining and moisture penetration. Choose a sealer appropriate for the type of grout used. Apply the sealer according to the manufacturer's instructions, typically using a brush or applicator. Allow the sealer to penetrate the grout for the recommended time before wiping away any excess. Sealing the grout is essential for maintaining its appearance and preventing the growth of mold and mildew.
Finally, inspect the completed tile installation for any imperfections, such as cracked tiles or uneven grout lines. Address any issues as needed to ensure a professional and lasting result.

How To Install Ceramic Wall Tile 13 Steps With Pictures

Installing Large Format Wall Tile Rogue Engineer

How To Install Wall Tile Howtospecialist Build Step By Diy Plans

How To Install Wall Tile In Bathroom

Installing Large Format Wall Tile Rogue Engineer

How To Install A Shower Tile Wall Bathroom

How To Install Wall Tiles A Step By Guide

Shower Tile Installation Step By Four Generations One Roof

How To Install Wall Tiles Transform Your Space

How To Install Wall Tile In Bathroom
Related Posts