Can You Tile On Block Wall?
Tiling directly onto a block wall presents unique challenges due to the wall's porous nature and potential for movement. While possible, proper preparation and material selection are crucial for a successful and long-lasting tile installation. This article explores the considerations and steps involved in tiling a block wall effectively.
Key Considerations Before Tiling a Block Wall
Several factors influence the success of tiling on a block wall. Addressing these upfront ensures a stable and aesthetically pleasing outcome. These considerations include the wall's location (interior or exterior), the type of block (concrete, cinder, etc.), the existing wall condition (e.g., presence of cracks or damage), and the type of tile being used.
Preparing the Block Wall Surface
Proper surface preparation is paramount for achieving strong tile adhesion and preventing future issues. This involves cleaning the wall thoroughly to remove dirt, debris, efflorescence, and any loose mortar. Repairing any cracks or damaged areas is essential to create a stable substrate. Depending on the block type and condition, a primer may be necessary to improve adhesion and reduce moisture absorption.
Choosing the Right Materials
Selecting appropriate materials significantly impacts the longevity and performance of the tiled surface. Using a high-quality, alkali-resistant tile adhesive specifically designed for use on block walls is crucial. The type of grout should also be compatible with the tile and the environment (e.g., sanded grout for wider joints, unsanded for narrower joints, and epoxy grout for wet areas). For exterior applications, using weather-resistant materials is essential.
Applying a Waterproofing Membrane (Optional but Recommended)
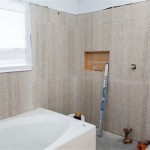
Applying a waterproofing membrane is a highly recommended step, particularly for areas exposed to moisture, such as bathrooms and shower walls. A waterproofing membrane creates a barrier against moisture penetration, protecting the block wall and the tile installation from water damage. This is particularly important in areas subject to freeze-thaw cycles, where trapped moisture can cause damage.
Applying the Tile Adhesive
The tile adhesive should be applied evenly to the prepared block wall surface using a notched trowel. The size of the notches depends on the size and type of tile being used. Applying the adhesive in manageable sections prevents it from drying out before the tiles are placed. Back-buttering individual tiles, especially larger format tiles, ensures full contact with the adhesive and minimizes the risk of voids.
Setting the Tiles
Tiles should be firmly pressed into the adhesive, ensuring proper alignment and spacing. Tile spacers help maintain consistent grout lines. Regularly checking the levelness of the tiles during installation is essential to avoid lippage (uneven tile surfaces). Excess adhesive should be removed promptly before it hardens.
Grouting the Tiles
Once the adhesive has cured according to the manufacturer's instructions, the grout can be applied. The grout should be worked into the joints completely, ensuring full coverage. Excess grout should be removed with a damp sponge before it dries completely. After the grout has cured, a sealant can be applied to protect the grout from staining and moisture.
Addressing Specific Block Wall Types
Different block types may require specific preparation methods. For example, cinder blocks are highly porous and may benefit from a thicker layer of adhesive or a scratch coat of mortar before tiling. Concrete blocks are generally denser and less absorbent, but still require thorough cleaning and priming. Autoclaved aerated concrete (AAC) blocks are lightweight and require specialized primers and adhesives due to their unique composition.
Dealing with Movement and Expansion
Block walls are subject to movement due to temperature changes and structural settling. Incorporating movement joints within the tile installation, particularly for larger areas, accommodates this movement and prevents cracking. Flexible sealant should be used in these joints to maintain waterproofing.
Long-Term Maintenance
Proper maintenance ensures the longevity of the tiled surface. Regular cleaning with appropriate tile cleaners prevents the buildup of dirt and grime. Inspecting the grout periodically for cracks or damage and resealing as needed helps maintain its water resistance. Addressing any issues promptly prevents more extensive damage.
Considerations for Exterior Block Walls
Tiling exterior block walls presents additional challenges due to exposure to the elements. Choosing frost-resistant tiles and adhesives is essential in climates with freeze-thaw cycles. Ensuring proper drainage behind the wall prevents moisture buildup and potential damage. Using a weather-resistant sealant on the grout protects it from weathering and deterioration.
Alternative Methods for Finishing Block Walls
While tiling is a viable option for finishing block walls, other methods exist, such as rendering or applying a skim coat of plaster. These alternatives can provide a smoother surface for painting or wallpapering. Choosing the best method depends on aesthetic preferences, budget, and the intended use of the space.

Tile Over Blockwork Mike Haduck

Tile Over Blockwork Mike Haduck

How To Install Ceramic Tile Over Painted Block Walls For A Shower Ehow

How To Lay Ceramic Tile Over Concrete Ron Hazelton

Tiling Over Cinder Block Diy Home Improvement Forum

Techniques For Installing Decorative Ceramic Tiles On Concrete Wall Install Steps

06 070 0104 Wall Tile Thinset On Concrete Masonry International Institute

Can I Put Tiles Over Painted Concrete Walls Ehow

How To Install Tile On Cinder Block Hunker

How To Install Ceramic Tiles On A Beautiful Concrete Wall Easily Construction Houses Step By
Related Posts