Can You Install Cork Flooring Over Tile? A Comprehensive Guide
The question of whether cork flooring can be installed over tile is a common one for homeowners considering a flooring upgrade. Cork, with its natural warmth, sound dampening properties, and eco-friendly appeal, presents an attractive alternative to traditional hard flooring. Tile, often found in kitchens and bathrooms, offers durability and water resistance. Combining these two materials raises crucial questions about feasibility, preparation, and long-term performance. This article explores the complexities of installing cork flooring over tile, providing a comprehensive overview of the factors to consider.
Directly installing any flooring material over an existing surface offers benefits, primarily saving time and labor associated with demolition and disposal. However, it also introduces potential drawbacks. The success of installing cork over tile hinges on several critical factors that must be thoroughly assessed before proceeding. These factors include the condition of the existing tile, the type of cork flooring being installed, and the preparation methods employed.
Key Point 1: Assessing the Existing Tile Substrate
The primary requirement for installing cork flooring over tile is a stable, level, and sound substrate. This means the existing tile installation must be free of loose, cracked, or uneven tiles. Any imperfections in the tile surface will telegraph through to the cork flooring, creating an uneven and potentially unstable surface. The goal is to create a flat, consistent surface upon which the cork can be properly adhered or installed.
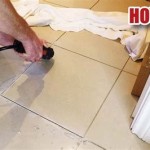
A thorough inspection of the tile is the first step. Look for cracked or broken tiles, loose tiles that move when stepped on, and any signs of water damage or mold. Pay particular attention to grout lines; crumbling or missing grout can indicate underlying problems. Using a level, check for any significant dips or rises in the tile surface. Minor imperfections may be addressed with patching compounds, but major unevenness will require more extensive remediation.
Repairing any issues with the existing tile is crucial. Loose tiles should be removed and re-set with thin-set mortar. Cracked tiles should be replaced. Grout lines should be thoroughly cleaned and re-grouted as needed. Any unevenness exceeding the manufacturer's recommendations for the cork flooring should be addressed with a self-leveling compound. This compound is poured over the tile surface and allowed to dry, creating a perfectly level plane for the cork to be installed.
Furthermore, the cleanliness of the tile surface is of paramount importance. Dirt, grease, and other contaminants can interfere with the adhesion of the cork flooring. The tile surface must be thoroughly cleaned with a degreasing cleaner and allowed to dry completely before any further steps are taken. Sanding the tile surface lightly can also improve adhesion by creating a slightly rougher profile.
Key Point 2: Choosing the Right Type of Cork Flooring
The type of cork flooring being installed significantly impacts the feasibility of an over-tile installation. Cork flooring is generally available in two main forms: cork tiles and cork floating floors (also known as cork planks). Each type possesses different installation requirements and suitability for installation over tile.
Cork tiles are typically glued directly to the substrate. This method requires a very smooth and even surface for proper adhesion. Given the potential for grout lines and slight imperfections in tile installations, cork tiles are generally less forgiving when installed directly over tile. The adhesive used must be compatible with both the tile and the cork. Furthermore, the thin profile of cork tiles often makes them less effective at concealing any minor discrepancies in the underlying tile surface.
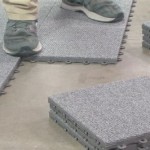
Cork floating floors, on the other hand, are designed to interlock and "float" over the subfloor. They do not require being glued down. This type of installation is often more forgiving when installed over tile, as the floating construction can better bridge minor imperfections. However, a level underlayment is still recommended to create a more uniform surface and provide additional cushioning. A thin foam or cork underlayment can help to minimize any telegraphing of grout lines and provide additional sound insulation.
Consider the thickness of the cork flooring. Thicker cork planks or tiles will generally be more effective at masking any minor imperfections in the tile surface. The thicker the material, the greater its capacity to bridge slight dips or rises without compromising the integrity of the flooring.
Ultimately, consulting the cork flooring manufacturer's recommendations is crucial. Some manufacturers may explicitly prohibit installing their products over tile, while others may provide specific guidelines for acceptable installation practices. Adhering to these recommendations will ensure the warranty remains valid and that the flooring performs as intended.
Key Point 3: Preparation and Installation Techniques
Proper preparation and installation techniques are essential for a successful cork flooring installation over tile. Even with a stable and level tile substrate and the right type of cork flooring, improper installation can lead to problems such as buckling, gapping, and adhesive failure.
As previously mentioned, thorough cleaning of the tile surface is critical. After cleaning, consider applying a primer that is compatible with both the tile and the adhesive recommended for the cork flooring. A primer will improve the adhesion between the tile and the cork, preventing the flooring from lifting or peeling over time.
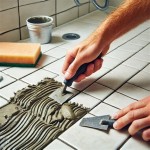
For cork tile installations, use a high-quality adhesive specifically designed for bonding cork to non-porous surfaces such as tile. Apply the adhesive evenly using a notched trowel, ensuring consistent coverage. Follow the manufacturer's instructions for open time (the time allowed for the adhesive to become tacky before applying the cork tiles). Press each tile firmly into place, ensuring good contact with the adhesive. Use a roller to further ensure adhesion and eliminate any air pockets.
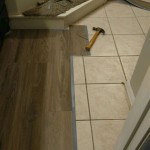
For cork floating floor installations, install an appropriate underlayment. This underlayment will provide cushioning and prevent any telegraphing of imperfections from the tile. Roll out the underlayment according to the manufacturer's instructions, ensuring that the seams are taped together securely. Begin installing the cork planks, following the manufacturer's instructions for the interlocking system. Use spacers along the walls to allow for expansion and contraction of the flooring due to changes in temperature and humidity.
When cutting cork flooring, use a sharp utility knife or a specialized cork flooring cutter. Precision is essential to achieve a seamless and professional-looking installation. Take accurate measurements and make clean, straight cuts. For complex cuts around pipes or door frames, use a template to ensure accuracy.
After the installation is complete, allow the adhesive (for cork tile installations) or the flooring (for cork floating floor installations) to cure or acclimate according to the manufacturer's instructions before placing furniture or heavy objects on the floor. This will allow the flooring to stabilize and minimize the risk of damage or movement.
Maintaining consistent temperature and humidity levels within the room is crucial both before and after the installation. Extreme temperature fluctuations can cause the cork to expand or contract, potentially leading to buckling or gapping. A stable environment will help ensure the long-term performance and appearance of the cork flooring.
In summary, installing cork flooring over tile is a project that requires careful planning, meticulous preparation, and adherence to manufacturer's recommendations. By thoroughly assessing the existing tile, choosing the appropriate type of cork flooring, and employing proper installation techniques, homeowners can successfully transform their spaces with the natural beauty and comfort of cork.

Advantages Of A Cork Floating Floor Over Glue Down Tiles Cancork

Cork Flooring Tiles Or Floating Floor Icork

Advantages Of A Cork Floating Floor Over Glue Down Tiles Cancork

How To Install A Cork Floor Young House Love

Complete Guide To Cork Flooring Installation Deerfoot Carpet

How To Install A Cork Floor Young House Love

Cork Flooring Pros And Cons Is It The Right Choice For You

Complete Guide To Cork Flooring Installation Deerfoot Carpet

Advantages Of A Cork Floating Floor Over Glue Down Tiles Cancork

How To Install A Cork Floor Young House Love
Related Posts