How to Install Tile Backsplash in a Bathroom Wall
Installing a tile backsplash in a bathroom can dramatically enhance the aesthetic appeal of the space while also providing a practical, water-resistant surface that protects the wall from moisture damage. This project is achievable for many homeowners with basic DIY skills, provided they follow a meticulous approach and adhere to established tiling techniques. This article outlines the complete process of installing a tile backsplash in a bathroom, from initial planning and preparation to the final grouting and sealing stages.
Before commencing the installation, careful planning is crucial. This includes selecting the appropriate tile type, measuring the surface area to be covered, and acquiring all necessary tools and materials. Rushing into the project without proper preparation can lead to errors, increased material waste, and a less-than-desirable final result.
Key Planning and Preparation Steps
The initial step involves an accurate assessment of the project area. Measure the length and height of the backsplash area, taking into account any obstructions such as outlets, plumbing fixtures, or windows. Add an extra 10-15% to the total tile quantity to account for cuts, breakage, and potential pattern matching requirements. This allowance helps ensure sufficient materials are available to complete the project without interruption.
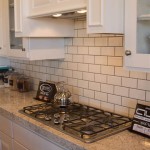
Selecting the right type of tile is also critical. Ceramic and porcelain tiles are popular choices for bathroom backsplashes due to their durability, water resistance, and wide range of available colors, sizes, and patterns. Glass tiles offer a modern aesthetic but can be more challenging to cut and install. Natural stone tiles, such as marble or granite, provide a luxurious look but may require more maintenance and specialized sealants. Consider the overall bathroom design and budget when choosing the tile material.
The tools required for this project include a tile cutter (either a snap cutter or a wet saw), a notched trowel, a margin trowel, a grout float, a sponge, a level, a measuring tape, a pencil, safety glasses, gloves, and a dust mask. Additional materials include tile adhesive (thin-set mortar), grout, tile spacers, sealant, and clean cloths. Gathering all necessary tools and materials before starting the installation will streamline the process and minimize downtime.
Prior to tile installation, the wall surface must be properly prepared. This typically involves cleaning the wall to remove any dirt, grease, or loose paint. A clean surface ensures proper adhesion of the thin-set mortar. If the wall is painted with a glossy paint, it may be necessary to lightly sand the surface to create a better bond. For drywall, it is recommended to apply a primer specifically designed for tiling to seal the surface and improve adhesion.
Locate and mark studs behind the wall using a stud finder. These locations can be useful for securing any additional support, such as a ledger board, if necessary. Determine the layout of the tiles, considering the desired pattern and the placement of any decorative elements. Dry-fitting the tiles on the floor before installation can help visualize the final result and identify any potential cutting challenges.
The use of a ledger board is often recommended, especially for larger tile installations. A ledger board is a temporary horizontal support attached to the wall that provides a level starting point for the first row of tiles. This prevents the tiles from sliding down the wall while the thin-set mortar is setting. The ledger board should be positioned at the bottom edge of the first row of tiles, ensuring it is perfectly level. Use screws to secure the ledger board to the wall studs.
Applying Thin-Set Mortar and Installing Tiles
With the wall prepared and the layout planned, the next step is to apply the thin-set mortar. Mix the thin-set mortar according to the manufacturer's instructions, ensuring a smooth, consistent consistency. Avoid adding too much water, as this can weaken the mortar and affect its bonding properties. Use a margin trowel to scoop the mortar from the bucket and apply it to the wall surface.
Employ the notched trowel to create ridges in the thin-set mortar. The size of the notches on the trowel should be appropriate for the size and type of tile being used. Hold the trowel at a 45-degree angle and apply even pressure to create uniform ridges. These ridges provide a greater surface area for the tile to adhere to the mortar, ensuring a strong bond. Apply the thin-set mortar in small sections, typically no more than 2-3 square feet at a time, to prevent it from drying out before the tiles are installed.
Carefully place the tiles onto the thin-set mortar, pressing them firmly into place. Use tile spacers to maintain consistent grout lines between the tiles. These spacers ensure a uniform appearance and prevent the tiles from shifting during the drying process. Insert the spacers at each corner of the tile, pressing them in until they are flush with the tile surface. For larger tiles, it may be necessary to use more than one spacer per side.
As you install the tiles, periodically check for level using a level. Make any necessary adjustments to ensure the tiles are aligned correctly. If a tile is not level, gently tap it with a rubber mallet to adjust its position. Remove any excess thin-set mortar from the tile surface with a damp sponge. Allow the thin-set mortar to dry completely according to the manufacturer's instructions, typically 24-48 hours, before proceeding to the grouting stage.
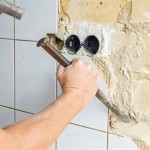
Cutting tiles is an inevitable part of most backsplash installations. A snap cutter is suitable for straight cuts on ceramic and porcelain tiles. Score the tile with the cutter and then apply pressure to snap it along the score line. For more complex cuts, such as around outlets or pipes, a wet saw is recommended. A wet saw uses a diamond-tipped blade and a continuous flow of water to make precise cuts without chipping or cracking the tile. Always wear safety glasses when cutting tiles to protect your eyes from debris.
When cutting around outlets or pipes, carefully measure the dimensions of the opening and transfer those measurements to the tile. Use a wet saw to make the necessary cuts, taking care to avoid overcutting. For small, intricate cuts, a tile nipper can be used to gradually trim the tile to the desired shape. After cutting the tile, smooth the edges with a rubbing stone to remove any sharpness.
Grouting and Sealing the Tile Backsplash
Once the thin-set mortar has fully cured, remove the tile spacers and prepare to grout the backsplash. Mix the grout according to the manufacturer's instructions, ensuring a smooth, consistent consistency. Choose a grout color that complements the tile and the overall bathroom design. Apply the grout to the tile surface using a grout float, working it into the grout lines at a 45-degree angle. Ensure all grout lines are completely filled.
After applying the grout, remove the excess grout from the tile surface with a damp sponge. Use a circular motion to wipe away the grout, rinsing the sponge frequently. Avoid using too much water, as this can weaken the grout and affect its color. Allow the grout to dry slightly, typically 15-30 minutes, before polishing the tile surface with a clean, dry cloth. This removes any remaining grout haze and reveals the clean, finished tile surface.
After the grout has fully cured, typically 24-72 hours, apply a grout sealant to protect the grout from stains and moisture penetration. A grout sealant helps prevent the grout from absorbing water, which can lead to mold and mildew growth. Apply the sealant according to the manufacturer's instructions, using a small brush or applicator. Wipe away any excess sealant from the tile surface with a clean cloth. Allow the sealant to dry completely before exposing the backsplash to water.
The final step is to apply a bead of sealant along the edges of the backsplash where it meets the countertop or other surfaces. This sealant creates a watertight barrier, preventing water from seeping behind the tiles and causing damage. Use a high-quality silicone sealant that is specifically designed for bathroom use. Apply the sealant in a smooth, even bead and then smooth it with a wet finger or a sealant smoothing tool. Remove any excess sealant with a damp cloth.
Regular maintenance is essential to keep the tile backsplash looking its best. Clean the backsplash regularly with a mild soap and water solution. Avoid using abrasive cleaners, as these can scratch the tile surface. Inspect the grout lines periodically for any signs of cracking or damage and reapply grout sealant as needed. By following these simple maintenance tips, the tile backsplash will provide years of beauty and protection.

Small Bathroom Remodel Easy Diy Tile Backsplash Engineer Your Space

How To Install A Backsplash On Vanity Bowed Wall

How To Install A Tile Backsplash Easily Our Home Made Easy

Diy Bathroom Adhesive Tile Backsplash The Home Depot

How To Install A Backsplash On Vanity Bowed Wall

Small Bathroom Remodel Easy Diy Tile Backsplash Engineer Your Space

One Project At A Time Diy Blog 186 Bathroom Backsplash Tile

Simple Subway Tile Backsplash Diy For Beginners Building Bluebird

Diy Bathroom Adhesive Tile Backsplash The Home Depot

Backsplash Advice For Your Bathroom Would You Tile The Side Walls Too Designed
Related Posts