What Do I Need to Install Wall Tile in Bathrooms?
Installing wall tile in a bathroom is a project that can significantly enhance its aesthetic appeal and functionality. However, successfully completing this endeavor requires careful planning and gathering the appropriate tools and materials. A comprehensive understanding of the necessary components ensures a smooth installation process and a durable, visually pleasing result. This article outlines the essential elements needed to install wall tile in bathrooms, covering preparation, application, and finishing aspects.
Essential Tools for Wall Tile Installation
A curated set of tools is paramount for efficient and precise tile installation. These tools facilitate accurate measurements, clean cuts, and secure tile adhesion, contributing to the overall quality and longevity of the tiled surface.
Measuring Tools: Accurate measurements are the foundation of any successful tiling project. A measuring tape, ideally one that extends to at least 25 feet, is crucial for determining the dimensions of the wall surface to be tiled. A level, typically a spirit level or a laser level, ensures that the tiles are installed horizontally and vertically aligned. A combination square can assist in marking right angles and accurately transferring measurements to the tiles for cutting. Finally, a tile layout stick, whether pre-made or self-constructed, helps visualize the tile arrangement and identify potential issues before the adhesive is applied.
Cutting Tools: Cutting tiles to fit around fixtures, corners, and edges is inevitable. A tile cutter, either a manual snap cutter or a wet saw, is essential for achieving clean, precise cuts. Manual snap cutters are suitable for straight cuts on ceramic and porcelain tiles up to a certain thickness, while wet saws are more versatile and can handle thicker tiles, including natural stone and glass. Tile nippers are helpful for making small, irregular cuts or shaping tiles around curved surfaces. A scoring tool, often integrated into the manual snap cutter, is used to create a score line on the tile before breaking it along the line.
Application Tools: Applying the adhesive and grout requires specific tools to ensure even distribution and proper bonding. Trowels, specifically notched trowels, are used to apply the thin-set mortar or adhesive to the wall surface. The size of the notch on the trowel determines the thickness of the adhesive layer, which should be chosen according to the tile size and type. A grout float is used to press grout into the spaces between the tiles, ensuring that they are completely filled. Sponges, both dry and damp, are necessary for cleaning excess grout from the tile surface and achieving a clean, professional finish.
Safety Gear: Protecting oneself during the tiling process is paramount. Safety glasses are essential to shield the eyes from tile shards and dust. Work gloves protect the hands from cuts, scrapes, and prolonged exposure to mortar and grout. A dust mask or respirator is crucial for preventing inhalation of dust particles, especially when cutting tiles with a dry saw or mixing powdered mortar. Knee pads provide comfort and support during extended periods of kneeling.
Necessary Materials for Wall Tile Installation
The choice of materials directly impacts the durability, aesthetics, and ease of maintenance of the tiled surface. Selecting appropriate materials for the specific bathroom environment is crucial for long-term performance.
Tiles: The type of tile chosen is a matter of personal preference, but considerations regarding water resistance, durability, and ease of cleaning are important. Ceramic tiles are a popular choice due to their affordability, wide range of styles, and water resistance. Porcelain tiles are denser and more durable than ceramic tiles, making them suitable for high-moisture areas. Natural stone tiles, such as marble and granite, offer a luxurious appearance but require more maintenance and sealing. Glass tiles add a modern touch but can be more challenging to install. The quantity of tiles should be calculated meticulously, accounting for waste due to cuts and potential breakage. It is generally advisable to purchase 10-15% more tiles than the calculated area to accommodate unforeseen circumstances.
Adhesive: The adhesive, typically thin-set mortar, is responsible for bonding the tiles to the wall surface. The type of adhesive should be chosen based on the type of tile being used and the specific requirements of the substrate. Modified thin-set mortars are generally recommended for most bathroom tile installations, providing enhanced adhesion and flexibility. Pre-mixed adhesives are available for small projects but are generally less durable and more expensive than powdered mortars. Factors such as water exposure and substrate material influence the choice of appropriate adhesive.
Grout: Grout fills the spaces between the tiles, providing a watertight seal and enhancing the overall appearance of the tiled surface. The choice of grout depends on the tile type, joint width, and desired aesthetic. Cement-based grout is the most common type, available in sanded and unsanded varieties. Sanded grout is suitable for wider grout lines (typically 1/8 inch or wider), while unsanded grout is used for narrower grout lines. Epoxy grout is more expensive but offers superior stain resistance, durability, and water resistance, making it ideal for high-moisture areas like showers. The grout color should complement the tile color and the overall bathroom design.
Sealer: Sealers are applied to grout and some types of tiles, particularly natural stone, to protect them from staining and water damage. Grout sealers penetrate the grout and create a barrier against moisture and dirt. Tile sealers, designed for porous tiles like natural stone, protect the surface from staining and etching. The type of sealer should be chosen based on the specific material being sealed and the manufacturer's recommendations.
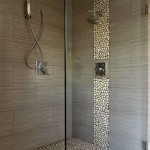
Waterproofing Membrane: In wet areas such as showers and tub surrounds, a waterproofing membrane is essential to prevent water from penetrating the substrate and causing damage. Various types of waterproofing membranes are available, including liquid-applied membranes, sheet membranes, and cementitious membranes. Liquid-applied membranes are easy to apply with a brush or roller and form a seamless, waterproof barrier. Sheet membranes are pre-fabricated sheets that are adhered to the substrate with thin-set mortar. Cementitious membranes are applied like mortar and provide a waterproof and crack-resistant layer. The choice of waterproofing membrane depends on the specific application and personal preference.
Preparation and Finishing Materials
Beyond the core tools and materials, certain ancillary items are crucial for preparing the surface and achieving a professional finish. These materials contribute to the overall durability and aesthetic appeal of the tiled surface.
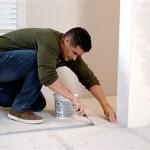
Substrate Preparation Materials: Proper substrate preparation is critical for ensuring that the tiles adhere securely and the tiled surface remains stable over time. This includes backer boards like cement boards for walls. These boards provide a stable and moisture-resistant base for the tiles. Fasteners, such as screws or nails, are used to secure the backer board to the wall studs. Seam tape is used to reinforce the joints between backer boards, preventing cracks from forming in the grout. Self-leveling compound may be necessary to level uneven floors or walls before tiling.
Cleaning Supplies: Cleanliness is essential throughout the tile installation process. Buckets are needed for mixing mortar and grout. Sponges are used for cleaning excess grout and adhesive from the tile surface. Clean cloths are necessary for wiping down the tiles and removing dust and debris. A grout haze remover is specifically designed to remove the stubborn haze that remains on the tile surface after grouting.
Caulk: Caulk is used to seal gaps between the tiled surface and other surfaces, such as bathtubs, showers, and countertops. Caulk prevents water from penetrating behind the tiles and causing damage. Silicone caulk is a popular choice for bathrooms due to its flexibility, water resistance, and mildew resistance. Acrylic caulk is another option, but it is less flexible than silicone caulk. The caulk color should match the grout color for a seamless appearance.
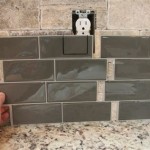
Spacers: Tile spacers are small plastic pieces that are placed between the tiles during installation to ensure consistent grout lines. Spacers are available in various sizes to create different grout line widths. Using spacers helps to create a uniform and professional-looking tile installation.
By meticulously gathering these tools and materials – measuring and cutting tools, appropriate tiles, adhesives, grout, sealers, waterproofing membranes, and related supplies – the individual undertaking a bathroom wall tile installation project can significantly increase the likelihood of a successful and enduring outcome. Thorough preparation and careful execution are keys to achieving a professional finish and maximizing the longevity of the tiled surface.

Shower Tile Installation Step By Four Generations One Roof

How To Tile A Bathroom Shower Walls Floor Materials 100 Pics Pro Tips

How To Tile Shower Or Tub Walls Step By

How To Install A Shower Tile Wall Bathroom

How To Install L And Stick Tiles On A Wall My Uncommon Slice Of Suburbia

The Complete Guide To Installing Tile On Shower Or Bathtub Walls

10 Tips To Install Subway Tile In Your Bathroom

How To Install Wall Tile In Bathroom Howtospecialist Build Step By Diy Plans

How To Install A Tile Shower Like Pro For Beginners Sunnyside Home

How To Install Subway Tile In A Shower Young House Love
Related Posts