What Do I Need to Install Wall Tile in a Bathroom?
Installing wall tile in a bathroom is a significant undertaking that can dramatically enhance the aesthetic appeal and functionality of the space. Success in this project hinges not only on careful planning and execution, but also on gathering the right tools and materials. The following details the essential components required for a successful bathroom wall tile installation.
Tile Selection and Quantity
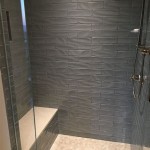
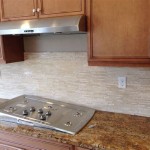
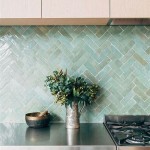
The first step involves selecting the appropriate tile. Bathroom tiles are available in a wide variety of materials, including ceramic, porcelain, glass, and natural stone. Each material offers distinct advantages and disadvantages in terms of durability, water resistance, maintenance requirements, and aesthetic qualities. Ceramic tiles are a popular choice due to their affordability and ease of maintenance. Porcelain tiles are denser and more water-resistant, making them suitable for areas exposed to frequent moisture. Glass tiles offer a unique visual appeal and are highly water-resistant, but can be more challenging to install. Natural stone tiles, such as marble or granite, provide a luxurious look but require ongoing sealing and maintenance.
Once the tile material has been selected, determine the desired size, shape, and color. The size of the tile can impact the visual perception of the bathroom. Larger tiles can make a small bathroom appear more spacious, while smaller tiles can create intricate patterns. The shape of the tile, such as square, rectangular, or mosaic, also contributes to the overall design aesthetic. Consider the existing bathroom fixtures and décor when choosing a color to ensure a cohesive and harmonious look.
Accurately calculating the required tile quantity is critical to avoid running short mid-project or purchasing excess materials. Measure the area of each wall to be tiled in square feet. Add an additional 10-15% to account for cuts, breakage, and potential errors. This buffer ensures sufficient material to complete the installation without interruption.
In addition to the field tile that covers the majority of the wall, consider decorative accents or border tiles. Accent tiles can add visual interest and break up the monotony of a single tile design. Border tiles can be used to create a finished edge or frame a specific area. Calculate the linear footage required for these accent or border tiles and add it to the overall tile order.
Essential Tools for Tile Installation
Successful tile installation requires a specific set of tools designed for cutting, setting, and grouting tile. These tools ensure precision, efficiency, and a professional-looking finished product.
A tile cutter is indispensable for making clean and accurate cuts. A snap cutter is suitable for cutting ceramic and porcelain tiles up to a certain thickness. For thicker or more difficult-to-cut tiles, a wet saw with a diamond blade is recommended. A wet saw uses water to cool the blade and reduce dust, resulting in cleaner and more precise cuts. A tile nipper is useful for making small, irregular cuts or shaping tiles around obstacles.
A notched trowel is used to apply the thin-set mortar to the wall. The size and shape of the notches determine the amount of mortar applied and the bond strength between the tile and the substrate. Consult the tile manufacturer's recommendations for the appropriate trowel size and notch configuration for the selected tile. A square or rectangular notch trowel is commonly used for most wall tile installations.
A rubber grout float is used to apply grout to the tile joints. The float's smooth surface allows for even distribution of the grout without scratching the tile surface. A grout sponge, along with a bucket of clean water, is essential for cleaning excess grout from the tile surface after application. Use the sponge to wipe the tile diagonally across the grout lines to avoid pulling grout out of the joints.
A level is crucial for ensuring that the tiles are installed straight and plumb. A spirit level or laser level can be used to establish a level starting line and check the alignment of each row of tiles. Tile spacers are used to maintain consistent grout lines between tiles. These spacers are available in various sizes to accommodate different design preferences. A measuring tape is used to accurately measure distances and mark cutting lines on the tiles. A pencil or marker is used to transfer measurements and outlines onto the tiles before cutting.
Other useful tools include a utility knife for scoring drywall or cutting sealant, a paint scraper for removing old adhesive or grout, a rubber mallet for gently tapping tiles into place, and safety glasses and gloves for protecting oneself from dust, debris, and chemicals.
Necessary Materials Beyond Tiles
In addition to the tiles themselves, several other materials are required for a successful bathroom wall tile installation. These materials ensure a strong, durable, and water-resistant installation.
Thin-set mortar is the adhesive used to bond the tiles to the wall substrate. It is available in various formulations, including pre-mixed and powder forms. Powdered thin-set mortar requires mixing with water or a latex additive to achieve the desired consistency. Select a thin-set mortar that is specifically designed for the type of tile being used and the substrate to which it will be applied. Look for a thin-set mortar that is rated for wet environments and has good adhesion properties.
Grout is used to fill the spaces between the tiles. It serves to seal the joints, prevent water from penetrating behind the tiles, and provide a finished look. Grout is available in sanded and unsanded varieties. Sanded grout is typically used for wider grout lines (1/8 inch or greater), while unsanded grout is used for narrower grout lines. Choose a grout color that complements the tile and the overall bathroom design. Consider using an epoxy grout for areas exposed to frequent moisture or harsh chemicals, as epoxy grout is more stain-resistant and durable than cement-based grout.
A waterproofing membrane is essential for areas of the bathroom that are frequently exposed to water, such as the shower or bathtub surround. This membrane creates a barrier that prevents water from penetrating the substrate and causing damage. Liquid waterproofing membranes are applied with a brush or roller, while sheet membranes are adhered to the substrate with thin-set mortar. Ensure that the waterproofing membrane is compatible with the thin-set mortar and grout being used.
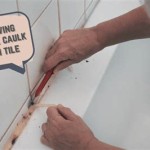
Caulk is used to seal gaps between the tile and other surfaces, such as the bathtub, shower pan, or countertop. Caulk prevents water from entering behind the tile and causing damage. Choose a caulk that is specifically designed for wet environments and is mildew-resistant. Silicone caulk is a popular choice due to its flexibility and water resistance. Acrylic caulk is another option, but it is less flexible than silicone caulk.
Backer board provides a stable and water-resistant substrate for the tile. Cement backer board is the most common choice for bathroom wall tile installations. It is resistant to moisture and mold growth, and it provides a strong surface for the tile to adhere to. Gypsum-based backer boards are also available, but they are not as water-resistant as cement backer boards. Secure the backer board to the wall studs with screws specifically designed for backer board.
Painter's tape is useful for protecting adjacent surfaces from thin-set mortar, grout, and caulk. Apply painter's tape to the edges of bathtubs, countertops, and other fixtures before starting the tile installation. This will make cleanup easier and prevent damage to these surfaces.
A primer is used to prepare the substrate for the thin-set mortar. Primer improves the adhesion of the thin-set mortar and prevents it from drying out too quickly. Choose a primer that is compatible with the substrate and the thin-set mortar being used.
Surface Preparation Essentials
Prior to commencing the tile installation, meticulous preparation of the wall surface is paramount. A clean, level, and stable substrate is essential for ensuring proper tile adhesion and preventing future problems such as cracking or detachment.
Begin by removing any existing wall coverings, such as wallpaper, paint, or old tile. Use a scraper or heat gun to loosen stubborn wallpaper or paint. Ensure that the surface is free of any loose debris, dust, or grease. Clean the wall with a mild detergent and water to remove any remaining contaminants. Rinse thoroughly and allow the surface to dry completely.
Inspect the wall for any damage, such as cracks, holes, or uneven areas. Repair any damage with patching compound or joint compound. Allow the patching compound to dry completely before sanding it smooth. Ensure that the surface is level and plumb. Use a level and shims to correct any uneven areas. If the wall is severely uneven, consider applying a skim coat of joint compound to create a smooth and level surface.
If the wall is painted with a glossy paint, sand the surface to create a better grip for the thin-set mortar. Use a medium-grit sandpaper to roughen the surface. Wipe away any sanding dust with a damp cloth. Apply a primer to the wall to improve the adhesion of the thin-set mortar. The primer will also prevent the thin-set mortar from drying out too quickly.
Ensure that the wall is structurally sound and can support the weight of the tile. If the wall is weak or unstable, reinforce it with additional framing or backer board. Check that all plumbing and electrical fixtures are properly installed and accessible before starting the tile installation. Turn off the water supply and electricity to the bathroom to prevent accidents.
Properly preparing the surface is a critical step in the tile installation process. Taking the time to thoroughly clean, repair, and level the wall will ensure a successful and long-lasting tile installation.

Shower Tile Installation Step By Four Generations One Roof

How To Tile A Bathroom Wall With Wickes

How To Tile A Bathroom Shower Walls Floor Materials 100 Pics Pro Tips

Part 1 How To Install Tile On Shower Tub Wall Step By

The Complete Guide To Installing Tile On Shower Or Bathtub Walls

How To Install Wall Tile In Bathroom Howtospecialist Build Step By Diy Plans

How To Install Tile On The Bathroom Wall Step By

How To Install L And Stick Tiles On A Wall My Uncommon Slice Of Suburbia

Tile Edge Trim Selection And Installation Tips From A Pro

How To Install A Shower Tile Wall Bathroom
Related Posts