What Do I Need to Install Wall Tile?
Installing wall tile is a common home improvement project that can dramatically enhance the aesthetic appeal and functionality of various spaces, such as bathrooms, kitchens, and entryways. Successfully completing this project requires careful planning and the proper tools and materials. This article provides a comprehensive overview of the essential items needed for wall tile installation, ensuring a professional and lasting result.
Essential Tools for Wall Tile Installation
The following tools are crucial for preparing the surface, cutting tiles, applying mortar, and achieving a polished final product. Investing in quality tools will contribute significantly to the success and efficiency of the tile installation process.
1. Measuring Tape: Precise measurements are fundamental to proper tile layout. A measuring tape is essential for determining the dimensions of the wall, calculating tile quantities, and marking cut lines accurately. A steel measuring tape that extends at least 25 feet is recommended for most wall tiling projects.
2. Level: Maintaining a level surface is paramount for a visually appealing and structurally sound tile installation. A level, typically 4 feet in length, is used to ensure that each row of tiles is perfectly horizontal or vertical. A spirit level, which utilizes a bubble in a liquid, is commonly used for this purpose. Avoid relying solely on the "eye" as even slight deviations can become significantly noticeable across the entire wall.
3. Tile Cutter: Cutting tiles to fit around corners, fixtures, or at the edges of the wall is a necessity. A manual tile cutter, also known as a snap cutter, is suitable for cutting ceramic and porcelain tiles. It scores the tile and then applies pressure to create a clean break. For larger, thicker, or more complex cuts, a wet saw is recommended. A wet saw utilizes a diamond-tipped blade and a water reservoir to cool the blade and minimize dust during cutting. It is essential to wear appropriate safety gear, such as eye protection, when operating a tile cutter or wet saw.
4. Notched Trowel: A notched trowel is used to apply the mortar (thin-set adhesive) to the wall. The notches create ridges in the mortar, ensuring proper adhesion of the tiles and allowing air to escape. The size of the notches on the trowel is determined by the size and type of tile being used. Consult the mortar manufacturer's recommendations for the appropriate notch size. Common notch sizes include 1/4" x 1/4", 3/8" x 3/8", and 1/2" x 1/2".
5. Rubber Grout Float: After the mortar has dried, grout is applied to fill the spaces between the tiles. A rubber grout float is used to press the grout into the joints and remove excess grout from the tile surface. The rubber construction of the float prevents scratching the tile. Ensure the grout float is clean to avoid embedding unwanted debris in the grout lines.
6. Grout Sponge: A grout sponge is used to clean the excess grout from the tile surface after the grout has partially dried. The sponge should be damp, not soaked, to prevent washing out the grout from the joints. Rinse the sponge frequently in clean water to avoid spreading the grout residue back onto the tile.
7. Tile Spacers: Tile spacers are small plastic pieces used to maintain consistent spacing between tiles. They ensure uniform grout lines and contribute to a professional-looking finish. Tile spacers are available in various sizes, typically ranging from 1/16" to 1/2", depending on the desired grout line width. Remove the tile spacers after the mortar has dried but before grouting.
8. Mixing Bucket and Mixing Paddle: Mortar and grout are typically supplied in powder form and need to be mixed with water to a specific consistency. A mixing bucket and mixing paddle are used to thoroughly combine the powder and water. A drill with a mixing attachment can expedite this process. Follow the manufacturer's instructions carefully to achieve the correct consistency and avoid lumps or inconsistencies in the mixture.
9. Utility Knife: A utility knife is helpful for various tasks, such as cutting vapor barriers, scoring drywall, or trimming backer board. Ensure the blade is sharp for clean and safe cuts. Always use a fresh blade for each project to maintain efficiency and precision.
10. Pencil or Marker: A pencil or marker is needed to mark cut lines on the tiles and to indicate the layout on the wall. Use a pencil for light-colored tiles and a marker for dark-colored tiles. Ensure the markings are clear and accurate to avoid mistakes during cutting and installation.
11. Safety Glasses and Gloves: Protecting your eyes and hands is crucial during tile installation. Safety glasses protect your eyes from dust, debris, and flying particles. Gloves protect your hands from the mortar, grout, and sharp tile edges. Consider using knee pads for extended periods of kneeling.
Essential Materials for Wall Tile Installation
Selecting the correct materials is just as important as having the right tools. The materials used will impact the longevity, aesthetics, and functionality of the wall tile installation.
1. Wall Tile: The choice of tile will depend on the aesthetic preference, budget, and the specific requirements of the space. Common types of wall tile include ceramic, porcelain, glass, and stone. Ceramic tiles are generally less expensive and suitable for most wall applications. Porcelain tiles are more durable and water-resistant, making them ideal for bathrooms and showers. Glass tiles offer a unique aesthetic and are often used for accent walls or backsplashes. Stone tiles, such as marble or granite, provide a luxurious look but require more maintenance. Calculate the square footage of the wall and add approximately 10% extra for cuts and breakage when ordering tile.
2. Mortar (Thin-Set Adhesive): Mortar is used to adhere the tiles to the wall. Choose a mortar that is specifically designed for the type of tile being used and the substrate (the underlying surface). Modified thin-set mortars, which contain polymers for increased adhesion and flexibility, are generally recommended for most wall tile installations. Consider using a rapid-setting mortar for small areas or when time is a constraint. Read the manufacturer's instructions carefully and follow the mixing ratios to achieve the correct consistency.
3. Grout: Grout fills the spaces between the tiles and provides a waterproof seal. Choose a grout color that complements the tile and the overall design of the space. Common types of grout include sanded grout, unsanded grout, and epoxy grout. Sanded grout is used for grout lines wider than 1/8" and contains sand to prevent cracking. Unsanded grout is used for grout lines 1/8" or narrower and does not contain sand. Epoxy grout is a more expensive option that is highly resistant to stains, chemicals, and water, making it ideal for high-traffic areas or areas exposed to moisture. Ensure the grout is properly sealed after installation to prevent staining and maintain its appearance.
4. Backer Board (Cement Board): Backer board, also known as cement board, provides a stable and moisture-resistant substrate for tile installations. It is typically used in wet areas such as bathrooms and showers. Backer board is more dimensionally stable than drywall and will not warp or deteriorate when exposed to moisture. It is available in various thicknesses, typically 1/4" or 1/2". Cut the backer board to size using a utility knife or circular saw with a masonry blade. Secure the backer board to the wall studs using backer board screws.
5. Waterproofing Membrane: In wet areas such as showers, a waterproofing membrane is essential to prevent water from penetrating the wall and causing damage. This membrane is applied to the backer board before tiling. Liquid waterproofing membranes, which are applied with a brush or roller, and sheet membranes, which are adhered to the surface, are common options. Follow the manufacturer's instructions carefully when applying the waterproofing membrane to ensure a watertight seal.
6. Caulk: Caulk is used to seal the gaps between the tile and other surfaces, such as bathtubs, countertops, or walls. Choose a caulk that is mildew-resistant and paintable. Apply the caulk using a caulking gun and smooth the bead with a wet finger or a caulk smoother. Remove any excess caulk with a damp cloth. Re-caulk as needed to maintain a watertight seal.
7. Sealer: Tile and grout sealers help to protect the tile and grout from stains, water damage, and mildew growth. Apply the sealer after the grout has cured according to the manufacturer's instructions. Reapply the sealer periodically to maintain its effectiveness.
Preparation and Safety Considerations
Proper preparation and adherence to safety protocols are crucial for a successful and safe tile installation project. Neglecting these aspects can lead to unsatisfactory results or potential injuries.
1. Surface Preparation: The wall surface must be clean, dry, and structurally sound before tiling. Remove any loose paint, wallpaper, or debris. Repair any cracks or holes in the wall. If the wall is uneven, apply a leveling compound to create a flat surface. For drywall, prime the surface with a tile primer to improve adhesion. For existing tile, ensure it is securely bonded to the wall and clean it thoroughly before applying the new tile. When working with pre-existing surfaces, consider the added weight and ensure the structural integrity of the wall is sufficient.
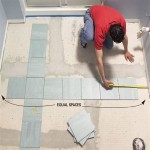
2. Planning and Layout: Before applying any mortar, plan the tile layout carefully. Determine the starting point and dry-fit the tiles to ensure a balanced and aesthetically pleasing design. Consider the placement of full tiles and cut tiles to minimize the appearance of small or awkward pieces. Use a level and a straightedge to mark guidelines on the wall to ensure that the tiles are installed straight and evenly spaced. Consider the placement of decorative tiles or accents and incorporate them into the layout.
3. Safety Precautions: Wear safety glasses and gloves to protect your eyes and hands. Use a dust mask or respirator when cutting tiles or mixing mortar to avoid inhaling dust particles. Work in a well-ventilated area to minimize exposure to fumes from adhesives and sealers. Use caution when operating power tools such as tile saws and drills. Follow the manufacturer's instructions for all tools and materials. Dispose of waste materials properly. Store materials safely away from children and pets. If working at heights, use a stable ladder or scaffolding and follow proper safety procedures. Consider professional assistance for complex or large-scale tile installation projects.
By gathering the appropriate tools and materials, and by taking proper safety precautions, one can proceed with a wall tile installation project confidently, achieving a durable and visually appealing result.

Installing Large Format Wall Tile Rogue Engineer

How To Install Tile On The Bathroom Wall Step By

How To Tile A Bathroom Shower Walls Floor Materials 100 Pics Pro Tips

Shower Tile Installation Step By Four Generations One Roof

Wall Tile Tips From A Pro Extreme How To

How To Install Wall Tile Howtospecialist Build Step By Diy Plans

Should Shower Tile Go Up To The Ceiling Here S What You Know

Every Step You Need To Install Large Format Tiles On A New Walk In Shower Wall Tile Walls 101

Installing Large Format Wall Tile Rogue Engineer

Absolute Beginners Guide To Installing Wall Tiles Turmericmecrazy
Related Posts