The Definitive Guide To Installing Porcelain Tile On Concrete
Porcelain tile offers a durable and aesthetically pleasing flooring option, particularly well-suited for concrete substrates. Proper installation ensures longevity and prevents issues like cracking, chipping, and water damage. This guide offers a comprehensive overview of the process, from preparation to grouting.
1. Concrete Surface Preparation
Preparing the concrete slab is the most crucial step for successful tile installation. A clean, level, and sound substrate ensures proper adhesion and prevents future problems. Any existing flooring, such as carpet, vinyl, or old tile, must be completely removed. Adhesive residue should be scraped away, and the surface thoroughly cleaned with a degreaser and rinsed with clean water. Allow adequate drying time before proceeding.
Assess the concrete for cracks, unevenness, or other imperfections. Minor cracks can be filled with a patching compound specifically designed for concrete. Larger cracks or significant unevenness may require a self-leveling underlayment. This creates a smooth, even surface for tile adhesion. Ensure the underlayment is compatible with the chosen thin-set mortar.
Moisture testing is vital to prevent future problems. Excessive moisture in the concrete can weaken the bond between the tile and the substrate. A calcium chloride test or a relative humidity test can accurately determine the moisture content. If the moisture levels are too high, implement appropriate moisture mitigation strategies before proceeding with the installation.
2. Planning and Layout
Careful planning ensures a professional-looking finished product. Begin by dry-laying the tiles to determine the best layout. Consider the room's dimensions and the tile size to minimize cuts and create a balanced appearance. A center layout, starting from the center of the room and working outwards, often yields the most visually appealing result.
Account for expansion joints around the perimeter of the room and at any transitions to other flooring materials. These gaps accommodate the natural expansion and contraction of the tile due to temperature changes, preventing cracking. Expansion joints should be filled with a flexible sealant, not grout.
Choosing the right trowel size is essential for proper thin-set coverage. The trowel size depends on the tile size and the substrate's evenness. Larger tiles generally require a larger trowel notch. Consult the tile manufacturer's recommendations for the appropriate trowel size.
3. Tile Installation and Grouting
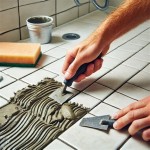
Mix the thin-set mortar according to the manufacturer's instructions. Apply a thin layer of mortar to the concrete surface using the flat side of the trowel, then comb it with the notched side to create consistent ridges. This ensures proper coverage and allows for air release, preventing voids under the tiles.
Place the tiles firmly into the mortar, applying even pressure to ensure full contact. Use spacers to maintain consistent grout lines. Periodically remove a tile to check for adequate thin-set coverage. The back of the tile should be fully covered with mortar. Clean any excess mortar from the tile surface immediately before it dries.
After the thin-set has cured for the recommended time, usually 24 hours, the grout can be applied. Mix the grout according to the manufacturer's instructions. Apply the grout diagonally to the tile lines, pressing it firmly into the joints. Remove excess grout with a damp sponge, being careful not to remove grout from the joints.
After the grout has partially dried, haze can be removed with a clean, damp sponge. Buff the tile surface with a dry cloth to remove any remaining residue. Allow the grout to cure completely before sealing it with a grout sealer to prevent staining and water penetration. This final step protects the grout and enhances its longevity.
4. Selecting Materials and Tools
Choosing high-quality materials and the right tools contributes significantly to a successful installation. Opt for porcelain tiles rated for floor use and a high-quality, polymer-modified thin-set mortar. Select a grout color that complements the tile and is suitable for the application area. Essential tools include a notched trowel, a grout float, a rubber mallet, tile spacers, a bucket, a sponge, and safety glasses.
Understanding the specific requirements of the project is crucial for material selection. Consider factors such as foot traffic, moisture exposure, and temperature fluctuations. For high-traffic areas, choose a durable tile with a high abrasion resistance rating. For wet areas, ensure the tile and grout are water-resistant and slip-resistant.

How To Install Ceramic Tiles On Concrete Floor Tile Installation

How To Tile Onto Concrete Floors Porcelain Super

How To Install Porcelain Tiles Tile Factory Direct

How To Lay Floor Tiles On Concrete Stonesuper
:max_bytes(150000):strip_icc()/can-you-install-tile-directly-on-concrete-1822600-04-458f7bb6c78348c1835cf8054ef36553.jpg?strip=all "How To Install Tile Over Concrete")
How To Install Tile Over Concrete

A Guide To Building Patio With Ceramic Tile Family Handyman

Complete Guide On How To Install Ceramic Floor Tiles Rubi Blog Usa

Complete Guide On How To Install Ceramic Floor Tiles Rubi Blog Usa

How To Lay Outdoor Porcelain Tiles Blog Bridport Glass Tile Centre

How To Lay A Porcelain Patio
Related Posts