Installing shower floor tiles is an important part of any bathroom remodel. Not only do they provide a clean, modern look, they also provide a slip-resistant surface, which is important for safety. But before you begin, it’s important to understand the steps involved in a successful tile installation.
To begin, you’ll need to prepare the subfloor. This means removing any existing tile or other material, such as linoleum or carpet. Once this is done, you’ll need to level the area to ensure a smooth surface. This can be done by using a self-leveling compound or a leveling board.
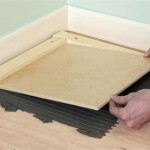
Next, you’ll need to lay down a waterproof membrane to ensure the floor doesn’t leak. This will also provide an additional layer of protection against water damage. Once the membrane is in place, you’ll need to apply a layer of thinset mortar to the floor. This will help the tiles adhere to the surface.
The final step before you begin laying the tiles is to dry fit them. This means taking each tile, placing it in its intended location, and making sure it is level and properly aligned. Once you’ve done this, you’re ready to begin tiling. Start in the corner and work your way out, making sure to apply pressure to ensure the tiles are properly adhered.
Once the tiles are in place, you’ll need to grout them. This helps fill any gaps between the tiles and provides a finished look. Be sure to use a high-quality grout that is resistant to water and mildew. Once you’ve grouted the tiles, you’ll need to seal them to prevent staining and discoloration. Allow the sealant to dry before using the shower.


Related Posts


