Laying Self-Adhesive Vinyl Tiles Over Linoleum
Self-adhesive vinyl tiles offer a cost-effective and relatively simple way to update a floor without the mess and expense of removing existing linoleum. While this method can be successful, careful preparation and execution are crucial for a durable and aesthetically pleasing result. This article outlines the process and considerations for laying self-adhesive vinyl tiles over linoleum.
Assessing the Linoleum's Condition
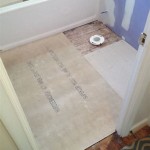
The existing linoleum must be in good condition for the vinyl tiles to adhere properly and create a smooth, even surface. Any loose or damaged sections of linoleum must be repaired or replaced before proceeding. Cracks, peeling, or significant warping will telegraph through the vinyl tiles, compromising the final appearance and longevity of the new flooring. Thoroughly inspect the linoleum for these issues. Pay close attention to seams and areas around appliances or fixtures where water damage might occur.
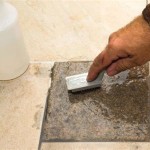
Furthermore, the linoleum must be clean and free of any wax, grease, or debris. These substances can interfere with the adhesive's ability to bond effectively with the linoleum. A thorough cleaning with a suitable degreaser is essential. After cleaning, ensure the linoleum is completely dry before proceeding to the next step. Any remaining moisture can trap air beneath the tiles, leading to bubbling and eventual tile detachment.
Preparing the Surface
Once the linoleum is deemed suitable and thoroughly cleaned, surface preparation is key. While self-adhesive tiles can adhere directly to linoleum, using an embossing leveler can significantly improve the results. This product fills in minor imperfections and creates a smoother, more uniform surface for tile adhesion. Apply the embossing leveler according to the manufacturer's instructions, ensuring even coverage across the entire floor. Allow adequate drying time before proceeding with tile installation.
Careful measurement of the room is essential to determine the number of tiles required. Calculating an additional 10% to 15% for cuts and wastage is advisable. This extra material accounts for potential errors and ensures sufficient tiles for completing the project without interruption. Additionally, planning the tile layout beforehand helps achieve a balanced and aesthetically pleasing final result, particularly in rooms with irregular shapes or prominent features.
Installing the Vinyl Tiles
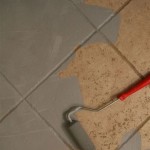
Begin laying the tiles from the center of the room outwards. This approach helps maintain symmetry and minimizes the visibility of cut tiles along the edges. Peel off the backing paper from each tile carefully, ensuring the adhesive remains intact. Position the tile precisely in its intended location and press firmly onto the prepared linoleum surface. Use a rolling pin or a heavy, flat object to apply even pressure across the entire tile surface, ensuring a secure bond and eliminating air bubbles.
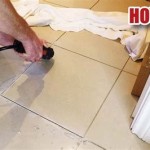
Maintaining consistent spacing between tiles is crucial for a professional finish. Tile spacers can be used to ensure uniformity and create straight grout lines. When reaching the edges of the room, measure and cut the tiles precisely to fit. A sharp utility knife and a straight edge are essential tools for clean and accurate cuts. Remember to account for any expansion gaps around the perimeter of the room. These gaps allow the flooring to expand and contract with temperature changes, preventing buckling and damage.
Addressing Specific Challenges
Certain situations require additional consideration. If the existing linoleum has a textured surface or embossed pattern, the texture might be visible through the vinyl tiles. In such cases, a thicker underlayment might be necessary to create a smoother surface. Similarly, if the linoleum has a particularly glossy finish, lightly sanding the surface can improve the adhesion of the vinyl tiles. Always test the adhesion in a small, inconspicuous area before proceeding with the entire floor.
Seams in the underlying linoleum also require attention. Ensure the seams are securely bonded to the subfloor to prevent movement that could affect the vinyl tiles. If necessary, reinforce the seams with adhesive or seam sealer before installing the vinyl tiles. This precaution can prevent cracking or separation of the tiles along the seam lines.
Finally, while self-adhesive vinyl tiles are designed for ease of installation, understanding the specific requirements of the chosen product is vital. Always consult the manufacturer's instructions for detailed guidance on surface preparation, adhesive application, and recommended installation techniques. Following these guidelines will contribute significantly to a successful and long-lasting flooring update.

How To Install L And Stick Tile Over Linoleum

How To Tile Over Linoleum Floors Correctly

How To Install L And Stick Tile Over Linoleum My Homier Home

How To Install Luxury Vinyl Tile Over Linoleum

How To Install L And Stick Tile Over Linoleum My Homier Home

How To Install L And Stick Tile Over Linoleum My Homier Home

Adhesive Vinyl Flooring 4 Ways To Install Planeo

Simple Inexpensive Self Adhesive Floor Tiles One Year Later Sunny Side Design

Install L And Stick Vinyl Floor Planks In The Bathroom More To Mrs E

What To Do Before Tiling Over Vinyl Or Lino Stonesuper
Related Posts