Installing Tile Like a Professional: A Step-by-Step Guide
Transforming your home with stunning tiles can elevate its aesthetic appeal. However, achieving a professional-looking installation requires a meticulous approach to planning and execution. Follow this comprehensive guide to ensure a flawless installation that lasts for years to come.
1. Preparation: The Foundation for Success
Before laying a single tile, meticulous preparation is essential. Begin by ensuring a level and stable subfloor. Remove any debris or old flooring materials and level any uneven surfaces using self-leveling compound or plywood underlayment. Moisture-prone areas, such as bathrooms and kitchens, should have a waterproof membrane installed.
2. Layout: Plan Your Design
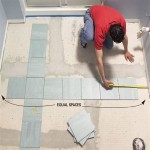
To avoid costly mistakes, plan the tile layout carefully. Use a chalk line or laser level to mark the center of the room. Determine the starting point and spacing of the tiles. It's advisable to create a dry-layout on the floor or a piece of plywood to visualize the final design and make necessary adjustments.
3. Setting the Tiles: Precision and Technique
Choose the appropriate thin-set mortar for your tile type and application. Apply a thin layer of mortar using a notched trowel and place the tiles firmly into the mortar. Ensure the tiles are level and evenly spaced using a level and spacers.
4. Grouting: Filling the Gaps
Once the tiles are set, allow the thin-set to cure for 24 hours. Mix the grout according to the manufacturer's instructions and apply it to the joints between the tiles using a rubber float. Fill the joints completely and remove any excess grout. Grout can be tinted to complement the tiles or enhance the overall design.
5. Sealing: Protecting Your Investment
To protect the tiles and grout from moisture and stains, apply a sealant. Choose a sealant specifically designed for the type of tiles you have installed. Apply it to the tiles and grout according to the manufacturer's instructions. Allow ample time for the sealant to fully cure before exposing it to moisture.
6. Maintenance: Preserving Beauty
To maintain the pristine condition of your tiled surface, regular cleaning is essential. Use a mild, pH-neutral cleaner and a soft cloth. Avoid abrasive cleaners or harsh chemicals that can damage the tiles or grout. For porous tiles, a penetrating sealer can be applied periodically to enhance their moisture resistance.
7. Troubleshooting: Addressing Common Issues
During installation or over time, certain issues may arise. To ensure prompt and effective resolution, be aware of common problems and their remedies:
- Loose Tiles: Remove the loose tiles and re-set them using fresh thin-set mortar.
- Cracked Tiles: Replace cracked tiles promptly to prevent further damage.
- Efflorescence: This white, chalky residue on the tiles is caused by moisture. Clean it using a vinegar solution or a specialized efflorescence cleaner.
- Moisture Damage: Ensure that the subfloor and tiles are waterproofed in moisture-prone areas. If moisture damage occurs, seek professional assistance.
Conclusion: A Gratifying Transformation
Installing tiles like a professional is a rewarding endeavor that requires precision, attention to detail, and a commitment to quality. By following the steps outlined in this guide, you can transform your home with stunning tiles that add value and enhance its beauty for years to come.

Tile Installation Diy Vs Professional Tiler Tileist By Tilebar

Pros And Cons Of Professional Tile Installation Vs Diy Atlas Marble

6 Tips For Laying Floor Tile With No Experience

Diy Tiling Vs Professional Tile Installation Checkatrade

How To Install A Tile Floor The Home Depot

Materials Needed To Lay Tile Floor The Best Tools Rubi Blog Usa

Install Porcelain Tile Over A Concrete Floor Like Pro

Professional Tile Installation How To Find A Tiler Homeadvisor

Transform Your Home With Professional Tile Installation Union Skills Corp

How To Install A Tile Floor The Home Depot
Related Posts


