Installing Mosaic Tile On Shower Wall: A Comprehensive Guide
Installing mosaic tile on a shower wall can significantly enhance the aesthetic appeal and value of a bathroom. This guide provides a detailed explanation of the process, encompassing preparation, installation, and post-installation procedures. This information is intended to equip individuals with the knowledge necessary to execute a successful mosaic tile installation, although professional tile setters possess specialized skills and experience and should be consulted for complex projects.
Planning and Preparation: The Foundation for Success
Prior to embarking on the installation process, meticulous planning and preparation are paramount. This phase lays the groundwork for a durable and visually pleasing final result. The initial step involves a thorough assessment of the existing shower wall substrate.
The substrate, typically cement board or a waterproof membrane over drywall, must be structurally sound and free from any signs of damage such as cracks, water stains, or mold. Any existing issues must be addressed before tile installation commences. Repairing cracks, replacing damaged cement board sections, or applying a fresh layer of waterproofing membrane are essential steps to ensure the longevity of the tiled surface.
Accurate measurement is critical for calculating the required amount of mosaic tile. Measure the height and width of each wall section to be tiled. Multiply these dimensions to determine the square footage of each section. Add the square footage of all sections together and then add an additional 10-15% for waste due to cuts and potential breakage during the installation process. This buffer ensures that sufficient material is available to complete the project without interruption.
The selection of appropriate materials is also crucial. Mosaic tile is available in a variety of materials, including glass, ceramic, porcelain, and natural stone. Consider the aesthetic preferences and the functional requirements of the shower environment when selecting the tile. Glass and porcelain tiles are often favored for their water resistance and ease of cleaning. The choice of thin-set mortar and grout should correspond to the type of tile selected.
Selecting the right thin-set mortar is critical. Modified thin-set mortars are generally recommended for shower applications due to their enhanced bonding strength and water resistance. Carefully read the manufacturer's instructions to ensure proper mixing and application. A notched trowel is essential for applying the thin-set mortar evenly, and the notch size should be appropriate for the size and type of mosaic tile being used. Consult the thin-set mortar manufacturer’s specifications to determine the correct notch size for the selected mosaic tile.
Grout selection is another important consideration. Epoxy grout is highly resistant to water, stains, and chemicals, making it an excellent choice for shower applications. Cement-based grout is a more economical option, but it requires sealing to prevent water penetration and staining. The grout color should complement the mosaic tile and the overall bathroom design. Sample grout colors on a small section of tile before committing to a specific color for the entire project.
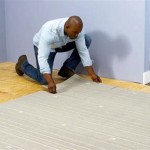
Gather all necessary tools and equipment before beginning the installation. This includes a notched trowel, a mixing bucket, a margin trowel, a grout float, a sponge, a level, a tile cutter or wet saw, measuring tape, a utility knife, safety glasses, and work gloves. Preparing the workspace and protecting adjacent surfaces, such as the shower floor and surrounding walls, with drop cloths or plastic sheeting is a prudent measure to prevent damage and simplify cleanup.
The Installation Process: Applying the Mosaic Tile
With the preparation phase complete, the installation process can commence. This involves applying the thin-set mortar, positioning the mosaic tile sheets, and ensuring proper alignment and adhesion.
Begin by applying a thin, even layer of thin-set mortar to a small section of the shower wall using the flat side of the notched trowel. Then, use the notched side of the trowel to create uniform ridges in the mortar. The ridges provide a greater surface area for the tile to adhere to. Work in small sections, typically no larger than 2-3 square feet, to prevent the thin-set mortar from drying out before the tile is applied.
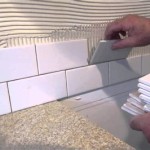
Carefully position the mosaic tile sheets onto the mortar, ensuring that the tiles are aligned correctly. Apply gentle pressure to embed the tiles into the mortar. Use a grout float or a rubber mallet to tap the tiles lightly and ensure uniform contact with the mortar. Pay close attention to the seams between the tile sheets to maintain consistent grout lines. Spacers can be used to maintain uniform grout lines, especially when working with irregularly shaped mosaic tiles.
As you progress with the installation, regularly check the levelness of the tile surface using a level. Make adjustments as necessary to ensure a flat and even surface. Use a damp sponge to wipe away any excess thin-set mortar from the tile surface as you work. This prevents the mortar from hardening on the tile and simplifies the cleanup process later.
Cutting mosaic tile can be challenging, especially when dealing with intricate patterns or curved surfaces. A wet saw is the most effective tool for cutting mosaic tile accurately and cleanly. When cutting tile, wear safety glasses to protect your eyes from debris. Mark the desired cut line on the tile using a pencil and carefully guide the tile through the wet saw blade. For small cuts or intricate shapes, tile nippers can be used to carefully trim the tiles.
Around fixtures such as showerheads, faucets, and soap dishes, precise cuts are required to ensure a neat and professional finish. Use a tile scribe or a template to mark the cut lines accurately. Gradually enlarge the opening in the tile until it fits snugly around the fixture. Caulk can be used to seal the gap between the tile and the fixture, preventing water from seeping behind the tile.
Allow the thin-set mortar to cure completely before proceeding to the grouting stage. The curing time typically ranges from 24 to 72 hours, depending on the type of thin-set mortar and the ambient temperature and humidity. Consult the manufacturer's instructions for specific curing recommendations.
Grouting and Sealing: Completing the Installation
Once the thin-set mortar has cured, the grouting process can begin. Grouting fills the spaces between the tiles, creating a waterproof barrier and enhancing the aesthetic appeal of the tiled surface.
Remove any spacers and clean the grout lines thoroughly, removing any debris or thin-set mortar residue. Mix the grout according to the manufacturer's instructions. Apply the grout to the tile surface using a grout float, working at a 45-degree angle to the grout lines. Ensure that the grout fills all the spaces between the tiles completely.
Remove excess grout from the tile surface using the grout float, again working at a 45-degree angle to the grout lines. Allow the grout to set for the recommended time, typically 15-30 minutes, before cleaning the tile surface with a damp sponge. Rinse the sponge frequently in clean water to avoid smearing the grout. Use a circular motion to remove the grout haze from the tile surface.
After the initial cleaning, allow the grout to cure completely before applying a grout sealer. Grout sealer protects the grout from water penetration, staining, and mildew growth. Apply the grout sealer according to the manufacturer's instructions, typically with a brush or applicator pad. Allow the sealer to dry completely before using the shower.
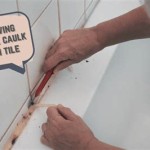
Caulk is essential for sealing the joints between the tiled walls and other surfaces, such as the shower floor, tub, or ceiling. Caulk prevents water from seeping behind the tile and causing damage. Choose a caulk that is specifically designed for wet environments and is mildew-resistant. Apply the caulk evenly and smoothly, using a caulk gun. Smooth the caulk bead with a wet finger or a caulking tool to create a professional finish.
Proper ventilation is important during and after the installation process. Open windows or use a fan to improve air circulation and reduce humidity. This helps the thin-set mortar, grout, and caulk to cure properly.
Regular cleaning and maintenance are essential for preserving the beauty and longevity of the mosaic tile shower wall. Clean the tiles regularly with a mild detergent and water. Avoid using abrasive cleaners or harsh chemicals, as they can damage the tile surface. Inspect the grout and caulk regularly for signs of damage or deterioration and repair or replace them as needed. By following these guidelines, the installed mosaic tile shower wall should provide years of enjoyment and functionality.

How To Lay Mosaic Tiles In A Shower Diy Projects

Setting Mosaic Tile Around A Shower

How To Install Mosaic Tiles Like A Pro Step By Guide Tiletoria

Making Sheets Of Mosaics Square The Floor Elf

How To Build A Shower Niche Easy 7 Step Diy Tutorial

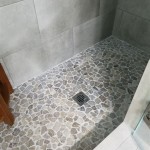
How To Install A Mosaic Tile On Shower Floor

Making Mosaic Shower Stalls

Gorgeous Walk In Shower Tile Ideas For An Aesthetic Look Stone Depot

Diy Bathroom Wall Tile And Tiling Guide For Beginners

Coastal Decor Ideas Interior Design Diy Ping 15 Out Of This World Rooms That Take You Under The Sea
Related Posts