How To Tile A Shower Floor On Concrete
Tiling a shower floor on a concrete subfloor is a common and effective way to create a waterproof and aesthetically pleasing shower space. The process involves careful preparation, proper material selection, and meticulous execution. While the project is achievable for experienced do-it-yourselfers, it necessitates a thorough understanding of tiling techniques and waterproofing principles to ensure a durable and long-lasting result. This article details the steps involved in tiling a shower floor on concrete, providing a comprehensive guide to the entire process.
Preparation is Key: Assessing and Preparing the Concrete Slab
The success of any tiling project hinges on the quality and condition of the substrate – in this case, the concrete floor. An inadequately prepared concrete slab can lead to tile failure, cracking grout, and potential water leaks. Therefore, a meticulous assessment and preparation phase is non-negotiable.
The first step involves inspecting the concrete slab for any existing damage, such as cracks, holes, or spalling. Small cracks (less than 1/8 inch) can often be filled with a crack isolation membrane or a cementitious patching compound specifically designed for concrete repair. Larger cracks may indicate structural issues and should be evaluated by a qualified professional before proceeding. Deep holes or spalled areas require patching with a concrete repair mortar to bring them level with the surrounding surface.
Next, the concrete slab must be thoroughly cleaned. Begin by removing any loose debris, dust, grease, or existing coatings. A shop vacuum is useful for removing loose particles. Grease and oil can be cleaned with a degreasing agent specifically formulated for concrete. Existing coatings, such as paint or sealant, must be removed entirely. Mechanical methods, such as grinding or scraping, are often necessary to achieve a clean, bare concrete surface. Acid etching may also be used, but it is essential to follow the manufacturer's instructions carefully and to neutralize the acid thoroughly after the etching process.
Leveling the concrete slab is another critical step. While concrete is generally perceived as flat, slight variations in level can compromise the tile installation. A self-leveling underlayment (SLU) compound is commonly used to create a perfectly level surface. The SLU is poured onto the cleaned and primed concrete slab and allowed to flow evenly, filling in any low spots. Follow the manufacturer's instructions for mixing and application, paying close attention to the recommended thickness and cure time.
Before applying any SLU or thin-set mortar, it's essential to prime the concrete. Priming helps to improve the adhesion of the subsequent layers and prevents the concrete from absorbing too much moisture from the SLU or thin-set. A concrete primer, often an acrylic-based product, should be applied according to the manufacturer's directions using a brush or roller.
Finally, ensure the concrete slab is properly sloped towards the drain. A shower floor should have a minimum slope of ¼ inch per foot to allow water to drain effectively. If the existing concrete slab does not have adequate slope, a mortar bed can be used to create the necessary pitch. Alternatively, a sloped shower pan kit may be used, providing a pre-sloped surface for tiling. Careful planning and accurate measurements are crucial to ensure proper drainage and prevent water from pooling on the shower floor.
Waterproofing: Creating a Reliable Barrier
Waterproofing is paramount in a shower installation. The consequences of water penetration can be severe, leading to mold growth, structural damage, and costly repairs. A robust waterproofing system is essential to protect the underlying structure from moisture.
Several waterproofing options are available, each with its own advantages and disadvantages. The most common methods include liquid-applied membranes, sheet membranes, and shower pan liners. Liquid-applied membranes are typically polymer-modified cementitious or elastomeric coatings that are applied in multiple layers to create a seamless waterproof barrier. Sheet membranes are flexible, waterproof sheets that are adhered to the concrete slab using a thin-set mortar. Shower pan liners are made of PVC or CPE and are installed between two layers of mortar, creating a waterproof basin.
When using a liquid-applied membrane, it is crucial to follow the manufacturer's instructions meticulously. The concrete slab should be clean, dry, and primed before applying the membrane. Apply the membrane in thin, even coats, allowing each coat to dry completely before applying the next. Pay particular attention to corners, seams, and penetrations (such as the drainpipe), reinforcing these areas with fiberglass mesh or specialized waterproofing tape. Ensure the membrane extends up the walls at least several inches to create a continuous waterproof barrier.
Sheet membranes offer a convenient and reliable waterproofing solution. Before installing the membrane, ensure the concrete slab is clean, level, and free of any sharp objects that could puncture the membrane. Apply a thin-set mortar specifically designed for use with sheet membranes to the concrete slab, using a notched trowel to create ridges. Carefully press the sheet membrane into the mortar, ensuring full contact and eliminating any air bubbles. Overlap the seams of the membrane according to the manufacturer's instructions, and seal the seams with a sealant or tape recommended by the membrane manufacturer.
Shower pan liners are typically used in conjunction with a mortar bed to create a waterproof basin. The liner is placed between two layers of mortar, with the bottom layer providing support and the top layer providing a surface for tiling. The liner should extend up the walls at least several inches and be securely clamped to the drain. Use a sealant specifically designed for shower pan liners to seal the drain connection and prevent water from leaking through the drain opening.
Regardless of the waterproofing method chosen, it is essential to perform a flood test after the waterproofing system has been installed. Plug the drain and fill the shower pan with water to a depth of several inches. Allow the water to sit for 24-48 hours, and carefully inspect the surrounding areas for any signs of leaks. If leaks are detected, identify the source and repair the waterproofing system before proceeding with the tile installation.
Tile Installation: Achieving a Professional Finish
Once the concrete slab is properly prepared and waterproofed, the tile installation can begin. Careful planning and precise execution are crucial to achieving a professional and aesthetically pleasing result.
Before starting the tile installation, create a layout that maximizes the visual appeal and minimizes tile cuts. Start by finding the center point of the shower floor and drawing a straight line through the center in both directions. Dry-lay a row of tiles along these lines to visualize the layout and identify any potential issues. Adjust the layout as needed to minimize small tile cuts and ensure a balanced appearance. Consider using a focal point, such as a decorative tile or mosaic, to draw the eye and create visual interest.
Choosing the right thin-set mortar is essential for a successful tile installation. Use a modified thin-set mortar specifically designed for use with the type of tile being installed. Follow the manufacturer's instructions for mixing the mortar, adding water gradually until a smooth, creamy consistency is achieved. Avoid adding too much water, as this can weaken the mortar and compromise its adhesion.
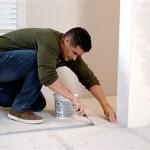
Apply the thin-set mortar to the concrete slab using a notched trowel. The size and shape of the notches should be appropriate for the size and type of tile being installed. Apply the mortar in small sections, working in areas that can be tiled within the open time of the mortar. Press the tiles firmly into the mortar, using a slight twisting motion to ensure full contact. Use tile spacers to maintain consistent grout lines. Periodically check the level of the tiles using a level or straightedge, and make adjustments as needed.
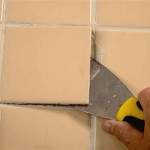
For tiles that require cutting, use a wet saw or a tile nipper. A wet saw provides clean, accurate cuts, while a tile nipper is useful for making small, irregular cuts. Always wear safety glasses when cutting tiles, and follow the manufacturer's instructions for operating the cutting tools.
Allow the thin-set mortar to cure completely before grouting. The cure time will vary depending on the type of mortar and the ambient temperature and humidity. Refer to the manufacturer's instructions for the recommended cure time. Once the mortar is fully cured, remove the tile spacers and clean the tile surface with a damp sponge to remove any excess mortar.
Grouting is the final step in the tile installation process. Choose a grout that is appropriate for the type of tile and the width of the grout lines. Mix the grout according to the manufacturer's instructions, adding water gradually until a smooth, creamy consistency is achieved. Apply the grout to the tile surface using a grout float, pressing the grout into the grout lines. Remove excess grout with a damp sponge, working diagonally across the tile surface. Allow the grout to haze over, and then buff the tile surface with a clean, dry cloth to remove any remaining grout residue.
After the grout has cured completely, seal the grout lines with a grout sealer. Grout sealer helps to protect the grout from staining and water damage. Apply the sealer according to the manufacturer's instructions, using a brush or applicator. Allow the sealer to dry completely before using the shower.
Properly installed tile, combined with thorough surface preparation and professional waterproofing, will result in a long-lasting and aesthetically pleasing shower floor.

Shower Pan On A Slab Jlc

How To Tile A Basement Shower The Home Depot

How To Use Concrete For Designing A Bathroom Shower Exchange

How To Make A Concrete Shower Pan Hunker 욕실 아이디어 인테리어 디자인

How To Create A Shower Floor Part 4 The Elf

How To Build A Shower Pan

Installing Mortar Shower Pan

Shower Drain Flush With Concrete Floor Help Ceramic Tile Advice Forums John Bridge

3 Shower Pan Choices For A Solid Tile Floor Installation Fine Homebuilding

Designing Barrier Free Showers Page 2 Of 3 Construction
Related Posts