How To Tile A Fireplace Like Profile Pictures On Facebook
Tiling a fireplace can dramatically transform a room, providing a focal point and enhancing the overall aesthetic. Similar to selecting the perfect profile picture on Facebook to represent oneself, choosing the right tile and executing the installation with precision will result in a visually appealing and enduring feature. This article provides a detailed guide on how to tile a fireplace, covering preparation, installation, and finishing touches.
Key Point 1: Preparation and Planning
Before embarking on a tiling project, thorough preparation is essential. This stage determines the success and longevity of the finished product. Key areas to address include assessing the existing fireplace surround, selecting the appropriate tile, gathering necessary tools and materials, and properly preparing the surface for tiling.
The first step is to evaluate the existing fireplace surround. Determine the material of the existing surface (brick, concrete, drywall, etc.) and its condition. If the existing surface is damaged or uneven, it must be repaired or replaced before tiling. Loose or crumbling brick should be re-mortared or replaced. Drywall should be inspected for water damage and repaired accordingly. A level and stable surface is crucial for proper tile adhesion and a professional-looking finish.
Choosing the right tile is more than just an aesthetic decision; it also involves considering the tile's suitability for a fireplace environment. Consider the tile material: ceramic, porcelain, natural stone, or glass. Ceramic tiles are generally more affordable and easier to cut, while porcelain tiles are denser and more durable, making them a better choice for high-traffic areas or surfaces exposed to heat. Natural stone tiles, such as granite or marble, offer a luxurious look but may require specialized sealants and maintenance. Glass tiles can add a modern touch but may be prone to scratching.
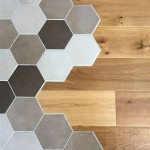
Size and design are also important considerations. Larger tiles can create a modern, seamless look, but they may be more challenging to install on uneven surfaces. Smaller tiles, such as mosaics, offer more design flexibility but require more grout lines, which can be more labor-intensive to clean. Select a tile design that complements the overall style of the room and enhances the fireplace's visual appeal. Consider the color, pattern, and texture of the tile, ensuring it harmonizes with existing decor.
Once the tile is selected, calculate the quantity needed. Measure the area to be tiled and add at least 10% extra to account for cuts and breakage. This ensures there is sufficient material to complete the project without running short. Also, acquire any coordinating trim pieces or bullnose tiles needed to finish the edges.
Gather all necessary tools and materials before starting the project. Essential tools include a tile saw (wet saw preferred for clean cuts), a notched trowel (size determined by tile size), a rubber grout float, a sponge, a bucket, a measuring tape, a level, a pencil, safety glasses, and gloves. Materials needed include thin-set mortar (specifically formulated for tile installation), grout (choose a color that complements the tile), tile sealant (if required by the tile type), and cleaning supplies.
Surface preparation is critical for ensuring proper tile adhesion. Clean the existing surface thoroughly, removing any dust, dirt, grease, or loose debris. Use a wire brush or scraper to remove any loose paint or mortar. If the surface is particularly smooth, consider etching it with a concrete etching solution to create a better bond. Apply a primer specifically designed for tile installation. This will improve adhesion and prevent moisture from seeping into the substrate. Allow the primer to dry completely before proceeding with the tile installation.
Plan the tile layout before applying any mortar. This will help visualize the finished product and ensure a symmetrical and aesthetically pleasing design. Start by finding the center point of the fireplace surround and the center point of the first row of tiles. Align these points to create a balanced layout. Use a level to draw guide lines on the surface, marking the placement of the first row of tiles. This will serve as a reference point for the rest of the installation.
Consider the placement of grout lines and how they will align with the surrounding surfaces. Use tile spacers to maintain consistent grout lines throughout the installation. This will not only create a more professional look but also ensure that the grout lines are uniform and easy to clean. Dry-fit the tiles before applying any mortar to check for any alignment issues or cutting needs.
Key Point 2: Tile Installation
With the preparation complete, the tile installation can begin. This stage involves applying the thin-set mortar, setting the tiles, and ensuring proper alignment and spacing. Patience and attention to detail are crucial for achieving a professional-looking result.
Mix the thin-set mortar according to the manufacturer's instructions. Add water gradually while stirring continuously until the mortar reaches a smooth, peanut butter-like consistency. Avoid adding too much water, as this will weaken the mortar. Allow the mortar to slake for about 10 minutes before using it. This allows the chemicals to fully activate and ensures proper adhesion.
Using the notched trowel, apply a layer of thin-set mortar to the prepared surface. Hold the trowel at a 45-degree angle to create ridges in the mortar. The size of the notches on the trowel should correspond to the size and type of tile being used. Cover only a small area at a time, enough to set a few tiles, to prevent the mortar from drying out before the tiles are set.
Press each tile firmly into the mortar, using a slight twisting motion to ensure good contact. Use tile spacers to maintain consistent grout lines between the tiles. Align the tiles with the guide lines drawn during the planning stage. Use a level to check that each tile is level and flush with the surrounding tiles. Make any necessary adjustments before the mortar sets.
For tiles that need to be cut, use a tile saw (wet saw preferred) to make clean, precise cuts. Measure the area to be cut accurately and mark the tile with a pencil. When cutting, wear safety glasses to protect the eyes from debris. Cut slowly and carefully, following the marked line. Smooth the edges of the cut tiles with a tile file or sanding sponge to remove any sharp edges.
As you work, periodically check the alignment and spacing of the tiles. Use a damp sponge to wipe away any excess mortar from the tile surfaces. This will prevent the mortar from hardening on the tiles and making them difficult to clean later. Continue setting the tiles until the entire area is covered. Allow the thin-set mortar to cure for at least 24 to 48 hours before proceeding to the grouting stage. This allows the mortar to fully harden and ensures a strong bond between the tiles and the substrate.
Key Point 3: Grouting and Finishing
Once the thin-set mortar has cured, the grouting stage can begin. This involves filling the spaces between the tiles with grout, cleaning the tile surfaces, and applying a sealant (if necessary). Grouting not only enhances the aesthetic appeal of the tiled surface but also provides a watertight seal, protecting the substrate from moisture.
Remove the tile spacers before applying the grout. Mix the grout according to the manufacturer's instructions. Add water gradually while stirring continuously until the grout reaches a smooth, creamy consistency. Avoid adding too much water, as this will weaken the grout. Allow the grout to slake for about 10 minutes before using it. This allows the chemicals to fully activate and ensures proper workability.
Using the rubber grout float, apply the grout to the tile surface, pressing it firmly into the grout lines. Hold the float at a 45-degree angle and work diagonally across the tiles to ensure that the grout lines are completely filled. Remove any excess grout from the tile surfaces with the grout float. Work quickly to prevent the grout from drying on the tiles.
After applying the grout, allow it to set for about 15 to 30 minutes, or as directed by the manufacturer. This allows the grout to firm up slightly before cleaning. Use a damp sponge to wipe away the excess grout from the tile surfaces. Rinse the sponge frequently in a bucket of clean water. Avoid using too much water, as this can wash away the grout from the grout lines.
After the initial cleaning, allow the grout to haze over on the tile surfaces. This haze is a thin film of grout residue that can be easily removed with a clean, dry cloth. Buff the tile surfaces with the cloth to remove the haze and reveal the clean, polished tiles. Repeat the cleaning process as needed until all traces of grout residue are removed.
Allow the grout to cure for at least 72 hours before applying a sealant. This allows the grout to fully harden and provides a more durable and watertight seal. Apply a grout sealant to the grout lines to protect them from moisture and stains. Follow the manufacturer's instructions for applying the sealant. Apply the sealant evenly and allow it to dry completely before using the fireplace.
Inspect the finished tiled surface for any imperfections or irregularities. Touch up any areas as needed. If any tiles are loose or damaged, replace them immediately. Clean the surrounding area and remove any debris or tools. The newly tiled fireplace is now ready to be enjoyed, providing a beautiful and durable focal point for the room. The meticulous planning, careful installation, and thorough finishing details will ensure that the tiled fireplace resembles the curated aesthetic of a well-chosen Facebook profile picture, reflecting attention to detail and a commitment to quality.

A Step By Guide To Fireplace Refacing Diy Family Handyman

Tile Inspiration For Fireplaces Mountain

How To Paint Fireplace Mantel And Tile Surround The Kelly Homestead

Tile Inspiration For Fireplaces Mountain

17 Fireplace Tile Ideas To Set Your Creative Side Ablaze Why

10 Fireplace Tile Ideas

How To Paint Fireplace Mantel And Tile Surround The Kelly Homestead

Blogger Reveals How She Refurbished Her Fireplace With 50 Vintage Insert And Surround Homebuilding

A Step By Guide To Fireplace Refacing Diy Family Handyman

How To Paint A Tile Fireplace Des And Sses
Related Posts