How To Tile A Fireplace: A Comprehensive Guide
Tiling a fireplace is a project that can dramatically enhance the aesthetic appeal of a living space. Whether updating an outdated design or adding a focal point to a room, tiling offers a versatile and durable solution. This article provides a detailed, step-by-step guide on how to tile a fireplace, covering everything from preparation to finishing touches.
Preparation: Assessing the Fireplace and Gathering Materials
Before embarking on the tiling project, a thorough assessment of the existing fireplace is crucial. This involves inspecting the existing surface for any damage, such as cracks, loose mortar, or unevenness. The type of existing material on the fireplace will influence the preparation method required. For instance, brick fireplaces may require cleaning and patching, while painted surfaces may need to be primed or completely removed. Properly assessing the surface ensures a strong and durable bond for the new tiles.
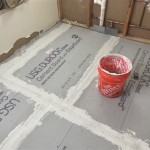
Cleaning is an essential first step. Remove any soot, dust, or debris from the fireplace surface. A wire brush or a specialized fireplace cleaner can be used to effectively remove stubborn deposits. For painted surfaces, consider using a paint scraper or chemical stripper to remove loose paint. Once the surface is clean, inspect for any cracks or damage. Fill any cracks with a masonry repair compound. Ensure the compound is fully cured before proceeding to the next step. If the existing surface is excessively uneven, consider applying a skim coat of mortar to create a level base for tiling. This will prevent tiles from sitting unevenly and ensure a professional-looking finish.
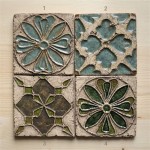
The selection of appropriate materials is paramount to the success of the project. Choosing the right tiles is not only an aesthetic decision but also a practical one. Consider the style of the room and the overall design intent. Common tile choices for fireplaces include ceramic, porcelain, natural stone (such as slate or marble), and glass mosaic. Each material offers unique characteristics in terms of appearance, durability, and maintenance requirements. Ceramic and porcelain tiles are generally cost-effective and easy to clean, while natural stone offers a luxurious and unique look. Glass mosaic tiles can add a touch of visual interest and can be configured into intricate patterns.
In addition to the tiles, other essential materials include: tile adhesive (thin-set mortar), grout, tile spacers, a tile cutter (either manual or wet saw), a notched trowel, a rubber grout float, sponges, buckets, safety glasses, and work gloves. The type of tile adhesive should be compatible with the chosen tile material and the substrate. Read the manufacturer's instructions carefully to ensure proper mixing and application. Grout is used to fill the spaces between the tiles and should also be selected based on the tile material and the desired aesthetic. Tile spacers ensure consistent spacing between the tiles, creating a uniform and professional look. A tile cutter is necessary for cutting tiles to fit around the fireplace opening and any other obstructions. A notched trowel is used to apply the tile adhesive evenly to the surface. A rubber grout float is used to apply grout and remove excess grout. Sponges are used to clean the tiles and grout haze. Safety glasses and work gloves protect eyes and hands during the project.
Tiling Process: Applying the Adhesive and Setting the Tiles
With the fireplace surface prepared and the necessary materials gathered, the next step is to apply the tile adhesive and set the tiles. Proper application of the adhesive is crucial for a strong and lasting bond. Begin by mixing the thin-set mortar according to the manufacturer's instructions. The consistency should be similar to that of peanut butter – not too thick and not too runny. Use a mixing drill with a mixing paddle to ensure thorough mixing and a consistent texture.
Apply the thin-set mortar to the fireplace surface using the notched trowel. Hold the trowel at a 45-degree angle and apply even pressure to create consistent ridges in the adhesive. The depth of the notches on the trowel will determine the thickness of the adhesive layer, so choose a trowel with the appropriate notch size for the chosen tile size. Only apply adhesive to a small area at a time, typically no more than a few square feet, to prevent the adhesive from drying out before the tiles are set.
Once the adhesive is applied, carefully set the tiles onto the surface. Start from the bottom and work upwards. Use tile spacers to maintain consistent spacing between the tiles. Press each tile firmly into the adhesive with a slight twisting motion to ensure good contact. Use a level to check that the tiles are aligned properly and adjust as needed. For tiles that need to be cut to fit around the fireplace opening or other obstructions, use the tile cutter to make precise cuts. It's always better to cut slightly larger than needed and then fine-tune the fit with a tile nipper if necessary. Wear safety glasses when cutting tiles to protect the eyes from flying debris.
Continue setting the tiles until the entire fireplace surface is covered. Allow the adhesive to dry completely according to the manufacturer's instructions, typically 24-48 hours. Avoid disturbing the tiles during this drying period, as this can compromise the bond. Once the adhesive is dry, remove the tile spacers. Inspect the tiled surface for any imperfections or areas that need to be touched up. If any tiles are loose or improperly aligned, remove them and re-set them with fresh adhesive.
Grouting and Finishing: Completing the Tiled Fireplace
After the tile adhesive has fully cured, the next step is to apply grout. Grouting fills the gaps between the tiles, providing a watertight seal and enhancing the overall aesthetic appeal of the tiled surface. Select a grout color that complements the tiles and the overall design of the room. Prepare the grout according to the manufacturer's instructions, ensuring a smooth and consistent texture. Avoid adding too much water, as this can weaken the grout and affect its color.
Apply the grout to the tiled surface using the rubber grout float. Hold the grout float at a 45-degree angle and spread the grout evenly over the tiles, forcing it into the spaces between the tiles. Work in small sections and ensure that all the joints are completely filled with grout. Remove excess grout from the tile surfaces with the grout float, using a diagonal motion to avoid pulling grout out of the joints.
Once the grout has been applied and the excess grout has been removed, allow it to set for a short period of time, typically 15-30 minutes, as recommended by the manufacturer. Then, use a damp sponge to clean the tile surfaces. Rinse the sponge frequently and wring it out thoroughly to avoid over-wetting the grout joints. Gently wipe the tiles to remove grout haze, taking care not to disturb the grout within the joints. Repeat this process several times until the tiles are clean and free of grout residue.
After the initial cleaning, allow the grout to cure completely, typically 24-72 hours. During this curing period, protect the tiled surface from moisture and avoid using the fireplace. Once the grout is fully cured, apply a grout sealer to protect it from stains and moisture. Follow the manufacturer's instructions for applying the sealer, ensuring that it is applied evenly and allowed to dry completely. Polishing the tiles can further enhance their shine and appearance. Use a soft cloth or a specialized tile polishing pad to buff the tiles and remove any lingering haze or residue.
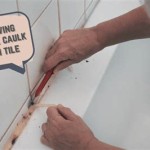
Finally, inspect the finished tiled fireplace for any remaining imperfections or areas that need attention. Touch up any grout lines that may have shrunk or cracked during the curing process. Seal the perimeter of the tiled area with a flexible sealant to prevent water from penetrating behind the tiles. Clean the surrounding area and remove any debris or dust. The newly tiled fireplace is now ready to add a touch of elegance and warmth to the living space.

Er Friendly Fireplace Makeover With L Stick Tiles The Homes I Have Made

Er Friendly Fireplace Makeover With L Stick Tiles The Homes I Have Made

A Step By Guide To Fireplace Refacing Diy Family Handyman

Er Friendly Fireplace Makeover With L Stick Tiles The Homes I Have Made

Building An Easy Modern Fireplace Mantel Young House Love

5 Easy Diy Fireplace Makeover Ideas Do It Best

A Step By Guide To Fireplace Refacing Diy Family Handyman

Er Friendly Fireplace Makeover With L Stick Tiles The Homes I Have Made

Tiling Fireplace Hearth Ceramic Tile Advice Forums John Bridge
:fill(white)/www.toppstiles.co.uk/static/uploads/2020/07/Fireplace-tiling-Batik.jpg?strip=all "Tips For Decorating Your Fireplace Topps Tiles")
Tips For Decorating Your Fireplace Topps Tiles
Related Posts