How To Tile A Bathroom Floor With Backer Board
Tiling a bathroom floor is a significant home improvement project that can dramatically enhance the aesthetic appeal and functionality of the space. A critical step in ensuring a long-lasting and durable tiled floor is the proper installation of backer board. Backer board provides a stable, water-resistant substrate that is essential for preventing cracks and ensuring proper adhesion of the tile. This article provides a comprehensive guide to tiling a bathroom floor with backer board, covering all necessary steps from preparation to finishing.
Preparing the Subfloor
The foundation for a successful tile installation is a solid subfloor. Before installing backer board, it is crucial to thoroughly inspect and prepare the existing subfloor. The goal is to create a level, clean, and structurally sound surface. This usually involves several key actions:
First, the existing floor covering must be removed. This may include old tiles, linoleum, or carpet. Use appropriate tools such as a scraper or pry bar to remove the existing flooring, taking care not to damage the subfloor beneath.
Once the old flooring is removed, the subfloor should be thoroughly cleaned. This involves sweeping, vacuuming, and potentially scrubbing to remove any debris, dust, adhesive residue, or other contaminants. A clean surface is essential for proper adhesion of the backer board.
Next, the subfloor should be inspected for damage or irregularities. Look for signs of water damage, rot, cracks, or unevenness. Any deficiencies must be addressed before proceeding. Water-damaged or rotted wood should be replaced. Cracks can be filled with a suitable patching compound. Uneven areas can be leveled using self-leveling compound or by adding shims as needed.
Finally, ensure the subfloor is securely fastened to the joists. Loose or squeaky subflooring should be secured by driving screws through the subfloor and into the joists below. This will minimize movement and provide a more stable base for the tile. Verify the subfloor meets minimum deflection requirements per industry standards and local building codes for the intended tile size and type. Using a straight edge and level, ensure the subfloor is level. Any variations greater than 1/4 inch over 10 feet should be addressed to prevent tiling issues.
Installing the Backer Board
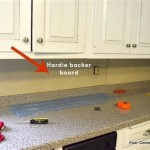
With the subfloor properly prepared, the next step is to install the backer board. Cement backer board is the most common choice for bathroom floors due to its water resistance and durability. Follow these steps for a successful installation:
Measure the bathroom floor and plan the layout of the backer board. Minimize cuts and seams and strive to arrange the boards so that they are staggered, similar to brickwork, to increase stability. Avoid placing seams directly over joists.
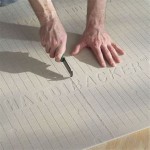
Cut the backer board to the necessary sizes using a utility knife or a backer board saw. Score the board several times with the utility knife, then snap it along the score line. For more intricate cuts, a backer board saw or a circular saw with a diamond blade can be used. Always wear safety glasses and a dust mask when cutting backer board.
Before placing the backer board, apply a thin-set mortar specifically designed for use with backer board to the subfloor. Use a notched trowel to create uniform ridges in the mortar. This mortar bed provides additional support and helps to ensure a strong bond between the backer board and the subfloor.
Carefully position the backer board onto the mortar bed, ensuring it is properly aligned and seated. Press firmly to ensure good contact between the backer board, mortar, and subfloor. Leave a small gap (approximately 1/8 inch) between the backer boards and around the perimeter of the room to allow for expansion and contraction.
Secure the backer board to the subfloor using backer board screws. These screws are specifically designed to resist corrosion and provide a strong hold. Space the screws every 6-8 inches along the edges and in the field of the board. Ensure the screws are driven flush with the surface of the backer board, but avoid over-tightening, which can damage the board.
Tape the seams between the backer boards with fiberglass mesh tape specifically designed for backer board. Apply a thin coat of thin-set mortar over the tape, embedding it completely. Smooth the mortar with a taping knife, creating a seamless transition between the boards. This helps to prevent cracks from developing in the tile grout lines. Allow the mortar to cure completely before proceeding to the next step.
Tiling the Floor
Once the backer board is properly installed and the mortar has cured, the floor is ready for tiling. Careful planning and execution are essential for achieving a professional-looking result.
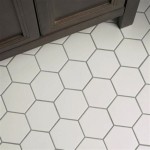
Plan the tile layout before applying any mortar. Consider the size and shape of the tiles and the overall design you want to achieve. Start by finding the center point of the room and laying out tiles from there. This will ensure that the tiles are symmetrical and balanced. Use tile spacers to maintain consistent grout lines. Adjust the layout as needed to avoid small cuts near the walls, which can look unprofessional.
Mix the thin-set mortar according to the manufacturer's instructions. Use a notched trowel to apply a layer of mortar to a small section of the backer board. The size of the section should be manageable so that the mortar does not dry out before the tiles are set. The size of the notched trowel depends on the size and type of the tile being used. Consult the tile manufacturer's recommendations for the appropriate trowel size.
Carefully place the tiles onto the mortar bed, pressing them firmly into place. Use tile spacers to maintain consistent grout lines. Use a level to ensure the tiles are even and flush with each other. If any tiles are uneven, gently tap them into place with a rubber mallet. Periodically check the level and alignment of the tiles to ensure a consistent and professional-looking installation.
Cut tiles as needed to fit around walls, doorways, and other obstacles. Use a tile cutter or a wet saw to make precise cuts. For curved cuts, a wet saw is generally required. Always wear safety glasses when cutting tiles.
Once all the tiles are set, allow the mortar to cure for at least 24-72 hours, or as recommended by the mortar manufacturer. Avoid walking on the tiles during this curing period.
Grouting and Sealing
After the mortar has fully cured, the next step is to grout the tiles. Grouting fills the spaces between the tiles, providing a water-resistant seal and enhancing the overall appearance of the floor.
Remove the tile spacers and clean the grout lines thoroughly. Use a grout saw or a utility knife to remove any excess mortar or debris. Vacuum the floor to remove any dust or grit.
Mix the grout according to the manufacturer's instructions. Apply the grout to the tile surface using a grout float, pressing it into the grout lines at a 45-degree angle. Work in small sections, ensuring that all the grout lines are completely filled.
Remove excess grout from the tile surface using the grout float at a 45-degree angle. Wipe the tile surface with a damp sponge, rinsing the sponge frequently. Be careful not to remove too much grout from the grout lines.
Allow the grout to haze over for approximately 15-30 minutes, or as recommended by the grout manufacturer. Then, polish the tile surface with a clean, dry cloth to remove the haze.
Allow the grout to cure for at least 72 hours, or as recommended by the grout manufacturer. During this curing period, protect the floor from moisture and heavy traffic.
After the grout has fully cured, apply a grout sealer to protect the grout from stains and moisture. Apply the sealer with a brush or sponge, following the manufacturer's instructions. Allow the sealer to dry completely before using the floor.
Finally, install baseboards or quarter-round molding around the perimeter of the room to cover the expansion gap between the tile and the wall. This will provide a finished and professional look. The baseboards can be attached with adhesive or nails. Caulk the top edge of the baseboard where it meets the wall to create a water-tight seal.

How To Install Cement Board On A Floor Diy Family Handyman

Tiling On Wooden Floors Part 4 Overboarding Bathroom Guru

How To Install Cement Backer Board For Floor Tile Installation The Home Depot

How To Fit Backer Boards Floors

Tiling On Wooden Floors Part 4 Overboarding Bathroom Guru

Floor Tile Part 1 Installing Cement Backer Board Handy Mandy

6mm No More Ply Tile Backer Board

Tile Underlayment The Complete Guide For Beginners Diytileguy

Tile Installation Backer Board Around A Bathtub Family Handyman

How To Install Shower Floor Hardie Board Haus 2 Home
Related Posts