How To Safely Remove Tile From A Wall
Removing wall tile can be a daunting task, but it's achievable with the right tools, safety precautions, and a methodical approach. Whether you're preparing for a renovation, fixing a damaged tile, or simply updating your decor, this comprehensive guide will provide you with step-by-step instructions to safely remove tile from your wall.
Before you begin, it's essential to gather the necessary tools and understand the potential hazards involved. This will ensure a smooth and safe tile removal process.
Tools and Safety Gear
Here are the essential tools and safety gear you'll need:
- Safety Glasses: Protect your eyes from flying debris.
- Gloves: Protect your hands from sharp edges and chemical irritants.
- Dust Mask: Prevent inhaling dust and particles.
- Chisel: Used to break the tile's bond with the wall.
- Hammer: For striking the chisel to break the tile.
- Putty Knife: For scraping off adhesive and grout.
- Utility Knife: For cutting through grout lines.
- Bucket: For collecting debris and disposing of old grout.
- Shop Vac: For cleaning up dust and debris efficiently.
- Tile Removal Solution (Optional): This can help loosen the adhesive and make removal easier.
- Work Gloves: Protect your hands from debris and chemicals.
Remember to always wear appropriate safety gear and follow proper safety guidelines when working with tools and chemicals.
Removing Tile from the Wall
Once you've gathered your tools and donned your safety gear, you can proceed with the following steps:
- Protect the surrounding area: Cover the floor and surrounding areas with drop cloths or plastic sheeting to avoid damage and protect your belongings from dust and debris.
- Prepare the tile: If you are removing a single tile, try to break it in the middle or corner to avoid spreading cracks to adjacent tiles. If you are removing multiple tiles, start at the edge and work your way inward.
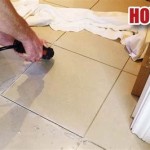
- Remove the grout: Use a utility knife to cut through the grout lines, removing as much grout as possible before you start breaking tiles. This will make the removal process easier and cleaner.
- Break the tile: Carefully position the chisel at the edge of the tile and give it a few firm taps with the hammer. The tile should begin to break. Continue tapping around the perimeter of the tile until it is loose enough to be removed.
- Loosen the adhesive: Once the tile is removed, use a putty knife or chisel to scrape off any remaining adhesive from the wall. You can use a tile removal solution to help loosen the adhesive and make removal easier.
- Remove the remaining tile: For remaining pieces of tile, use a chisel and hammer to break them into smaller pieces. This will make it easier to remove them from the wall.
- Clean up the area: Once all the tiles are removed, use a shop vac to clean up any dust and debris. You can then wash the wall with soap and water to remove any residual adhesive.
Dealing with Stuck Tiles
If you encounter a tile that refuses to budge, try the following tips:
- Apply heat: Using a heat gun or hair dryer, apply heat to the backside of the tile. This can help loosen the adhesive and make removal easier.
- Use penetrating oil: Apply penetrating oil around the perimeter of the tile and allow it to penetrate for several minutes before attempting to remove the tile. This can help loosen the adhesive.
- Use a pry bar: If the tile is still stuck, you can use a pry bar to carefully pry it off the wall. Be careful not to damage the wall underneath.
Remember to always exercise caution when using tools and handling sharp objects. If you're unsure about any step, consult a professional contractor to ensure your safety and project success.
To ensure a successful tile removal project, it's essential to understand the different types of tiles and their bonding methods. This knowledge will help you choose the right tools and techniques for efficient and safe removal.
Types of Tile and Bonding Methods
The type of tile you are removing will affect how you approach the process. Here are a few common tile types and their bonding methods:
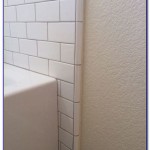
- Ceramic Tile: Often bonded with thin-set mortar and can be removed with a chisel and hammer.
- Porcelain Tile: Known for durability, it's usually bonded with thin-set mortar and can be removed using the same techniques as ceramic tile.
- Glass Tile: Glass tiles are delicate and should be removed with extra care. Use a chisel and hammer carefully to avoid shattering the tile.
- Stone Tile: Natural stones like granite, marble, and slate are harder to remove and may require specialized tools and techniques.
- Mosaic Tile: This type of tile can be challenging to remove due to its small size. Patience and careful handling are essential.
Always be aware of the specific type of tile you are working with and adjust your techniques accordingly.
While this guide provides general instructions for removing tile from a wall, remember that every project has its own unique challenges. If you're unsure about the proper methods to use for your situation, it’s wise to consult a professional contractor to ensure a smooth and successful tile removal experience.

Easy Diy Guide On Removing Tiles From Walls Fantastic Handyman Au

How To Remove A Tile Backsplash Homeserve Usa

How To Remove Tile From Wall Like A Pro

How To Remove Floor And Wall Tiles Without Breaking Them

How To Remove Tile From Wall Like A Pro

How To Remove Old Tiles A Step By Guide Walls And Floors

Diy How To Remove Ceramic Tiles Off Drywall

How To Remove Wall Tiles 11 Steps With Pictures Wikihow

How To Remove A Bathroom Wall Tile Today S Homeowner

How To Remove Tiles Get The Best Result For Your Tiling Project
Related Posts