```html
How To Replace Wall Tile In Shower
Replacing wall tile in a shower can revitalize the look of a bathroom and address issues such as cracked, stained, or outdated tiles. The process involves removing the old tile, preparing the surface, and installing the new tile. Successfully completing this project requires careful planning, the right tools, and attention to detail.
Planning and Preparation
Before beginning any physical work, a thorough assessment of the existing tile and surrounding area is crucial. Note the extent of the damage or deterioration. This will help determine the quantity of replacement tile needed and identify potential underlying issues such as water damage. It is also essential to match the existing tile as closely as possible in terms of size, color, and texture if only replacing a section. If a complete overhaul is desired, selecting a new tile design and color scheme is the first step.
Calculate the square footage of the area to be tiled and add approximately 10-15% for waste due to cuts and potential breakage. Gather all necessary materials and tools. This will minimize interruptions during the tiling process. The required tools include a tile scorer, tile nippers, a grout saw, a chisel, a hammer, a putty knife, a notched trowel, a level, a measuring tape, a sponge, buckets, safety glasses, gloves, and a dust mask. Essential materials consist of replacement tiles, thin-set mortar, grout, sealant, cement board screws, and water-resistant drywall compound.
Protect the surrounding area from dust and debris by covering the shower floor and nearby bathroom fixtures with drop cloths or plastic sheeting. Ensure adequate ventilation in the bathroom. This is important for both personal safety and to allow the thin-set mortar and grout to dry properly. Turn off the water supply to the shower to prevent any accidental leaks during the process.
Removing Existing Tile
Begin by removing loose grout around the damaged or targeted tiles. A grout saw or a utility knife can be used for this purpose. Carefully run the tool along the grout lines to loosen the grout without damaging the surrounding tiles (if they are to remain). For stubborn grout, a grout removal tool attached to a rotary tool can expedite the process. However, exercise caution to avoid damaging the adjacent tiles.
Once the grout is removed, use a chisel and hammer to carefully dislodge the tiles. Position the chisel at an angle behind the tile and gently tap the hammer to loosen the adhesive bond. Work slowly and methodically to avoid damaging the underlying wallboard or adjacent tiles. Apply steady pressure rather than excessive force. This will help prevent the tile from shattering and causing injury.
After removing the tile, inspect the underlying wallboard for any signs of water damage, mold, or rot. If damage is present, it must be addressed before proceeding with the new tile installation. Remove any damaged sections of wallboard and replace them with new water-resistant cement board. Secure the cement board with cement board screws, ensuring that the screws are properly countersunk to avoid protruding above the surface. Apply water-resistant drywall compound to the seams between the cement boards to create a smooth and waterproof surface.
Clean the surface thoroughly to remove any residual adhesive, grout, or debris. A putty knife can be used to scrape away stubborn adhesive residue. Vacuum the area to remove any loose particles. Finally, wipe down the surface with a damp sponge to ensure it is clean and ready to receive the thin-set mortar.
Installing New Tile
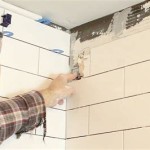
Prepare the thin-set mortar according to the manufacturer's instructions. The consistency should be similar to that of peanut butter – spreadable but not too runny. Using a notched trowel, apply a thin, even layer of thin-set mortar to the prepared wall surface. The notch size of the trowel will depend on the size of the tile being used. Refer to the tile manufacturer's recommendations for the appropriate trowel size.
Press each tile firmly into the mortar, using a slight twisting motion to ensure good adhesion. Use tile spacers to maintain consistent grout lines between the tiles. Spacers are available in various sizes, so choose the appropriate size to achieve the desired grout line width. Check the alignment and level of each tile with a level as you go. Make any necessary adjustments before the mortar sets. For tiles that require cutting, use a tile scorer to create a precise score line and then snap the tile along the score. Alternatively, a wet saw can be used for more complex cuts.
Allow the thin-set mortar to cure completely according to the manufacturer's instructions, typically 24-48 hours. Avoid disturbing the tiles during the curing process. Once the mortar is fully cured, remove the tile spacers.
Grouting and Sealing
Prepare the grout according to the manufacturer's instructions. The consistency should be similar to that of a thick paste. Using a grout float, apply the grout to the tile surface, working it into the grout lines at a 45-degree angle. Ensure that all grout lines are completely filled. Remove excess grout from the tile surface with the grout float.
After the grout has had a chance to set slightly, typically 15-30 minutes, use a damp sponge to clean the tile surface. Rinse the sponge frequently in clean water. Be careful not to remove too much grout from the grout lines. Repeat this process several times until the tile surface is clean and free of grout haze.
Allow the grout to cure completely according to the manufacturer's instructions, typically 24-72 hours. Once the grout is fully cured, apply a grout sealant to protect the grout from moisture and stains. The sealant should be applied according to the manufacturer's instructions. Allow the sealant to dry completely before using the shower.
Inspect the surrounding areas, such as the joint where the tile meets the shower pan or tub, and apply a bead of sealant or caulk to create a waterproof barrier. This will help prevent water from seeping behind the tile and causing damage. Regularly inspect the grout and sealant for any signs of deterioration and reapply sealant as needed to maintain a waterproof seal.
```
How To Remove Bathtub Shower Wall Tiles

Part 1 How To Install Tile On Shower Tub Wall Step By

How To Install A Shower Tile Wall Bathroom

How To Remove A Bathroom Wall Tile Today S Homeowner

How To Replace Shower Tiles Young House Love

How To Install A Shower Tile Wall Bathroom

How To Replace Shower Wall Tiles Art Tile Renovation

How To Remove Tiled Shower Walls The Floor Elf

How To Remove Replace One Bathroom Tile Ceramic Repair

How To Remove Tiled Shower Walls The Floor Elf
Related Posts