```html
How To Replace Tile Wall In Bathroom
Replacing bathroom tile is a significant undertaking that can dramatically improve the aesthetic appeal and functionality of the space. While seemingly daunting, tackling this project with careful planning, the right tools, and a methodical approach can yield professional-looking results. This article provides a comprehensive guide to replacing tile on a bathroom wall, from initial preparation to the final grouting.
Planning and Preparation: Setting the Stage for Success
Before any physical work begins, thorough planning is crucial. This stage involves assessing the existing tile situation, selecting replacement tiles, gathering necessary tools and materials, and preparing the work area.
Assessment of Existing Tile: Begin by inspecting the existing tile wall. Identify the extent of the damage or deterioration. Are there cracked or loose tiles? Is the grout crumbling? Understanding the scope of the project determines the quantity of materials required and the time commitment involved. Note any underlying issues, such as water damage, which must be addressed before installing new tiles. Ignoring these problems can lead to premature failure of the new tiling.
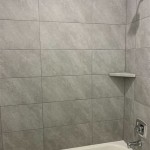
Tile Selection: Choosing the right tile is paramount, considering both aesthetics and functionality. Bathroom tiles should be water-resistant and durable. Common options include ceramic, porcelain, and natural stone tiles. Porcelain is particularly well-suited for bathrooms due to its low porosity and resistance to staining. Consider the size and style of the bathroom when selecting tile size and color. Smaller tiles can make a small bathroom appear larger, while larger tiles can create a more modern and seamless look. Obtain samples of different tiles and view them in the bathroom under different lighting conditions before making a final decision.
Tool and Material Acquisition: A successful tile replacement project hinges on having the right tools and materials readily available. Essential tools include: * Safety glasses and work gloves * A chisel and hammer or a specialized tile removal tool * A grout removal tool (grout saw or rotary tool with a grout removal attachment) * A notched trowel (size determined by tile size) * A tile cutter (snap cutter or wet saw) * A level * A measuring tape * A pencil * Buckets and sponges * A rubber grout float * Grout sponge * Clean cloths * Sealant (for corners and edges) * Caulking gun
Essential materials include: * Replacement tiles (plus extra for cuts and breakage) * Thin-set mortar (choose a type appropriate for the selected tile) * Grout (choose a type and color that complements the tile) * Backer board (if replacing the existing substrate) * Screws or nails (for securing backer board) * Tile spacers
Workspace Preparation: Protect surrounding surfaces from dust and debris. Cover the floor with drop cloths or plastic sheeting. Remove any fixtures that may obstruct the tiling process, such as towel bars, mirrors, and toilet paper holders. Turn off the water supply to the toilet and sink to prevent accidental leaks. Ensure adequate ventilation in the bathroom by opening windows or using a fan. Proper preparation streamlines the work process and minimizes cleanup.
Tile Removal and Surface Preparation: Creating a Clean Slate
The next phase involves removing the existing tile and preparing the underlying surface for the new installation. This step requires careful attention to avoid damaging the surrounding walls and plumbing.
Tile Removal: Begin by removing the grout. A grout removal tool, such as a grout saw or rotary tool with a grout removal attachment, is used to carefully scrape away the grout surrounding each tile. Exercise caution to avoid scoring the adjacent tiles. Once the grout is removed, use a chisel and hammer or a specialized tile removal tool to pry the tiles off the wall. Start at a corner or edge and work systematically across the wall. Be prepared for some tiles to break during removal. Wear safety glasses and gloves to protect against flying debris. If the tiles are firmly adhered, consider using a heat gun to soften the adhesive. The heat can make the tile removal process less strenuous and reduce the risk of damaging the substrate.
Backer Board Inspection and Replacement: After removing the tiles, inspect the underlying backer board. Backer board, typically cement board or a similar water-resistant material, provides a stable and moisture-resistant base for the tile. If the backer board is damaged, crumbly, or shows signs of water damage, it must be replaced. To replace the backer board, carefully cut it to the appropriate size using a utility knife or saw. Secure the new backer board to the wall studs using screws or nails, ensuring it is flush with the surrounding surfaces. Seal the seams between the backer board sheets with backer board tape and thin-set mortar to create a waterproof barrier.
Surface Cleaning and Leveling: Thoroughly clean the surface of the backer board to remove any dust, debris, or residual adhesive. Use a scraper to remove any stubborn adhesive residue. Ensure the surface is level and smooth. If necessary, apply a thin layer of thin-set mortar to fill any imperfections or low spots. Allow the mortar to dry completely before proceeding. A level and clean surface is essential for a professional-looking tile installation.
Tile Installation and Grouting: Crafting the Finished Product
The final phase involves applying the thin-set mortar, setting the tiles, and grouting the joints. This step requires precision and attention to detail to ensure a visually appealing and durable result.
Applying Thin-Set Mortar: Mix the thin-set mortar according to the manufacturer's instructions. Use a notched trowel to apply a consistent layer of thin-set mortar to the backer board. The size of the notches on the trowel should correspond to the size of the tiles being used. Apply the mortar in small sections, working from the bottom up or from a central point outwards. Comb the mortar with the notched trowel to create ridges. These ridges provide a better bond between the tile and the mortar.
Setting the Tiles: Press each tile firmly into the thin-set mortar, ensuring it is level and aligned with the adjacent tiles. Use tile spacers to maintain consistent grout lines. Work systematically across the wall, checking the alignment frequently with a level. For tiles that require cutting to fit around corners or fixtures, use a tile cutter (snap cutter or wet saw). A snap cutter is suitable for straight cuts, while a wet saw is necessary for more complex cuts or for cutting thicker tiles. After setting the tiles, allow the thin-set mortar to dry completely according to the manufacturer's instructions. This typically takes 24 to 48 hours.
Grouting: Once the thin-set mortar is dry, remove the tile spacers. Mix the grout according to the manufacturer's instructions. Use a rubber grout float to apply the grout to the tile joints, pressing it firmly into the spaces. Work diagonally across the tiles to ensure the grout fills all the joints completely. After applying the grout, use a damp grout sponge to wipe away the excess grout from the tile surfaces. Rinse the sponge frequently and avoid using too much water, as this can weaken the grout. Allow the grout to haze over slightly before buffing the tiles with a clean, dry cloth. This removes any remaining grout residue and reveals the clean tile surfaces. Allow the grout to cure completely according to the manufacturer's instructions. This typically takes several days.
Sealing and Caulking: After the grout has cured, apply a grout sealer to protect it from stains and moisture. Follow the manufacturer's instructions for application. Apply sealant to the corners and edges of the tiled area where the tile meets other surfaces, such as the bathtub or shower surround. Use a caulking gun to apply a bead of sealant and smooth it with a wet finger or a specialized caulking tool. Sealing and caulking provide a waterproof barrier and prevent water damage.
```
How To Install A Shower Tile Wall Bathroom

The Complete Guide To Installing Tile On Shower Or Bathtub Walls

How To Tile A Bathroom Wall Granada Cement Blog Ideas Tips And More

How To Remove Bathtub Shower Wall Tiles

How To Renovate Bathroom Without Removing Tiles Multipanel

How To Remove A Bathroom Wall Tile Today S Homeowner

Edited Removing Tile From Bathroom Walls Hometalk

How To Replace Shower Tiles Young House Love

Vintage Pink Wall Tiles Removing Adhesive Made Easy

How To Replace Shower Wall Tiles Art Tile Renovation
Related Posts