How to Replace Floor Tiles in a Bathroom
Replacing floor tiles in a bathroom can be a challenging but rewarding home improvement project. With proper planning and execution, you can transform the look and feel of your bathroom with new, stylish tiles. This article outlines the essential steps involved in replacing bathroom floor tiles, providing a comprehensive guide for DIY enthusiasts.
1. Preparation and Planning
Before diving into the replacement process, it's crucial to prepare the bathroom and plan the project meticulously.
Clear the Bathroom: Remove all furniture, fixtures, and items from the bathroom to create an open workspace. Cover remaining items with plastic sheeting to protect them from dust and debris.
Assess Tile Condition: Carefully inspect the existing tiles to determine the extent of damage. If only a few tiles are damaged, consider replacing those individually instead of the entire floor.
Choose New Tiles: Select new tiles that complement the bathroom's design and match the desired feel and style. Consider factors such as size, color, material, and durability. It's advisable to purchase extra tiles to account for potential breakage or future repairs.
Measure and Plan Layout: Measure the bathroom floor accurately to determine the required tile quantity and layout. Consider the tile size and grout lines to create a seamless and aesthetically pleasing installation.
Obtain Necessary Tools and Materials: Gather the necessary tools and materials, including a tile cutter, grout float, grout, tile adhesive, a level, a trowel, a hammer, a chisel, a rubber mallet, a bucket, a sponge, a safety mask, and safety glasses.
2. Removing Existing Tiles
Once the preparations are complete, it's time to remove the existing tiles.
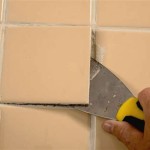
Start at the Edges: Begin by removing tiles at the edges of the floor, as these tiles are generally less secured.
Use a Chisel and Hammer: Carefully insert a chisel underneath the edge of the tile and gently tap it with a hammer to loosen the tile from the adhesive. Work systematically, removing tiles one by one.
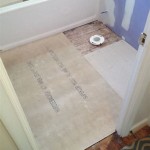
Remove Mortar and Adhesive: After removing the tiles, use a chisel and hammer to remove any remaining mortar or adhesive from the subfloor. Ensure the subfloor is clean and smooth for a secure tile installation.
3. Installing New Tiles
With the subfloor prepared, you can proceed with installing the new tiles.
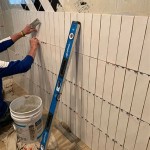
Apply Adhesive: Apply a layer of tile adhesive to the subfloor using a trowel. Spread the adhesive evenly and ensure proper coverage for optimal bonding.
Install Tiles: Starting from a corner or center point, position the first tile and firmly press it into the adhesive. Use a rubber mallet to ensure level installation and proper adhesion.
Maintain Consistent Spacing: Use spacers between tiles to ensure consistent grout lines and a visually appealing layout.
Leveling: Regularly check the level of the tiles to ensure a flat and even surface. Use a level to adjust tiles as needed.
Allow for Curing: After installing the tiles, allow the adhesive to cure for the recommended time, usually 24 hours. This ensures proper bonding and stability.
4. Grouting and Finishing
Once the adhesive has cured, you can grout the tiles to create a finished look.
Mix Grout: Prepare the grout according to the manufacturer's instructions, ensuring a smooth and consistent mixture.
Apply Grout: Use a grout float to apply the grout into the spaces between the tiles. Press the grout firmly into the joints and remove excess grout with a damp sponge.
Clean Excess: Clean the tiles and grout with a damp sponge, removing any excess grout and ensuring a smooth and polished finish. Allow the grout to cure for the recommended time.
Seal Grout: After the grout has cured, apply a grout sealant to protect the grout from staining and moisture.
Replace Fixtures and Furnishings: Once the grout is fully cured, replace the bathroom fixtures, furniture, and other items, completing the tile replacement project.
Replacing bathroom floor tiles can significantly enhance the aesthetic appeal and functionality of the space. By following these steps and exercising patience and attention to detail, you can achieve professional-looking results and enjoy the benefits of a revitalized bathroom.

How To Remove A Tile Floor

How To Tile Floors Walls Sincerely Sara D Home Decor Diy Projects

How To Lay Bathroom Tile 5 Easy Steps Rubi Blog Usa

How To Lay A Tile Floor

Laying Floor Tiles In A Small Bathroom Houseful Of Handmade

How To Upgrade Bathroom Tile Without Replacing

How To Retile A Shower Floor Art Tile Renovation
.png?strip=all "How To Fix Loose Or Broken Ceramic Floor Tiles")
How To Fix Loose Or Broken Ceramic Floor Tiles

How To Remove Bathroom Tile Steps Prep Considerations

How To Install An Adhesive Vinyl Bathroom Tile Floor Merrypad
Related Posts