How To Replace Broken Floor Tiles In Bathroom – A Step-By-Step Guide
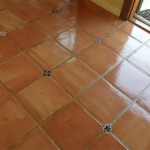
A broken floor tile in your bathroom can not only be unsightly but also a potential tripping hazard. Replacing a broken floor tile does not have to be a difficult or time-consuming task. With the right tools and a little bit of patience, you can easily replace a broken floor tile yourself.
Tools and Materials You’ll Need
Before you start, gather the necessary tools and materials. You will need the following:
- Replacement tile
- Tile chisel or scraper
- Hammer or mallet
- Safety glasses
- Dust mask
- Grout saw or oscillating tool
- Thin-set mortar
- Grout
- Grout float
- Tile spacers
- Sponge or cloth
Step 1: Remove the Broken Tile
Put on your safety glasses and dust mask. Use a tile chisel or scraper and gently tap the edges of the broken tile. Be careful not to damage the surrounding tiles. Once the edges are loose, use a hammer or mallet to break up the tile into smaller pieces. Remove the pieces of the broken tile and any debris from the area.
Step 2: Clean the Area
Once the broken tile is removed, clean the area thoroughly. Remove any remaining adhesive or debris. Use a sponge or cloth to wipe down the area with clean water. Allow the area to dry completely.
Step 3: Apply Thin-Set Mortar
Apply a thin layer of thin-set mortar to the area where the new tile will be placed. Use a notched trowel to spread the mortar evenly. Make sure that the mortar is level and smooth.
Step 4: Install the New Tile
Carefully place the new tile onto the thin-set mortar. Press down on the tile firmly to ensure that it is level and secure. Use tile spacers to ensure that the tile is evenly spaced from the surrounding tiles.
Step 5: Remove Excess Mortar
Once the tile is in place, remove any excess mortar that has squeezed out from the sides of the tile. Use a damp sponge or cloth to wipe away the excess mortar.
Step 6: Grout the Tile
Once the mortar has dried completely, you can grout the tile. Mix the grout according to the manufacturer's instructions. Use a grout float to apply the grout to the joints between the tiles. Press the grout firmly into the joints and remove any excess grout.
Step 7: Clean the Grout
Once the grout has dried completely, clean the tiles and grout with a damp sponge or cloth. Remove any remaining grout residue. Allow the grout to cure completely before using the bathroom.
.png?strip=all "How To Fix Loose Or Broken Ceramic Floor Tiles")
How To Fix Loose Or Broken Ceramic Floor Tiles

Solved How To Repair Ed Chipped Tiles Surface Masters

5 Ways To Patch Tile

How To Replace A Broken Tile Ace Hardware

How To Repair Chipped Or Broken Tile And Replace Grout

Home Dzine Bathrooms Fix Chipped Or Ed Tiles

Repairing Ed Shower Floor Tiles Using Fillers Leaky Showers

How To Remove Replace One Bathroom Tile Ceramic Repair

Why Ed Tiles In Your Bathroom Are A Problem Shower Sealed

How To Repair A Broken Tile If You Don T Have Any Extra
Related Posts