How to Replace Bathroom Tile in a Shower
Replacing bathroom tile in a shower can be a challenging yet rewarding DIY project. This process involves meticulous preparation, careful tile removal, and precise installation. By following these steps, homeowners can successfully refresh their shower space with new tile and enhance the overall aesthetics of their bathroom.
Preparing for Tile Removal
Before embarking on the actual tile removal process, it is crucial to prepare the workspace thoroughly. This involves clearing the shower area of all personal items, such as toiletries, towels, and shower curtains. Additionally, it is advisable to protect the surrounding areas from potential damage caused by dust and debris, using drop cloths or plastic sheeting.
Next, turn off the water supply to the shower. This step is essential to prevent any water leaks during the tile removal process. Locate the main water shutoff valve for the bathroom or the shower head itself. Open the shower faucet to drain any remaining water in the pipes.
After the water is shut off, carefully dismantle the showerhead and any other fixtures that are attached to the shower wall. This allows for easier access to the tile and reduces the risk of damaging these components during the removal process.
Once the shower area is prepped, the existing tile can be removed. This task requires a combination of tools and techniques, depending on the type of tile and the condition of the grout. For ceramic or porcelain tiles that are firmly adhered to the wall, a chisel and hammer can be employed to carefully break the tile.
Alternatively, a tile removal tool can be used to lift and pry the tile from the wall. If the grout is very hard, it may need to be loosened with a grout saw or a utility knife.
As the tile is removed, it's important to be mindful of the underlying substrate. Be careful not to damage the drywall, cement board, or any other material that may be present behind the tile. If the substrate is damaged, it will need to be repaired before the new tile can be installed.
Installing New Tile
Once the old tile is removed, the shower walls should be cleaned thoroughly to remove any remaining mortar, grout, or debris. This ensures that the new tile will adhere properly to the surface. Any cracks, holes, or other imperfections in the substrate should be repaired using patching compound or other appropriate materials.
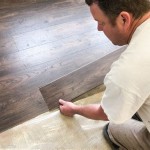
The next step involves setting up the new tile. This may involve creating a layout guide for the tile pattern, especially if a specific design is desired. Remember to account for the thickness of the grout and any expansion joints when making the layout.
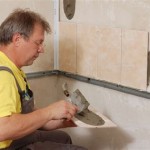
Start installing the tiles by applying thin-set mortar to the wall using a notched trowel. The size and shape of the notch on the trowel will vary depending on the size and type of the tile. Apply the mortar in a thin layer, ensuring that it covers the entire surface area where the tile will be placed.
Carefully position the tile on the mortar bed, pressing it firmly into the wall to ensure proper adhesion. Use a level to make sure that each tile is installed straight and at the same height. Use tile spacers to maintain even grout lines and ensure proper spacing between the tiles.
After the tile is installed, allow the mortar to cure according to the manufacturer’s instructions. This curing time will vary depending on the type of mortar used. Once the mortar is cured, the grout can be applied. Apply the grout using a rubber float, filling the spaces between the tiles. Clean any excess grout using a damp sponge.
After the grout has set, the shower can be finished by installing any necessary trim pieces. This may include decorative corner pieces, edge trim, or other finishing touches. Once the trim is installed, the shower can be reassembled. Replace the showerhead, faucet, and other fixtures and then turn the water supply back on.
Final Considerations for Success
Success in replacing bathroom tile requires a combination of careful planning, meticulous execution, and attention to detail. It is crucial to choose the right type of tile for the shower environment. This involves selecting materials that are water-resistant, durable, and easy to clean.
Additionally, it is essential to use high-quality mortar, grout, and tile spacers to ensure that the new tile installation is strong and long-lasting. If you are not an experienced DIYer, it is always advisable to seek professional assistance for the tile replacement project. They can provide expert guidance and ensure that the job is done correctly and efficiently.

Repair Fallen Tile Reinstall Shower With Simple Fix Re Install Bath No Grout

How To Remove Bathtub Shower Wall Tiles

How To Replace Damaged Shower Surround Tile

Diy Shower Remodel Start To Finish Part 1 Of 2

Semi Diy Bathroom Remodel Replacing A Tub Surround The Bathtub Tile

How To Fix Shower Tiles Falling Off Wall Diy

The Complete Guide To Installing Tile On Shower Or Bathtub Walls

The Best Way To Remove Old Shower Tile

How To Replace Shower Wall Tiles Art Tile Renovation

How To Replace Shower Tiles Young House Love
Related Posts