How To Repair Loose Tile In Shower Floor
A loose tile in your shower floor is not only unsightly, but it can also be a safety hazard. If you step on a loose tile, it could crack or break, causing you to slip and fall. In addition, loose tiles can allow water to seep beneath the tile and damage the subfloor. Fortunately, repairing a loose tile in your shower floor is a relatively easy and inexpensive project that you can do yourself.
Before you begin, you will need to gather a few supplies, including:
- A hammer or mallet
- A chisel or utility knife
- A trowel
- Thinset mortar
- Grout
- A sponge
- A bucket
Step 1: Remove the Loose Tile
The first step is to remove the loose tile. To do this, gently tap the tile with a hammer or mallet. If the tile is loose, it should come up easily. If the tile is not loose, you may need to use a chisel or utility knife to carefully pry it up.
Step 2: Clean the Area
Once the loose tile is removed, you will need to clean the area where the tile was located. Remove any old thinset mortar or grout that may be present. You can use a sponge and a bucket of water to clean the area.
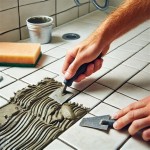
Step 3: Apply Thinset Mortar
Now, you will need to apply thinset mortar to the area where the new tile will be installed. Use a trowel to spread the thinset mortar evenly over the area. Be sure to press the thinset mortar firmly into the area.
Step 4: Install the New Tile
Once the thinset mortar has been applied, you can install the new tile. Place the new tile in the area where the old tile was located. Press the tile firmly into the thinset mortar. Be sure to align the new tile with the surrounding tiles.
Step 5: Grout the Tile
Once the new tile is installed, you will need to grout the tile. To do this, mix the grout according to the manufacturer's instructions. Use a trowel to spread the grout over the tile. Be sure to press the grout firmly into the joints between the tiles.
Step 6: Clean the Grout
Once the grout has been applied, you will need to clean the grout. To do this, use a sponge and a bucket of water to wipe away any excess grout. Be sure to rinse the sponge frequently to remove any grout that may build up on the sponge.
Step 7: Allow the Grout to Dry
Once the grout has been cleaned, you will need to allow the grout to dry. It may take several hours or even overnight for the grout to dry completely. Once the grout is dry, your shower floor will be repaired and ready to use.
Repairing a loose tile in your shower floor is a relatively easy and inexpensive project that you can do yourself. By following these steps, you can repair the loose tile and restore your shower floor to its former glory.

How To Fix A Loose Tile In The Bathroom Floor

Tile Repair Loose Tiles Part 1 How To Identify And The Proper Way Remove Them

Fixing Loose Floor Tiles And Why They In New Builds

Repair Fallen Tile Reinstall Shower With Simple Fix Re Install Bath No Grout

How To Prevent Expensive Bathroom Shower Tile And Grout Repair Promaster Home Handyman
.png?strip=all "How To Fix Loose Or Broken Ceramic Floor Tiles")
How To Fix Loose Or Broken Ceramic Floor Tiles

How To Fix Loose Hollow Tile Floors Don T Remove Or Replace Just Drill Fill

Loose Tile Repair Via Injection The Extractor

How To Repair Shower Tile Pulling Away From Wall Diy Home Improvement Forum

Steam Shower Floor Tile Repair
Related Posts