How To Repair Loose Floor Tiles Without Removing Them
Loose floor tiles can be a common household nuisance, detracting from a floor's aesthetic appeal and potentially posing a safety hazard. Addressing this issue promptly is crucial to avoid further damage and potential accidents. While traditional repair methods often involve the cumbersome and time-consuming process of removing and replacing the affected tiles, effective techniques exist for repairing loose tiles without resorting to such drastic measures. This article provides a detailed guide on how to repair loose floor tiles without removing them, focusing on practical methods and preventative measures. Understanding the underlying causes of tile loosening is fundamental to implementing the appropriate repair strategy.
Several factors contribute to floor tile detachment. One of the most prevalent causes is inadequate initial adhesion. This could stem from insufficient application of the adhesive during the initial installation, the use of an incorrect type of adhesive for the specific tile and subfloor materials, or improper subfloor preparation. A subfloor that is not clean, level, or structurally sound can compromise the bond between the tile and the subfloor, leading to premature loosening. Furthermore, moisture exposure plays a significant role. Water infiltration from spills, leaks, or high humidity can weaken the adhesive bond over time. Temperature fluctuations can also contribute to tile loosening; expansion and contraction cycles can stress the adhesive, eventually causing it to fail. Heavy foot traffic and impact, particularly in high-traffic areas, can also accelerate the deterioration of the adhesive bond.
Before commencing any repair work, a thorough assessment of the situation is paramount. This assessment involves identifying all the loose tiles and examining the extent of the damage. Gently tap on each tile to determine if any areas sound hollow, which suggests a lack of adhesion. Observing the grout lines around the loose tiles is also crucial. If the grout is cracked or missing, it could indicate that moisture has penetrated beneath the tiles. Carefully inspect the surrounding tiles to see if they are also showing signs of loosening. Finally, evaluate the general condition of the floor and subfloor. If there are signs of water damage, such as staining or warping, addressing the underlying moisture issue must take precedence before attempting to repair the tiles.
Preparation for Repairing Loose Tiles
Prior to initiating the repair process, gather the necessary materials and tools. Essential items include a high-quality tile adhesive specifically designed for the type of tile being repaired. Acrylic-based adhesives are often suitable for ceramic and porcelain tiles, while epoxy-based adhesives may be preferred for stone tiles. In addition to the adhesive, a grout saw or utility knife is needed to remove loose or damaged grout around the tile. A vacuum cleaner is essential for removing debris and dust from the affected area. A clean, damp sponge or cloth is necessary for cleaning the tile surface and wiping away excess adhesive. A rubber mallet or tapping block is beneficial for gently tapping the tile back into place. Finally, appropriate safety gear, such as gloves and eye protection, is essential.
The preparation stage involves meticulous cleaning. Begin by removing any loose debris or dirt from around the affected tile using a vacuum cleaner or brush. If there is loose or cracked grout, carefully remove it with a grout saw or utility knife. Take care not to damage the surrounding tiles during this process. Thoroughly clean the surface of the loose tile and the surrounding area with a damp sponge or cloth to remove any remaining dirt or residue. Ensure that the area is completely dry before proceeding with the adhesive application. This process ensures proper adhesion and longevity of the repair.
Applying Adhesive Under the Tile
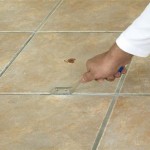
Several methods can be used to introduce adhesive under the loose tile without removing it. One common approach involves using a syringe or squeeze bottle to inject the adhesive beneath the tile. This technique is particularly effective for tiles with narrow grout lines. Select a syringe or bottle with a nozzle that can easily fit into the grout lines. Fill the syringe or bottle with the chosen tile adhesive. Carefully insert the nozzle into the grout lines around the loose tile and slowly inject the adhesive underneath. Apply the adhesive in a consistent and controlled manner, ensuring that it spreads evenly across the underside of the tile. Avoid over-applying the adhesive, as this can cause it to seep out from the grout lines.
Another method involves using a thin blade or spatula to work the adhesive beneath the tile. This technique is suitable for tiles with slightly wider grout lines or tiles that are partially lifted. Apply a small amount of adhesive to the tip of a thin blade or spatula. Carefully insert the blade or spatula into the grout lines around the loose tile and gently work the adhesive underneath. Move the blade or spatula around the perimeter of the tile to ensure that the adhesive is distributed evenly. As with the syringe method, avoid over-applying the adhesive.
After applying the adhesive, gently press down on the tile to ensure that it is firmly seated. Use a rubber mallet or tapping block to gently tap the tile into place, ensuring that it is level with the surrounding tiles. Wipe away any excess adhesive that seeps out from the grout lines with a damp sponge or cloth. Place a weight, such as a heavy book or brick, on top of the tile to keep it in place while the adhesive dries. Allow the adhesive to dry completely according to the manufacturer's instructions. This drying time typically ranges from 24 to 48 hours. Avoid walking on the repaired tile during the drying period.
Grouting and Finishing the Repair
Once the adhesive has fully cured, the next step involves re-grouting the tile. Select a grout that matches the existing grout color as closely as possible. Mix the grout according to the manufacturer's instructions. Apply the grout to the grout lines around the repaired tile using a grout float. Ensure that the grout fills the grout lines completely. Remove any excess grout from the tile surface with the grout float. Allow the grout to dry for the recommended time, typically 15 to 30 minutes.
After the grout has partially dried, use a damp sponge to wipe away any remaining grout haze from the tile surface. Rinse the sponge frequently to avoid smearing the grout. Allow the grout to fully cure for at least 24 hours before exposing the repaired area to water or heavy traffic. After the grout has fully cured, apply a grout sealer to protect it from moisture and stains. This sealer will help to prolong the life of the grout and maintain its appearance. Follow the manufacturer's instructions for applying the grout sealer. Regular maintenance, such as cleaning spills promptly and resealing the grout periodically, will help to prevent future tile loosening. Addressing underlying issues, such as moisture leaks, is also crucial for maintaining the integrity of the floor.
An alternative method involves using epoxy grout. Epoxy grout is more resistant to moisture and stains than traditional cement-based grout. This means it can be more expensive and more difficult to work with. If choosing epoxy grout, carefully follow the manufacturer’s instructions and take precautions to prevent it from staining the tile. Apply epoxy grout to the grout lines around the repaired tile using a grout float, being sure to fill each line completely. Remove any excess epoxy grout from the tile surface promptly to prevent the grout from hardening. The epoxy grout will need to cure completely, which is typically around 24 to 72 hours. Avoid exposing the repaired area to water or heavy traffic during this time. Once the epoxy grout has fully cured, it shouldn’t require sealing.

How To Fix A Loose Floor Tile Without Removing It

Fixing Loose Floor Tiles And Why They In New Builds

How To Fix Loose Hollow Tile Floors Don T Remove Or Replace Just Drill Fill

Method Surprised 50 Year Old Tiler Fix Loose Tiles Without Removing

How To Fix A Hollow Tile Step By Guide

Tile Repair Loose Tiles Part 1 How To Identify And The Proper Way Remove Them

How To Fix A Loose Floor Tile Without Removing It

Why Are My Floor Tiles Loose And How To Fix This A
.png?strip=all "How To Fix Loose Or Broken Ceramic Floor Tiles")
How To Fix Loose Or Broken Ceramic Floor Tiles

How To Repair Loose And Hollow Floor Tiles Without Removing Them
Related Posts