How to Remove Tile From a Cement Slab
Removing tile from a cement slab is a common task in renovation projects. It can be challenging due to the strong bond between the tile and the underlying cement. Effective tile removal requires the right tools, techniques, and a systematic approach to minimize damage to the slab and ensure a safe working environment. This article provides a comprehensive guide on how to successfully remove tile from a cement slab.
Preparation and Safety Precautions
Prior to initiating the tile removal process, thorough preparation is essential. This involves gathering the necessary tools and equipment, as well as taking necessary safety precautions to protect oneself and the surrounding area.
Tools and Materials: The following tools and materials are typically required for tile removal:
- Safety Glasses: Protects eyes from flying debris.
- Gloves: Protects hands from cuts and abrasions.
- Dust Mask or Respirator: Prevents inhalation of dust particles.
- Hearing Protection: Reduces noise exposure, especially when using power tools.
- Chisel: A hardened steel tool used to break the bond between the tile and the slab. Consider both a cold chisel and a narrower grout chisel.
- Hammer or Mallet: Used to strike the chisel. A rubber mallet can be used for more delicate work, while a heavier hammer provides more forceful impact.
- Scraper: A tool with a flat, wide blade used to remove thin-set mortar residue.
- Power Drill with Chisel Attachment (Optional): Speeds up the removal process but requires careful handling.
- Floor Scraper/Razor Scraper: Helpful for removing adhesive residue
- Shop Vacuum: To clean up dust and debris.
- Muriatic Acid (Optional): For dissolving stubborn thin-set, but requires extreme caution and proper ventilation.
- Putty Knife: For scraping and prying.
- Trash Bags or Buckets: For disposing of tile debris.
- Knee Pads: Improves comfort and prevents knee injuries.
- Crowbar or Pry Bar (Optional): For lifting larger sections of tile.
- Moisture Meter (Optional): To check the moisture level of the slab before and after tile removal.
Safety Precautions: Prioritizing safety is crucial to prevent injuries during the tile removal process. Adhering to the following precautions is highly recommended:
- Wear protective gear: Always wear safety glasses, gloves, a dust mask or respirator, and hearing protection.
- Ventilation: Ensure adequate ventilation in the work area to minimize dust inhalation. Open windows and doors or use a fan to circulate air.
- Dust Control: Consider using a wet saw or wetting the tiles before removal to reduce dust generation. A shop vacuum should be used frequently to remove dust as it accumulates.
- Proper Tool Handling: Use tools correctly and avoid applying excessive force. This reduces the risk of injury and damage to the slab.
- Awareness: Be aware of the surrounding environment and potential hazards, such as electrical wires or plumbing lines.
- Chemical Safety: If using muriatic acid, wear appropriate chemical-resistant gloves, eye protection, and a respirator. Ensure excellent ventilation and follow the manufacturer's instructions carefully. Always add acid to water, never water to acid.
Area Preparation: Preparing the area for tile removal involves clearing the space and protecting surrounding surfaces.
- Remove Furniture: Clear the room of all furniture and other items to provide ample workspace.
- Protect Adjacent Surfaces: Cover adjacent surfaces, such as walls, baseboards, and flooring, with plastic sheeting or drop cloths to protect them from dust and debris.
- Consider Neighboring Areas: Be mindful of noise levels, especially if working in an apartment building or close proximity to neighbors. Inform neighbors ahead of time about the project and potential noise.
Tile Removal Techniques
Several techniques can be employed to remove tile from a cement slab, depending on the type of tile, the strength of the bond, and the available tools. The following methods provide a systematic approach to tile removal.
1. Grout Removal: The first step in tile removal is to remove the grout surrounding the tiles. This weakens the bond and makes it easier to lift the tiles. A grout saw, grout removal tool, or a chisel and hammer can be used to remove the grout. Care should be taken not to damage the surrounding tiles or the cement slab. A power grout removal tool can speed up this process significantly.
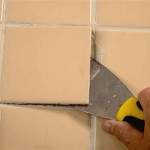
2. Chisel and Hammer Method: This is a manual method that involves using a chisel and hammer to carefully break the bond between the tile and the cement slab. Place the chisel at a 45-degree angle to the tile edge and gently tap the chisel with the hammer. Work around the tile, gradually lifting it from the slab. Start at an existing crack or damaged area if possible. For larger tiles, it may be necessary to work from the center outwards. This method is more time-consuming but provides greater control and reduces the risk of damaging the slab.
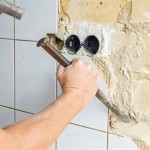
3. Power Drill with Chisel Attachment: A power drill with a chisel attachment can significantly speed up the tile removal process. Select a chisel attachment that is appropriate for the size and type of tile being removed. Position the chisel attachment at a 45-degree angle to the tile edge and apply gentle pressure while activating the drill. Move the drill around the tile, gradually lifting it from the slab. Exercise caution when using a power drill to avoid damaging the slab. This method is effective for removing large areas of tile quickly.
4. Pry Bar Method: For larger tiles or tiles that are strongly bonded to the slab, a pry bar can be used to lift the tiles. Insert the pry bar under the tile edge and apply gentle pressure to lift the tile. Use a hammer to tap the pry bar if necessary. Work around the tile, gradually lifting it from the slab. Be careful not to apply excessive force, as this can damage the slab. The pry bar method is effective for removing large tiles that are difficult to lift with a chisel and hammer alone. Start at a corner or edge where the tile is already loose if possible.
5. Heat Gun (Optional): Applying heat to the tile can soften the adhesive, making it easier to remove. A heat gun can be used to heat the tile before attempting to remove it with a chisel or pry bar. Hold the heat gun a few inches from the tile surface and move it around to distribute the heat evenly. Avoid overheating the tile, as this can damage the slab or release harmful fumes. This method is particularly effective for removing tiles that are bonded with a strong adhesive.
Thin-Set Mortar Removal and Slab Preparation
After removing the tiles, a layer of thin-set mortar residue will remain on the cement slab. Removing this residue is essential for preparing the slab for new flooring. Several methods can be used to remove thin-set mortar, depending on its thickness and hardness.
1. Scraper Method: A scraper can be used to remove thin layers of thin-set mortar. Hold the scraper at a low angle to the slab and apply firm pressure while pushing it across the surface. This method is effective for removing loose or crumbly thin-set mortar. A floor scraper with a long handle can make this process easier and more efficient.
2. Chisel and Hammer Method: For thicker or harder thin-set mortar, a chisel and hammer can be used to break up the residue. Position the chisel at a low angle to the slab and gently tap it with the hammer. Work across the surface, gradually removing the thin-set mortar. This method is more time-consuming but effective for removing stubborn residue.
3. Grinding: A concrete grinder with a diamond grinding wheel can be used to remove thin-set mortar quickly and efficiently. Wear appropriate safety gear, including a dust mask or respirator, eye protection, and hearing protection. Move the grinder across the surface, applying gentle pressure. Avoid grinding too deeply, as this can damage the slab. A shop vacuum should be used simultaneously to remove dust. This method is effective for removing large areas of thin-set mortar.
4. Muriatic Acid (Optional): Muriatic acid can be used to dissolve stubborn thin-set mortar. However, it should be used with extreme caution due to its corrosive nature. Wear appropriate chemical-resistant gloves, eye protection, and a respirator. Ensure excellent ventilation. Dilute the muriatic acid with water according to the manufacturer's instructions. Apply the diluted acid to the thin-set mortar and allow it to sit for a few minutes. Scrub the surface with a stiff brush to remove the softened thin-set mortar. Rinse the surface thoroughly with water to neutralize the acid. Dispose of the acid solution according to local regulations. This method is effective for removing thin-set mortar that is resistant to other methods.
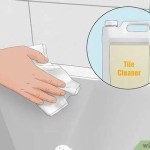
5. Chemical Thin-Set Removers: Several commercially available chemical thin-set removers can be used to soften and remove thin-set mortar. Follow the manufacturer's instructions carefully. Apply the remover to the thin-set mortar and allow it to sit for the recommended time. Scrape off the softened thin-set mortar with a scraper or putty knife. Rinse the surface thoroughly with water. These removers are generally safer than muriatic acid but may require multiple applications.
Slab Preparation: After removing the thin-set mortar, the cement slab should be thoroughly cleaned and prepared for new flooring. This involves removing any remaining debris, patching any cracks or holes, and leveling the surface. Use a shop vacuum to remove dust and debris. Inspect the slab for cracks or holes and fill them with a concrete patching compound. Allow the patching compound to dry completely before proceeding. Use a self-leveling compound to level the surface if necessary. Follow the manufacturer's instructions carefully. The slab should be clean, smooth, and level before installing new flooring. A moisture meter can be used to ensure the slab is sufficiently dry before installing new flooring.
Proper clean-up after each stage of tile removal is critical. Prompt removal of debris minimizes trip hazards and keeps the workspace organized.

How To Remove Tile From A Concrete Floor

Removing Tile And Thinset From Concrete Sawdust Girl

How To Remove Floor Tiles From Concrete Our Guide

How To Remove Tile From Concrete Floor Central Florida Dust Free Flooring Demo Removal Llc

The Best Way To Remove Thinset From A Cement Foundation House Of Hepworths

Tile Removal Melbourne Concrete Floor Renovations

How To Remove Tile Floor From Concrete

Removing Tile And Thinset From Concrete Sawdust Girl

How To Remove Ceramic Tile And Thinset The Nifty Nester

How To Remove A Tile Floor Complete Step By Guide Apollo
Related Posts