How To Remove Tile Floor From Concrete Slab
Removing tile flooring from a concrete slab is a common yet often challenging home improvement project. Whether upgrading existing flooring, addressing damaged tiles, or preparing for a new installation, understanding the process and employing the correct techniques are crucial for a successful outcome. This article provides a comprehensive guide to removing tile from a concrete slab, covering the necessary tools, safety precautions, and step-by-step instructions.
Key Considerations Before Starting
Before commencing the tile removal process, several preliminary steps are essential to ensure a smooth and efficient operation. These considerations encompass safety protocols, surface preparation, and understanding potential challenges.
Safety First: Prioritize personal safety by assembling the necessary protective gear. Safety glasses are indispensable for shielding the eyes from flying debris generated during the tile and mortar removal process. Work gloves protect hands from cuts and abrasions caused by handling sharp tile fragments and tools. A dust mask or respirator is crucial for preventing the inhalation of airborne dust particles, which can be harmful to the respiratory system, especially silica dust released from the mortar. Hearing protection, such as earplugs or earmuffs, minimizes the noise exposure from hammering and other tools, protecting auditory health.
Assess the Tile Type and Mortar: Identifying the type of tile and the mortar used is essential for selecting the appropriate removal methods and tools. Ceramic tiles are generally easier to remove than porcelain tiles due to their lower density and hardness. The type of mortar also affects the removal process. Thin-set mortar is common, but epoxy mortar is more challenging to remove. Carefully examine the edges of existing tiles or exposed areas to discern the type of tile and mortar employed.
Prepare the Work Area: Proper preparation of the work area minimizes disruption and simplifies the cleanup process. Remove all furniture, appliances, and other objects from the room to provide ample workspace. Cover any remaining items with plastic sheeting to protect them from dust and debris. Tape the plastic sheeting securely to walls and floors to prevent dust from escaping. Ensure adequate ventilation in the work area by opening windows and doors. Consider using a fan to circulate air and extract dust particles. If possible, seal off the room from the rest of the house with plastic sheeting to contain dust and debris.
Gathering the Necessary Tools and Materials
Having the right tools and materials readily available is crucial for efficient and effective tile removal. The following list encompasses essential items required for most tile removal projects.
Safety Gear: As previously emphasized, prioritize safety by gathering safety glasses, work gloves, a dust mask or respirator, and hearing protection.
Hammer and Chisel: A hammer and chisel set are foundational tools for breaking and removing tiles. A cold chisel is specifically designed for striking with a hammer to chip away at hard materials. Consider acquiring a variety of chisel sizes and shapes to accommodate different tile sizes and mortar thicknesses.A masonry chisel will also work. A larger hammer is generally recommended for larger tiles or more stubborn mortar.
Scraper: A floor scraper, preferably with a long handle, is essential for removing residual thin-set mortar from the concrete slab after the tiles have been removed. Floor scrapers typically feature a wide, rigid blade designed for efficient scraping. A handheld scraper can also be useful for detail work and reaching tight spaces.
Pry Bar: A pry bar can be utilized to lift larger tile sections or assist in removing stubborn tiles that resist the hammer and chisel method. Choose a pry bar with a sturdy construction and a comfortable grip.
Angle Grinder with Diamond Blade (Optional): For particularly challenging tile removal scenarios or when dealing with epoxy mortar, an angle grinder equipped with a diamond blade can be a valuable tool. The diamond blade can effectively cut through the tile and mortar, facilitating removal. Exercise extreme caution when using an angle grinder, as it can generate significant dust and sparks. Always wear appropriate safety gear and ensure adequate ventilation.
Shop Vacuum: A shop vacuum is indispensable for cleaning up dust and debris generated during the tile removal process. Choose a shop vacuum with a high-efficiency particulate air (HEPA) filter to effectively capture fine dust particles, including silica dust.
Dustpan and Brush: A dustpan and brush are useful for sweeping up loose debris and dust during and after the tile removal process.
Plastic Sheeting: Plastic sheeting is essential for protecting surrounding areas from dust and debris. Use heavy-duty plastic sheeting for durability.
Duct Tape: Duct tape is useful for securing plastic sheeting and for various other tasks during the tile removal process.
Garbage Bags: Heavy-duty garbage bags are necessary for disposing of tile debris and mortar remnants.
Knee Pads (Optional): Knee pads provide cushioning and support, enhancing comfort during extended periods of kneeling.
Step-by-Step Tile Removal Process
The following provides a detailed step-by-step guide for removing tile from a concrete slab. It is crucial to meticulously follow these instructions to ensure a safe and effective outcome. Remember to work in a well-ventilated area and wear all the required safety equipment.
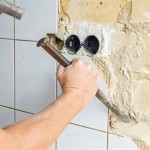
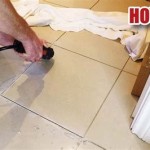
Prepare the First Tile: Select a starting point, ideally near a corner or along an edge where tiles are already loose or damaged. Using the hammer and chisel, carefully position the chisel at the edge of the tile and strike it firmly with the hammer. The objective is to break the tile and create a starting point for lifting it from the concrete slab. Avoid striking the chisel too forcefully, as this can cause the tile to shatter into small, sharp fragments.
Chisel Around the Tile: Once a starting point has been established, continue chiseling around the perimeter of the tile. Angle the chisel slightly downward to try and get beneath the tile. Apply consistent, moderate force to gradually loosen the tile from the mortar bed. Work slowly and methodically to minimize the risk of damaging the concrete slab beneath the tile. If a tile proves particularly resistant, try chiseling from a different angle or using the pry bar to gently lift it.
Remove the Tile: After chiseling around the tile, it should become loose enough to remove by hand or with the assistance of the pry bar. Carefully lift the tile away from the concrete slab, taking care to avoid dropping it or shattering it into smaller pieces. Place the removed tile in a garbage bag for disposal. If the tile breaks into smaller pieces during removal, use gloved hands or a scraper to collect the fragments and place them in the garbage bag.
Remove Remaining Mortar: Once the tile has been removed, residual thin-set mortar will remain adhered to the concrete slab. This mortar must be removed to create a smooth, level surface for the new flooring. Using the floor scraper, firmly scrape away the mortar, working in a consistent direction. Apply moderate pressure and overlap each stroke to ensure thorough removal. For particularly stubborn mortar, consider using a handheld scraper or an angle grinder with a diamond blade. If using an angle grinder, exercise extreme caution and wear appropriate safety gear.
Clean the Concrete Slab: After removing the mortar, thoroughly clean the concrete slab to remove any remaining dust, debris, and mortar remnants. Use a shop vacuum with a HEPA filter to vacuum the entire surface, paying particular attention to corners and edges. Sweep the floor with a broom and dustpan to collect any loose debris. Finally, wipe down the concrete slab with a damp cloth or mop to remove any remaining dust or residue. Allow the concrete slab to dry completely before proceeding with any further flooring installation.
Disposal of Waste: Properly dispose of all tile debris and mortar remnants in accordance with local regulations. Seal the garbage bags containing the debris securely to prevent dust from escaping. Contact your local waste management service for information on disposal options for construction debris. Do not dispose of tile debris in regular household trash.
Inspect the Concrete Slab: After completing the tile removal and cleaning process, carefully inspect the concrete slab for any cracks, holes, or other damage. Address any issues before installing new flooring. Small cracks can be filled with concrete patch, while larger cracks or holes may require more extensive repairs. Ensure the concrete slab is level and smooth to provide a solid foundation for the new flooring.
By following these steps, homeowners can successfully remove tile flooring from a concrete slab, preparing the surface for a new installation. Remember that patience and attention to detail are key to achieving a professional and safe outcome.

How To Remove Tile From A Concrete Floor

Removing Tile From A Concrete Slab

Removing Tile And Thinset From Concrete Sawdust Girl

How To Remove Floor Tiles From Concrete Our Guide

The Best Way To Remove Thinset From A Cement Foundation House Of Hepworths

How To Remove Floor Tiles From Concrete Superior

How To Remove Floor Tiles From Concrete Superior

How To Remove Ceramic And Porcelain Tiles Hyperion

How To Remove Tile Flooring Yourself With Tips And Tricks All Things Thrifty

Remove Floor Tile Effectively With Rubi S Tools And Tips
Related Posts