How to Remove Shower Tile Without Damaging the Wall
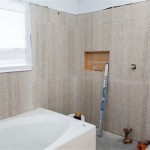
Removing shower tile can be a necessary undertaking when renovating a bathroom, repairing water damage, or simply updating the aesthetic. One of the most significant concerns during this process is preventing damage to the underlying wall. A careful and methodical approach is crucial for a successful tile removal project that leaves the wall in a condition suitable for retiling or other surface treatments.
The type of wall material behind the tile significantly influences the removal strategy. Common materials include drywall (gypsum board), cement board (Durock, HardieBacker), and plaster. Drywall is the most vulnerable to damage and requires the utmost care. Cement board is more resilient but can still be chipped or cracked during aggressive tile removal. Plaster, especially older plaster, can be brittle and prone to crumbling.
Before commencing the removal process, it is essential to gather the necessary tools and safety equipment. This includes safety glasses, gloves, a dust mask or respirator, a chisel (several sizes are recommended), a hammer, a utility knife, a grout saw or scoring tool, a pry bar (small and flat), a heat gun (optional), a shop vacuum, drop cloths or plastic sheeting, and a scraper.
Proper preparation of the work area is paramount. Cover the shower floor and surrounding bathroom surfaces with drop cloths or plastic sheeting to protect them from falling debris and dust. Ensure adequate ventilation by opening windows or using a fan. Turn off the water supply to the shower to prevent any accidental leaks during the process.
Key Point 1: Assessing the Tile and Grout
The first step in tile removal is to thoroughly assess the tile and grout. Examine the grout lines for cracks, gaps, or areas where the grout is already loose. This can provide clues about the overall condition of the installation and potential weak points for initiating the removal process. The type of grout used can also influence the removal technique. Epoxy grout, for example, is significantly more difficult to remove than cement-based grout.
Scoring the grout lines is a critical step in minimizing damage to the wall. A grout saw or scoring tool is used to carefully cut along the grout lines, breaking the bond between the grout and the tile edges. This creates a pathway for the chisel to be inserted and reduces the likelihood of the tile pulling chunks of the wall surface with it.
When using a grout saw, apply consistent pressure and avoid excessive force. Work slowly and methodically, ensuring that the grout lines are scored evenly. For wider grout lines, multiple passes may be necessary. A utility knife can also be used to score the grout lines, particularly in tight corners or around fixtures.
An alternative approach to grout removal involves using a reciprocating saw with a grout removal blade. This method can be faster than manual scoring but requires careful control to avoid damaging the surrounding tiles or the wall surface. The blade should be held at a shallow angle to the grout line, and gentle pressure should be applied. Constant monitoring of the blade's position is essential to prevent unintended cuts into the wall.
Key Point 2: Carefully Removing the Tiles
Once the grout lines have been adequately scored, the actual tile removal can begin. Start by selecting a tile that appears to be loose or damaged, as this will provide a convenient starting point. Insert the tip of the chisel at a shallow angle into the scored grout line, aiming for a spot near the edge of the tile. Gently tap the end of the chisel with a hammer, applying controlled pressure to break the bond between the tile and the wall.
Avoid using excessive force when tapping the chisel. The goal is to gradually weaken the adhesive bond, not to shatter the tile or gouge the wall. If the tile does not budge easily, try repositioning the chisel to a different location along the grout line and repeating the tapping process. Patience and a gentle approach are crucial for minimizing damage.
A small, flat pry bar can also be used to assist in tile removal. Insert the pry bar behind the tile and gently apply pressure to lift it away from the wall. Use caution to avoid bending or cracking the tile. The pry bar should be used in conjunction with the chisel, not as a replacement for it. Alternating between the chisel and pry bar can help to loosen the tile gradually and evenly.
When encountering particularly stubborn tiles, a heat gun can be used to soften the adhesive. Apply heat to the tile surface for a short period, moving the heat gun back and forth to avoid overheating any one spot. The heat will help to loosen the adhesive, making it easier to remove the tile with the chisel or pry bar. Use caution when handling a heat gun and wear appropriate safety glasses and gloves.
As tiles are removed, carefully inspect the back of the tile and the wall surface for any remaining adhesive. This will provide insights into the type of adhesive used and the effectiveness of the removal process. Take note of any areas where the adhesive is particularly strong or where the wall surface is showing signs of damage. Adjust the removal technique accordingly to minimize further damage.
Key Point 3: Preparing the Wall Surface
After all the tiles have been removed, the wall surface will likely be covered with residual adhesive, grout, and potentially damaged areas. The next step is to thoroughly clean and prepare the wall surface for retiling or other surface treatments. A scraper is used to remove any remaining adhesive or grout. A wide, flat scraper blade is ideal for removing large areas of adhesive, while a smaller, angled scraper is useful for reaching tight corners and edges.
Apply consistent pressure to the scraper and work at a shallow angle to avoid gouging the wall surface. For stubborn adhesive, a chemical adhesive remover can be used. Follow the manufacturer's instructions carefully and ensure adequate ventilation. Test the adhesive remover in an inconspicuous area first to ensure that it does not damage the wall material.
Once the adhesive has been removed, use a shop vacuum to thoroughly clean the wall surface. Remove any loose debris, dust, and grout particles. Pay particular attention to any cracks or holes in the wall surface. These areas will need to be repaired before retiling or applying other surface treatments.
For small cracks and holes in drywall or plaster, a patching compound can be used. Apply the patching compound with a putty knife, filling the cracks and holes completely. Allow the patching compound to dry according to the manufacturer's instructions and then sand it smooth. For larger holes or areas of significant damage, more extensive repairs may be necessary, such as replacing sections of drywall or plaster.
If cement board is damaged, a cement board patching compound can be used. Apply the compound according to the manufacturer's instructions, ensuring that it bonds properly to the existing cement board. Allow the compound to cure completely before proceeding with retiling. In some cases, it may be necessary to replace entire sheets of cement board if the damage is too extensive to repair.
After the wall surface has been cleaned and repaired, it is essential to prime the surface before retiling. Primer helps to seal the wall surface, improve adhesion, and prevent moisture penetration. Use a primer that is specifically designed for use in wet environments, such as a bathroom. Apply the primer evenly with a brush or roller, following the manufacturer's instructions. Allow the primer to dry completely before proceeding with retiling.
Before beginning the retiling process, ensure that the wall surface is level and plumb. Use a level and straight edge to check for any unevenness or irregularities. If necessary, apply a leveling compound to create a smooth and even surface. A level and plumb wall will ensure that the new tiles are installed properly and will prevent future problems with water damage or tile cracking.
Proper preparation, careful technique, and the right tools are essential for removing shower tile without damaging the wall. By following these guidelines, individuals can successfully complete their DIY projects and achieve professional-looking results.

How To Remove Bathtub Shower Wall Tiles

How To Remove Tiles From The Wall Using A Multi Tool Carefully Without Damage

Easy Diy Guide On Removing Tiles From Walls Fantastic Handyman Au

Tips On How To Remove Old Shower Tile Ugly Duckling House

Tips On How To Remove Old Shower Tile Ugly Duckling House

Diy How To Remove Ceramic Tiles Off Drywall

How To Remove Bathroom Tile Without Damaging The Plaster Walls

How To Remove Tiles Like A Pro Step By Guide Essential Tools An Daitool

How To Remove Wall Tiles 11 Steps With Pictures Wikihow

Bathroom How Can I Remove The Tile From This Wall Home Improvement Stack Exchange
Related Posts