How To Remove Grout From Wall Tiles Without Damaging
Removing grout from wall tiles can be a delicate process. Improper techniques can lead to chipped tiles, scratched surfaces, and an overall unsatisfactory result. This article outlines effective methods for grout removal that prioritize the preservation of the tile's integrity.
Before beginning any grout removal project, it's essential to gather the necessary tools and materials. These typically include a grout removal tool, a utility knife with a sharp blade, safety glasses, dust mask, a shop vacuum, a grout saw (manual or electric), a stiff-bristled brush, a spray bottle filled with water, and a sponge.
Protecting surrounding surfaces is crucial. Adjacent countertops, fixtures, or flooring should be covered with painter's tape, plastic sheeting, or cardboard to prevent damage from stray debris or errant tools. Protective eyewear and a dust mask are also essential for personal safety.
Initiating the grout removal process involves softening the existing grout. This can be achieved by applying warm water to the grout lines using a spray bottle or sponge. Allowing the water to soak in for a few minutes helps loosen the grout, making it easier to remove. For particularly stubborn grout, specialized grout softener solutions are available, but it is important to follow the manufacturer's instructions carefully.
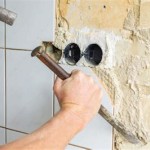
Once the grout has softened, a grout removal tool, often a carbide-tipped blade or a specialized bit attached to an oscillating multi-tool, can be carefully inserted into the grout line. It's important to maintain a shallow angle to avoid contacting the tile surface. The tool should be moved along the grout line in a controlled manner, removing small sections at a time. Avoid applying excessive pressure, which can cause the tool to slip and damage the tiles. For smaller or more intricate areas, a manual grout saw might be more suitable. These saws have thin blades that can be carefully maneuvered in tight spaces.
Alternatively, a utility knife with a sharp blade can be utilized for grout removal. The sharp edge of the blade should be positioned at a low angle against the grout line. Gentle pressure is applied while sliding the knife along the grout line, effectively scraping away the softened grout. Extreme care must be taken with this method, as it carries a higher risk of scratching the tile surface.
During the removal process, regularly vacuuming the loosened grout debris is essential. This prevents the accumulation of dust and debris, which can scratch the tiles and impede visibility. A shop vacuum with a crevice attachment is ideal for this task.
After the majority of the grout has been removed, a stiff-bristled brush can be used to clear away any remaining residue. The brush should be moved along the grout lines in a gentle scrubbing motion to avoid scratching the tile surface.
Once the grout lines are clean, the area should be thoroughly cleaned with a damp sponge to remove any remaining dust and debris. This also helps to prepare the surface for the application of new grout.
Choosing the correct grout removal tool is a critical factor in preventing tile damage. Oscillating multi-tools with grout removal attachments offer excellent control and precision. Manual grout saws provide a cost-effective option for smaller projects and detailed work. Utility knives, while readily available, require a higher level of skill and precision to avoid scratching the tiles.
Different types of grout require different removal techniques. Epoxy grout, known for its durability, is significantly more challenging to remove than standard cement-based grout. Specialized epoxy grout removal tools and techniques are recommended for this type of grout.
Patience is key throughout the grout removal process. Rushing the process increases the risk of errors and potential damage to the tiles. Taking breaks, particularly during lengthy projects, can help maintain focus and precision.
Inspecting the tile surface for any damage after grout removal is crucial. Minor scratches can often be buffed out with a soft cloth and a mild abrasive cleaner. However, significant damage may require professional repair or tile replacement.
Recognizing when professional assistance is needed is important. If the tiles are particularly delicate, the grout is exceptionally stubborn, or the area to be regrouted is extensive, consulting a professional tile installer is recommended.
Regular maintenance can prolong the life of grout and minimize the need for extensive removal. Periodically cleaning grout lines with a mild cleaning solution and a soft brush can prevent the buildup of dirt and grime, keeping the grout looking fresh and extending its lifespan.

How To Remove Tiles From The Wall Using A Multi Tool Carefully Without Damage

How To Remove And Replace Grout In A Shower Diy For Beginners

Easy Diy Guide On Removing Tiles From Walls Fantastic Handyman Au

How To Remove Wall Tiles 11 Steps With Pictures Wikihow

How To Remove Grout 8 Steps With Pictures Wikihow

How To Remove Wall Tiles 11 Steps With Pictures Wikihow

How To Remove Grout From Tile Rubi Blog Usa

Tips On How To Remove Old Shower Tile Ugly Duckling House

Here S How Clean Mildew Off Bathroom Tile Grout

How To Remove Backsplash Tile Like A Champ
Related Posts